> ## Documentation Index
> Fetch the complete documentation index at: https://support.i.moneyforward.com/llms.txt
> Use this file to discover all available pages before exploring further.
# AWS IAM Identity Center
> AWS IAM Identity Center (AWS SSO)の連携手順です。
## サポートする機能
アカウント作成 アカウント削除
## 事前準備
### Step1: 連携用のポリシーの作成方法
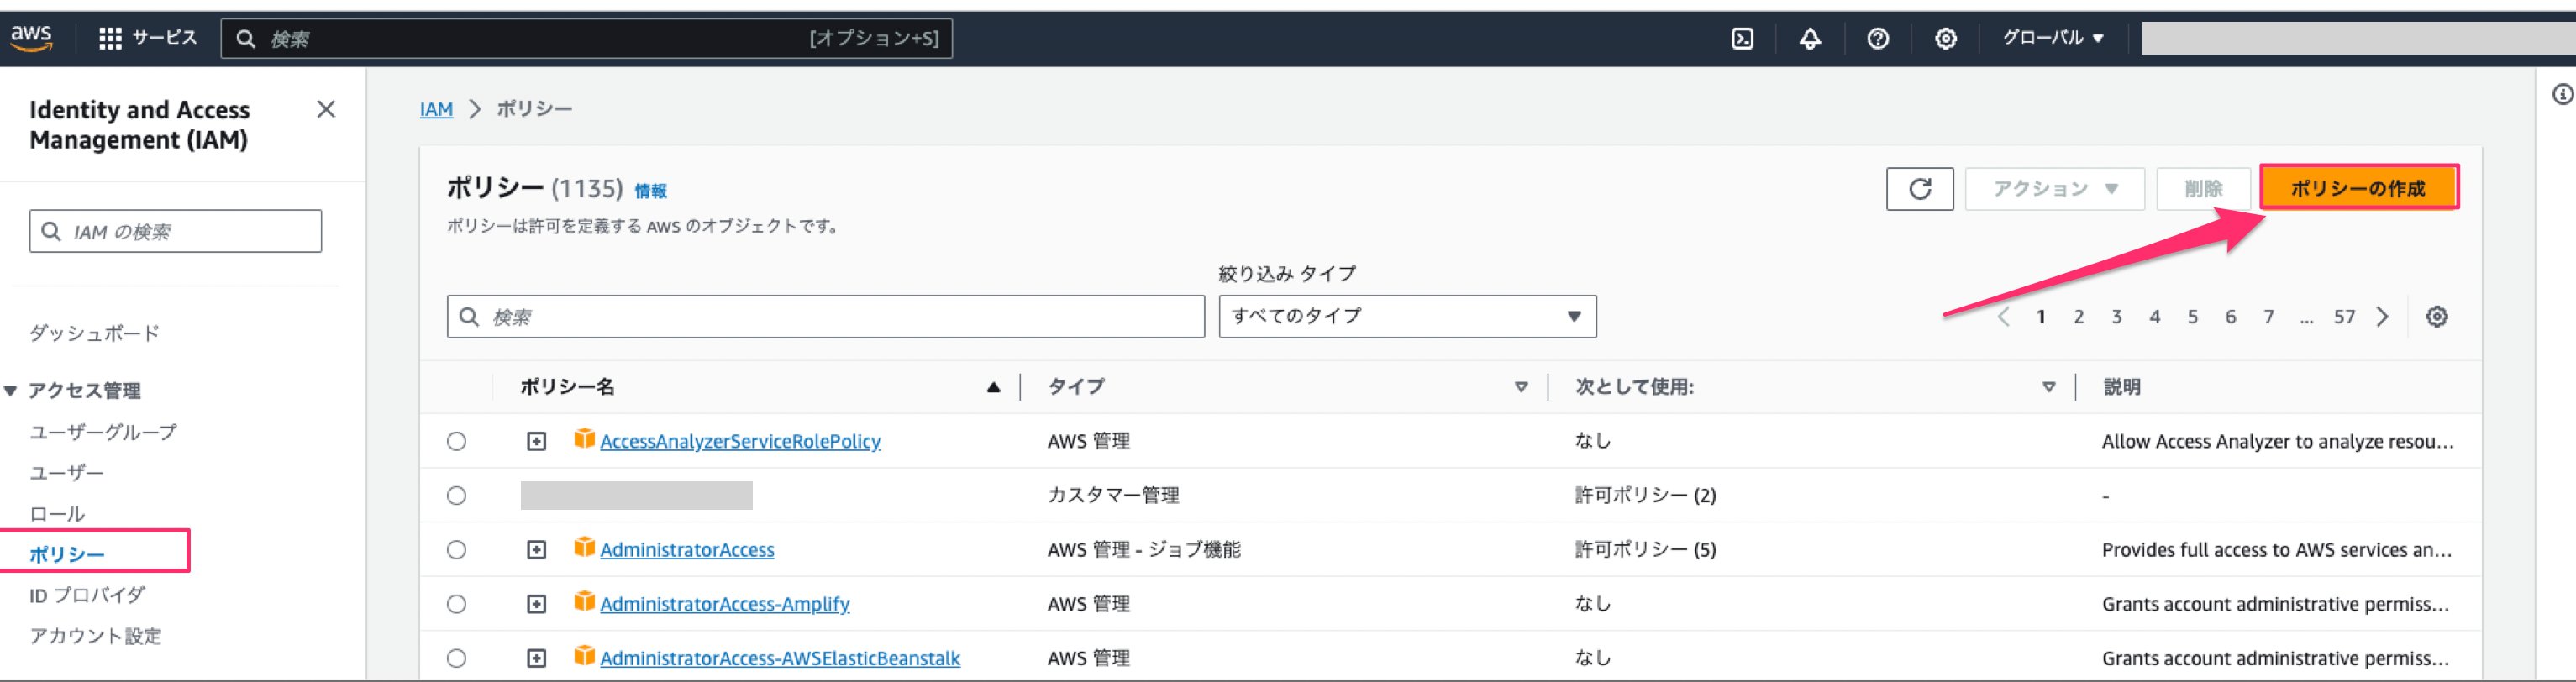
1. [Identity and Access Management (IAM)](https://console.aws.amazon.com/iam)にアクセスし、左メニューの**ポリシー**から \[**ポリシーの作成**] をクリックします。詳細は[IAM ポリシーを作成する(外部サイト)](https://docs.aws.amazon.com/ja_jp/IAM/latest/UserGuide/access_policies_create-console.html)側でご確認ください。
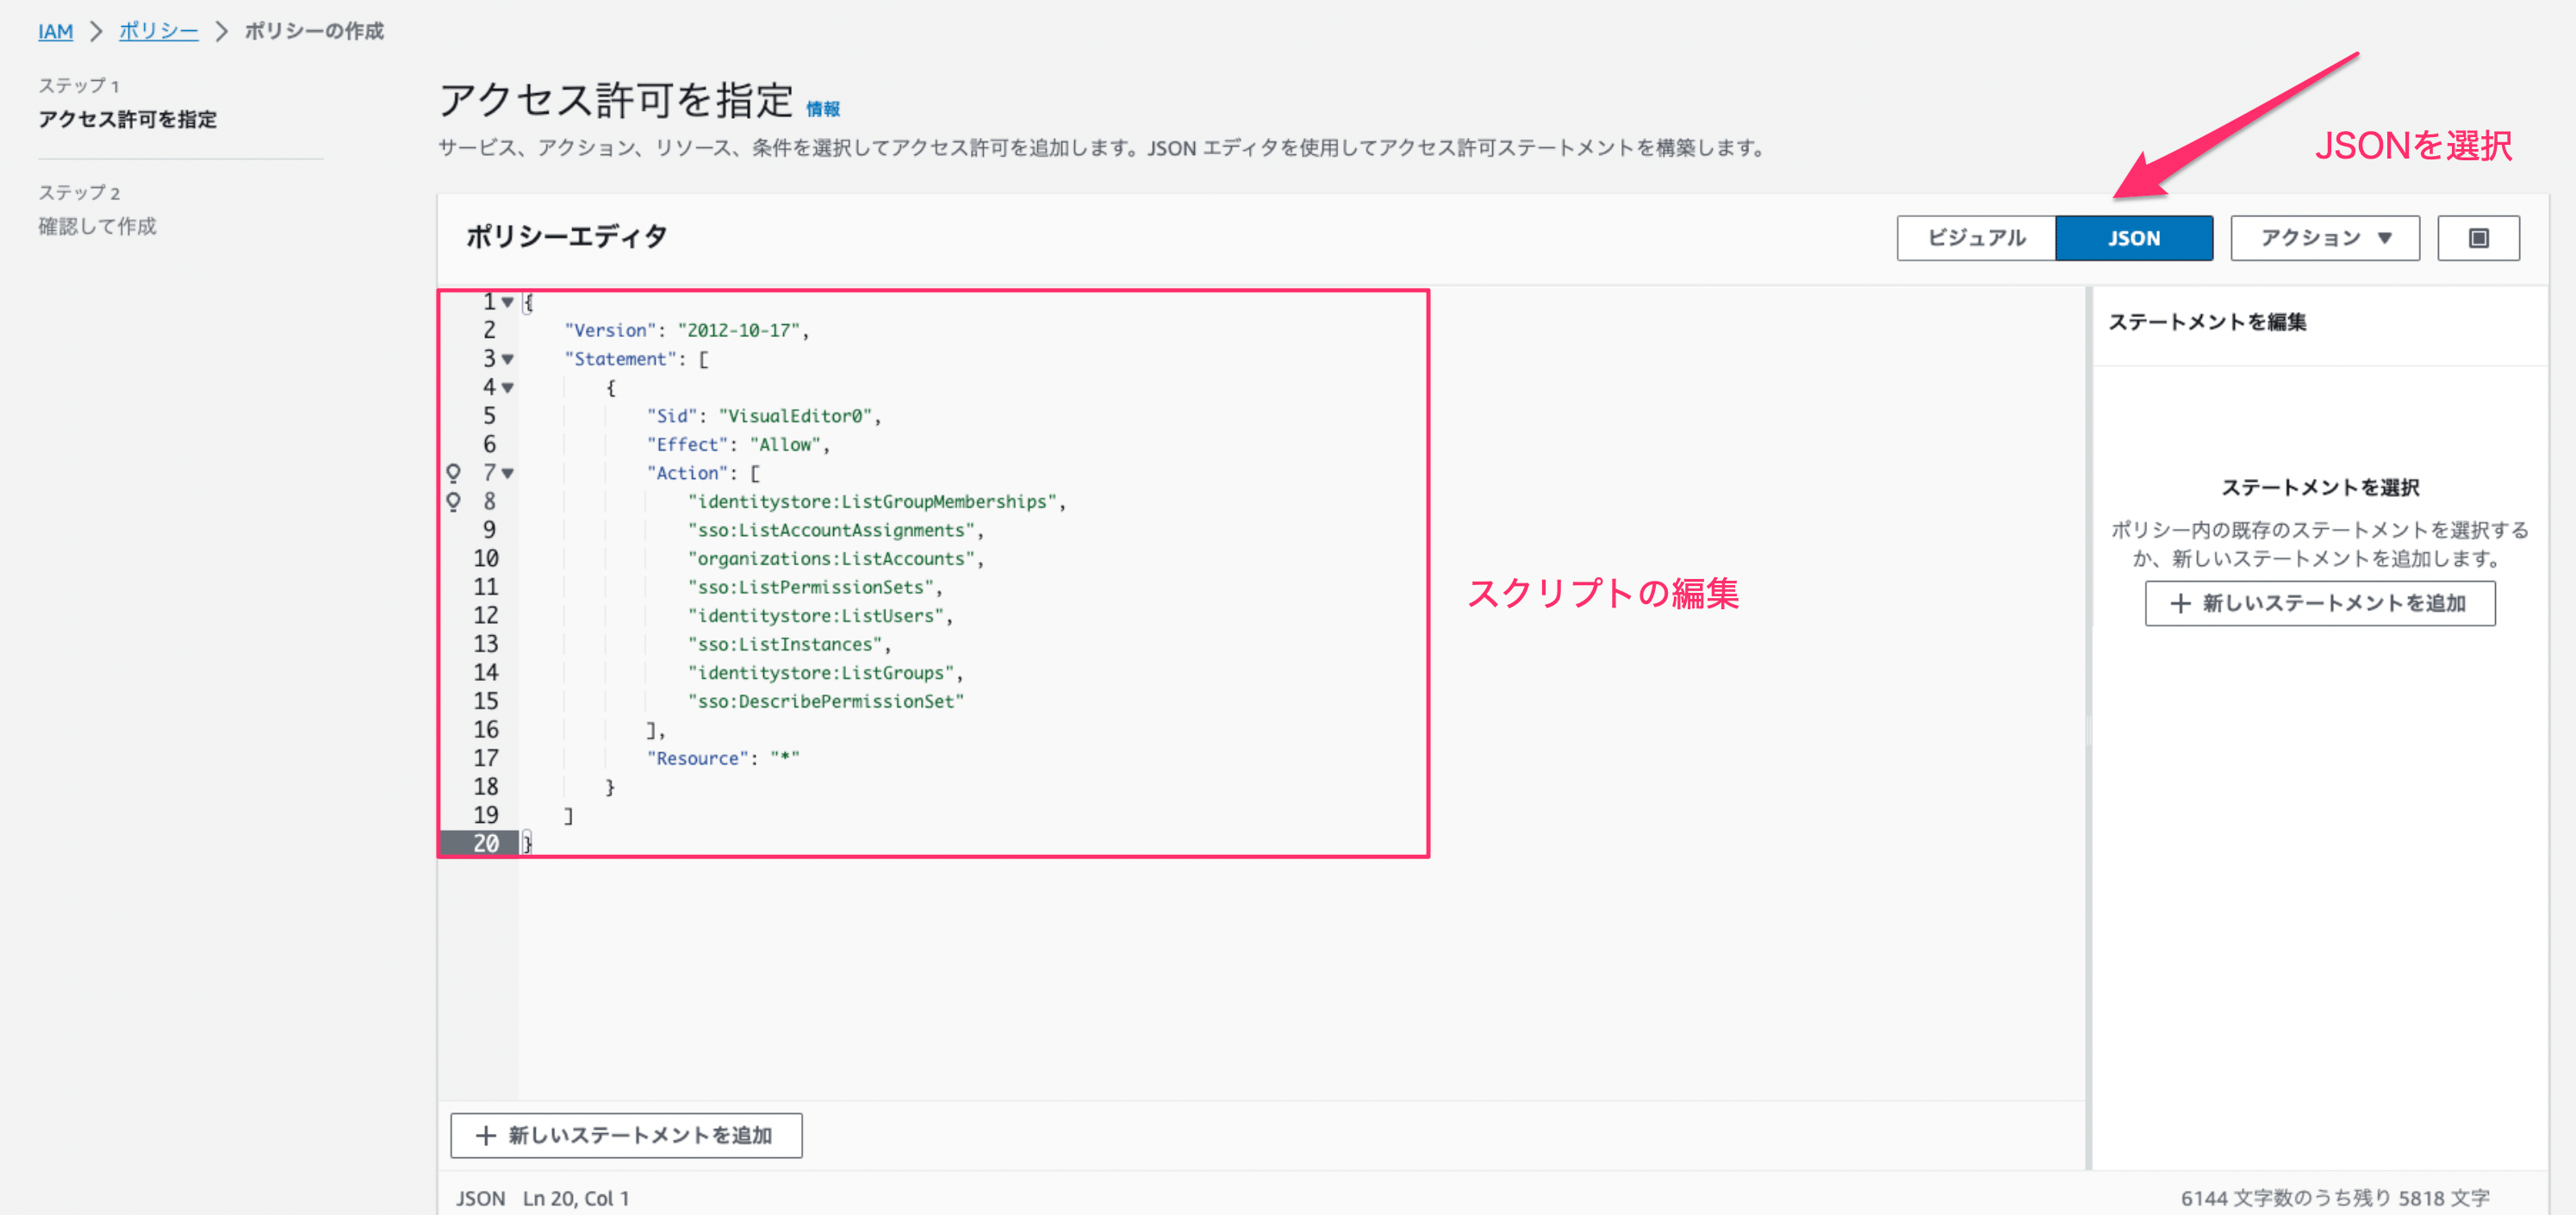
 2. ポリシーの作成画面で、JSONタブをクリックし、次のスクリプトを上書きします。
 ```json theme={null}
{
"Version": "2012-10-17",
"Statement": [
{
"Sid": "VisualEditor0",
"Effect": "Allow",
"Action": [
"identitystore:ListGroupMemberships",
"sso:ListAccountAssignmentsForPrincipal",
"organizations:ListAccounts",
"sso:ListPermissionSets",
"identitystore:ListUsers",
"sso:ListInstances",
"identitystore:ListGroups",
"sso:DescribePermissionSet"
],
"Resource": "*"
}
]
}
```
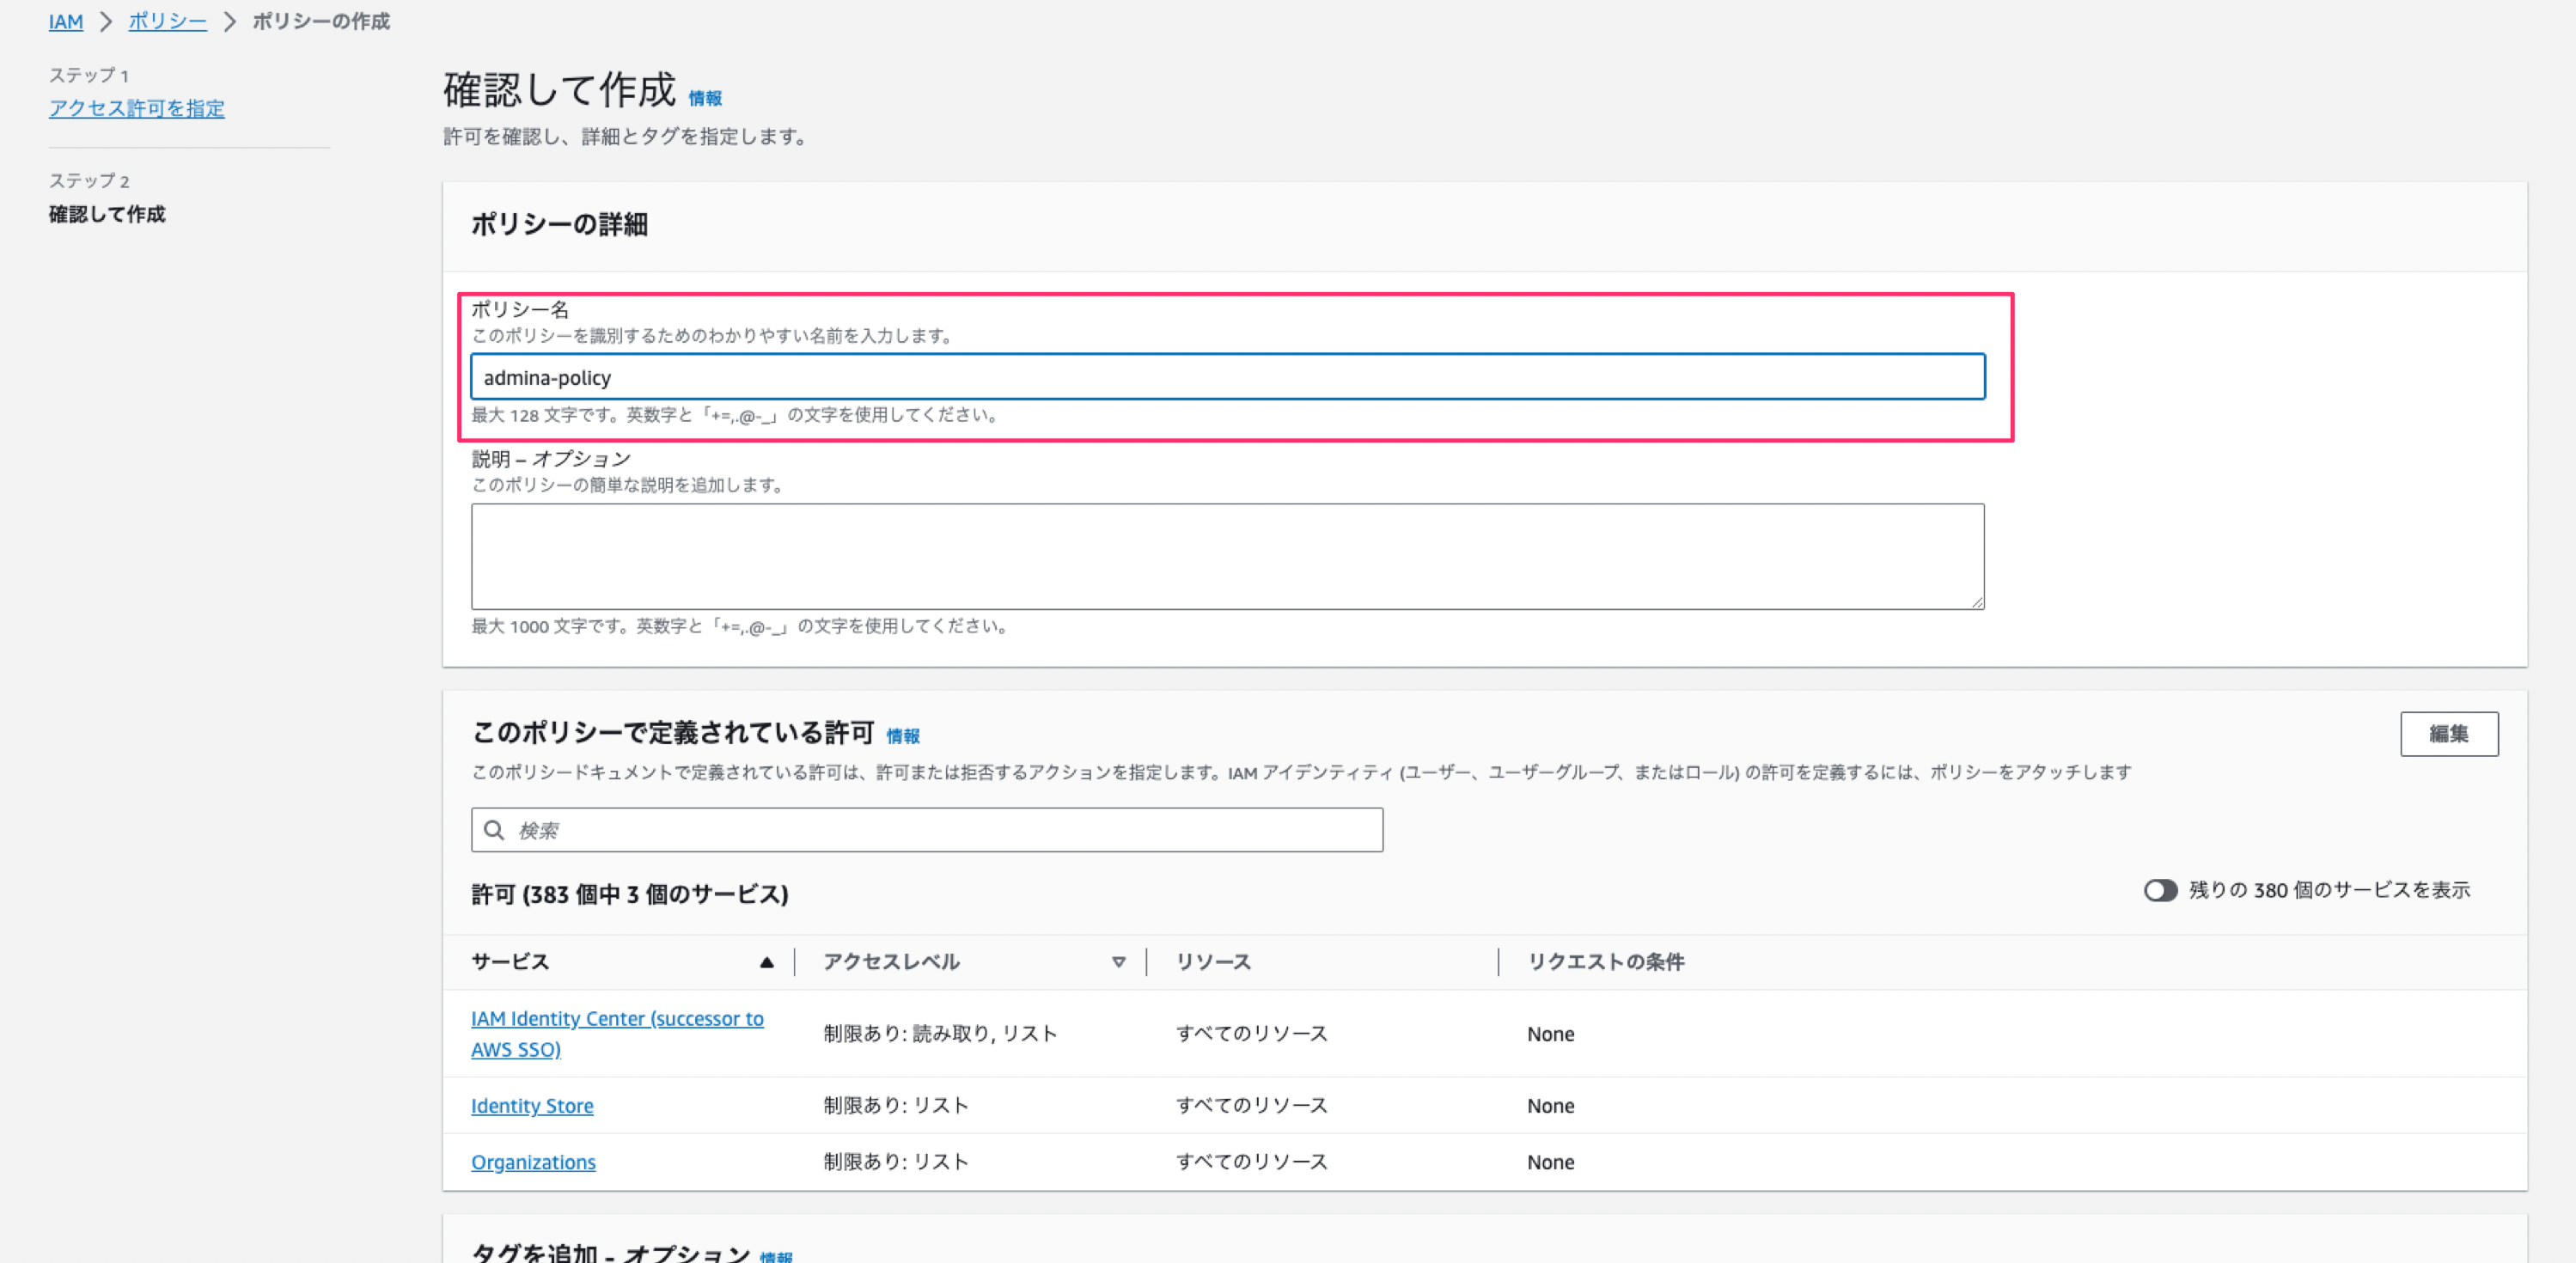
3. 任意の名前を入力し、\[ポリシーの作成]をクリックし保存します。(その他の項目は入力不要です)
```json theme={null}
{
"Version": "2012-10-17",
"Statement": [
{
"Sid": "VisualEditor0",
"Effect": "Allow",
"Action": [
"identitystore:ListGroupMemberships",
"sso:ListAccountAssignmentsForPrincipal",
"organizations:ListAccounts",
"sso:ListPermissionSets",
"identitystore:ListUsers",
"sso:ListInstances",
"identitystore:ListGroups",
"sso:DescribePermissionSet"
],
"Resource": "*"
}
]
}
```
3. 任意の名前を入力し、\[ポリシーの作成]をクリックし保存します。(その他の項目は入力不要です)
 ### Step2: 連携用のロール作成方法
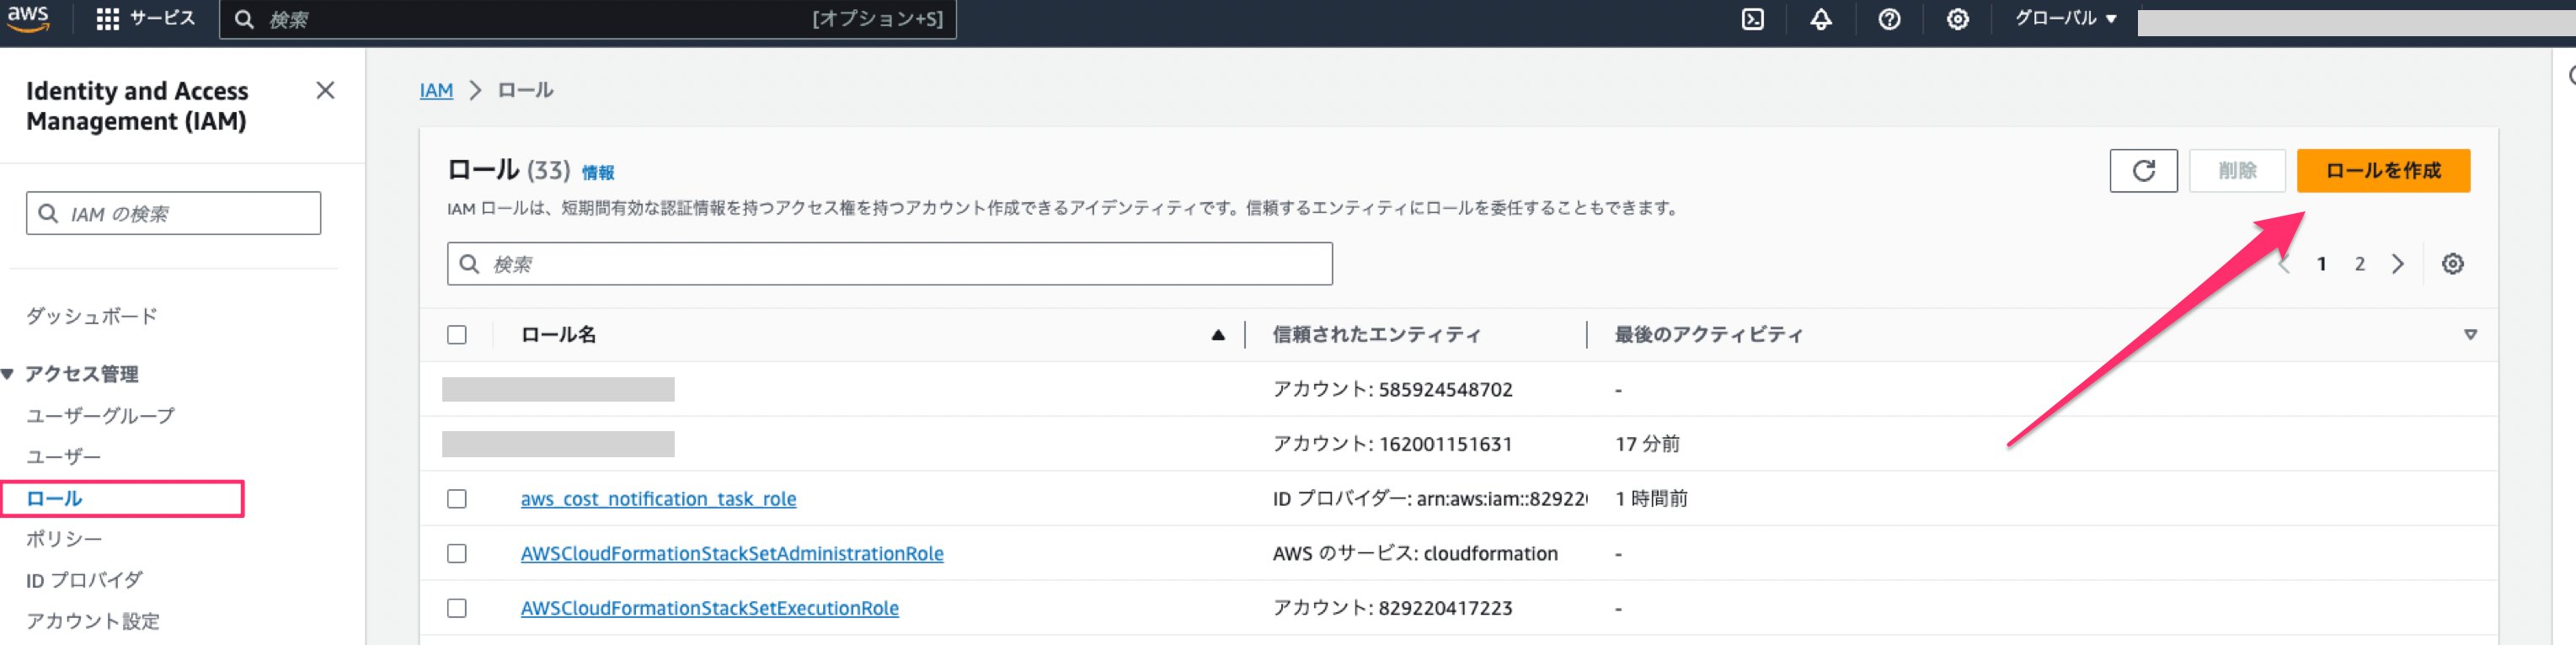
1. [Identity and Access Management (IAM)](https://console.aws.amazon.com/iam)にアクセスし、左メニューの**ロール >** **ロールを作成** をクリックします。
### Step2: 連携用のロール作成方法
1. [Identity and Access Management (IAM)](https://console.aws.amazon.com/iam)にアクセスし、左メニューの**ロール >** **ロールを作成** をクリックします。
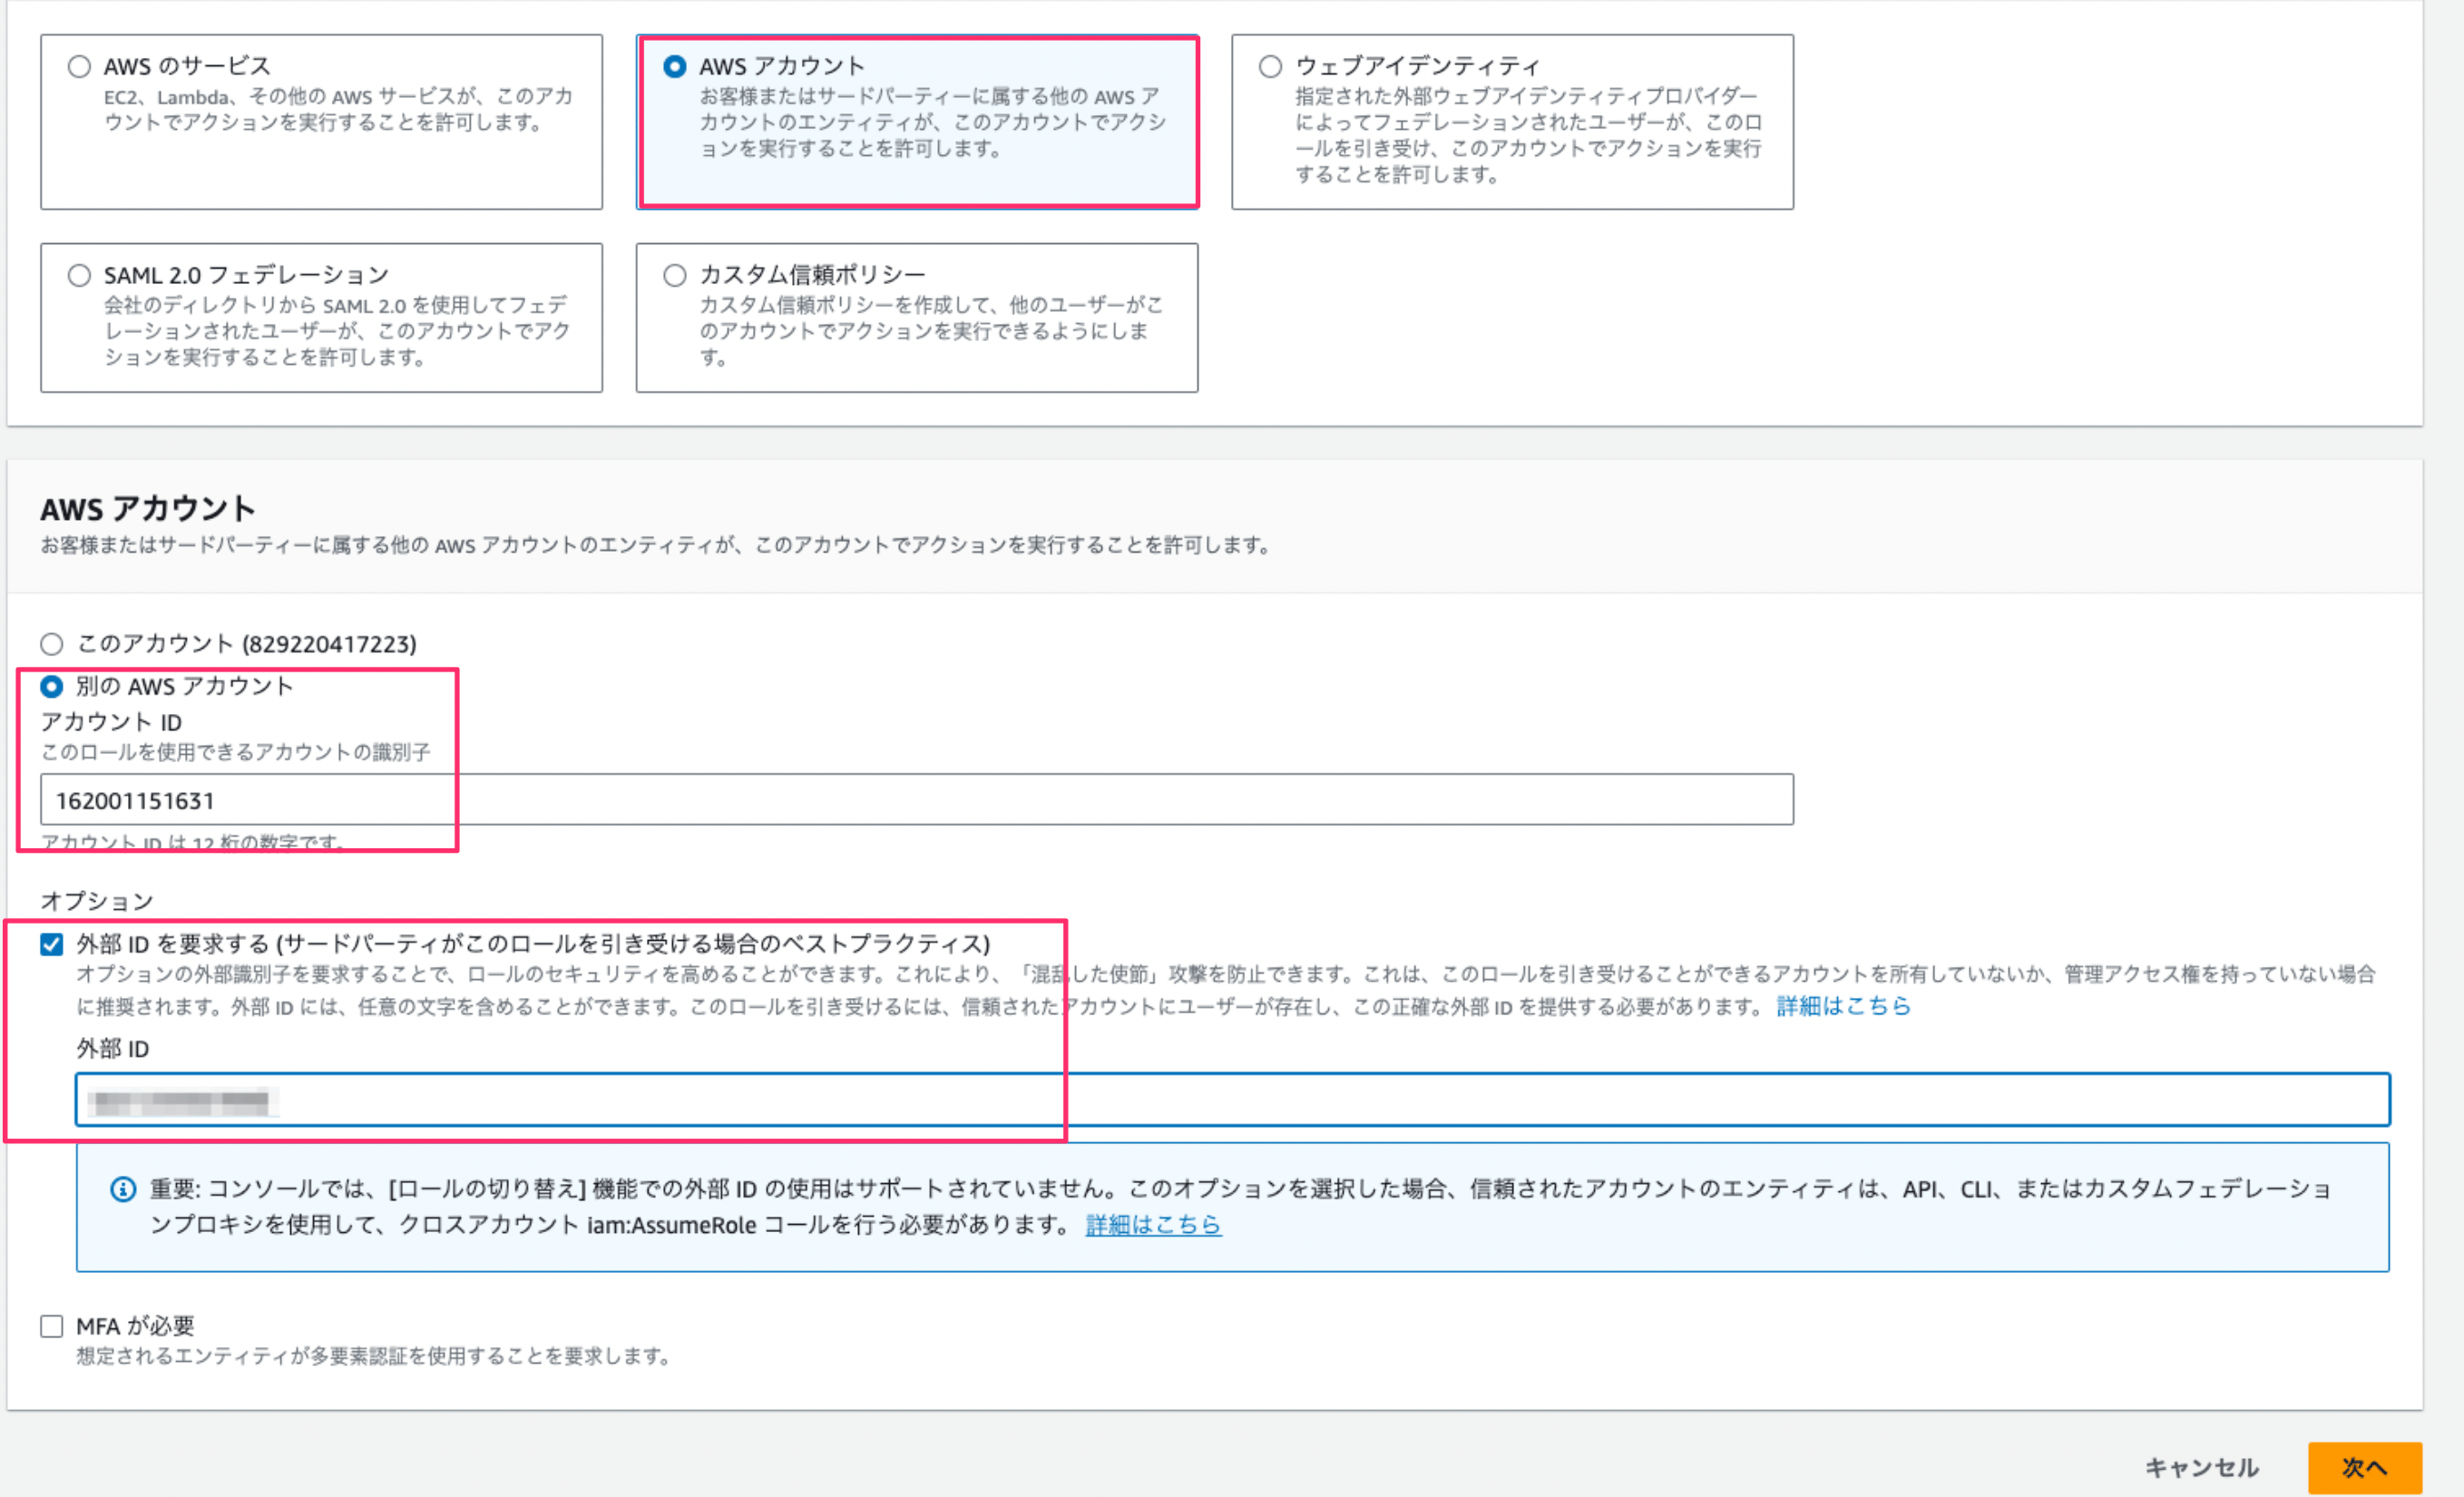
 2. 信頼されたエンティティを選択では、次のように各値を入力します。入力完了後、[**次へ**]をクリックします。
* 信頼されたエンティティタイプ:AWSアカウントを選択
* AWSアカウント:「別のAWSアカウント」を選択し、アカウントIDに`162001151631`と入力します。
* \*\*外部 ID を要求する (サードパーティがこのロールを引き受ける場合のベストプラクティス)\*\*にチェック
* 外部IDには`ランダムな英数字(記号を除く24桁以上推奨)`を入力します。
* MFAが必要のチェックは外してください。
* Admina上でユーザーを追加・削除する場合、[こちらの権限](#policies-controlling-access-create-update-delete)をロールに付与してください。
2. 信頼されたエンティティを選択では、次のように各値を入力します。入力完了後、[**次へ**]をクリックします。
* 信頼されたエンティティタイプ:AWSアカウントを選択
* AWSアカウント:「別のAWSアカウント」を選択し、アカウントIDに`162001151631`と入力します。
* \*\*外部 ID を要求する (サードパーティがこのロールを引き受ける場合のベストプラクティス)\*\*にチェック
* 外部IDには`ランダムな英数字(記号を除く24桁以上推奨)`を入力します。
* MFAが必要のチェックは外してください。
* Admina上でユーザーを追加・削除する場合、[こちらの権限](#policies-controlling-access-create-update-delete)をロールに付与してください。
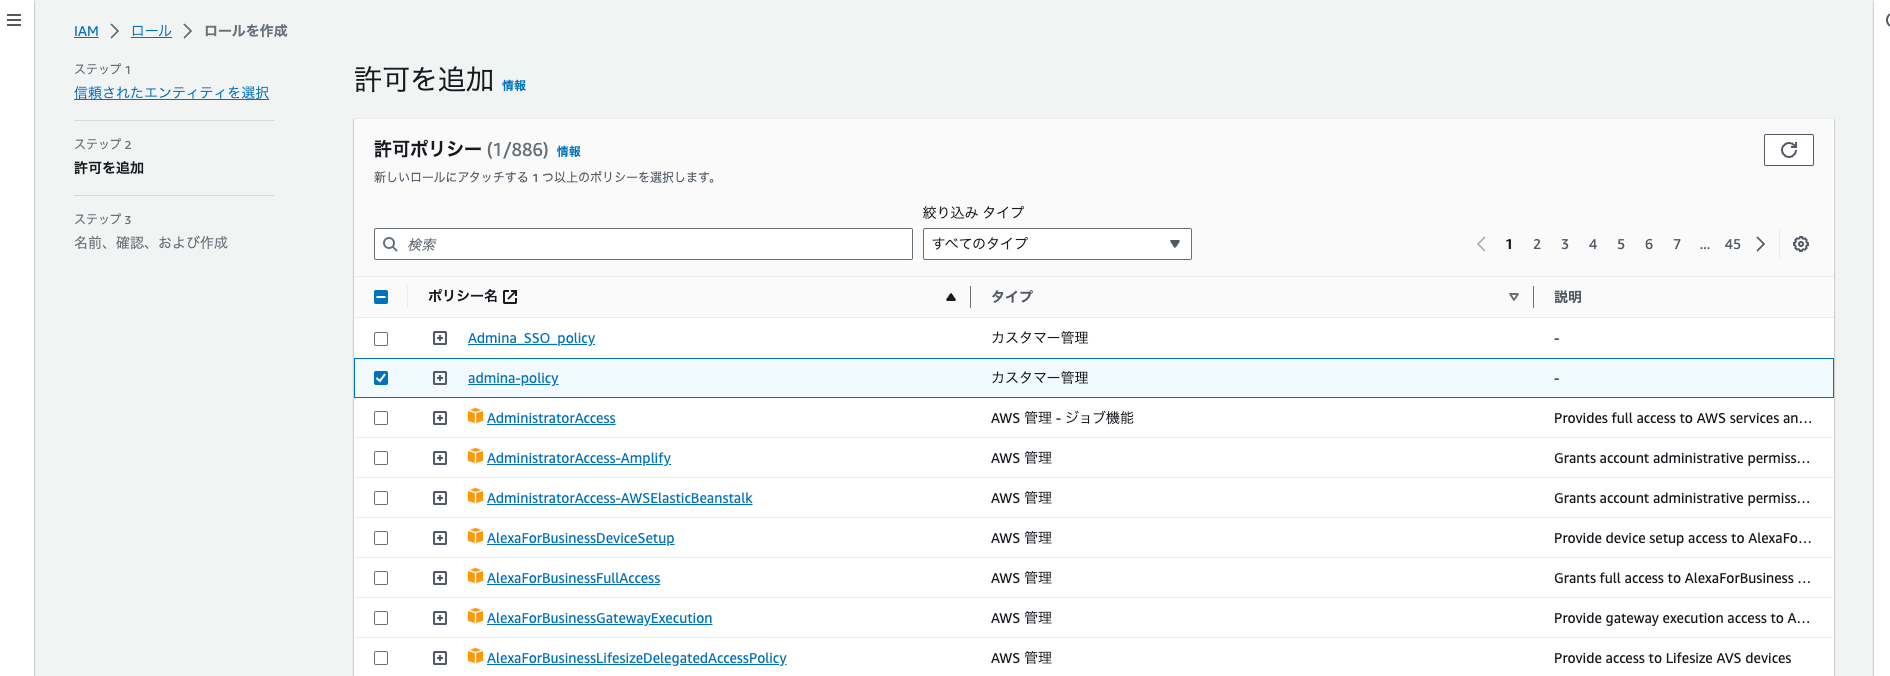
 3. Step1で作成したポリシーを選択し、次へをクリックします。
 4. 任意のロール名を設定し、\[**ロールを作成**] をクリックします。(その他の項目は編集不要です)

カスタマー管理ポリシーを作成、削除する権限の設定
Admina上でユーザーを追加・削除するためには、以下の権限をロールに付与してください。
詳細は[カスタマー管理ポリシーを作成、更新、削除する権限の制御(外部サイト)](https://docs.aws.amazon.com/ja_jp/IAM/latest/UserGuide/access_controlling.html#access_controlling-identities#%E3%82%AB%E3%82%B9%E3%82%BF%E3%83%9E%E3%83%BC%E7%AE%A1%E7%90%86%E3%83%9D%E3%83%AA%E3%82%B7%E3%83%BC%E3%82%92%E4%BD%9C%E6%88%90%E3%80%81%E6%9B%B4%E6%96%B0%E3%80%81%E5%89%8A%E9%99%A4%E3%81%99%E3%82%8B%E6%A8%A9%E9%99%90%E3%81%AE%E5%88%B6%E5%BE%A1)もご参照ください。
```json theme={null}
{
"Version": "2012-10-17",
"Statement": [
{
"Effect": "Allow",
"Action": [
"identitystore:CreateUser",
"identitystore:DeleteUser",
"identitystore:CreateGroupMembership"
],
"Resource": "*"
}
]
}
```
### Step3: Role ARNの確認方法
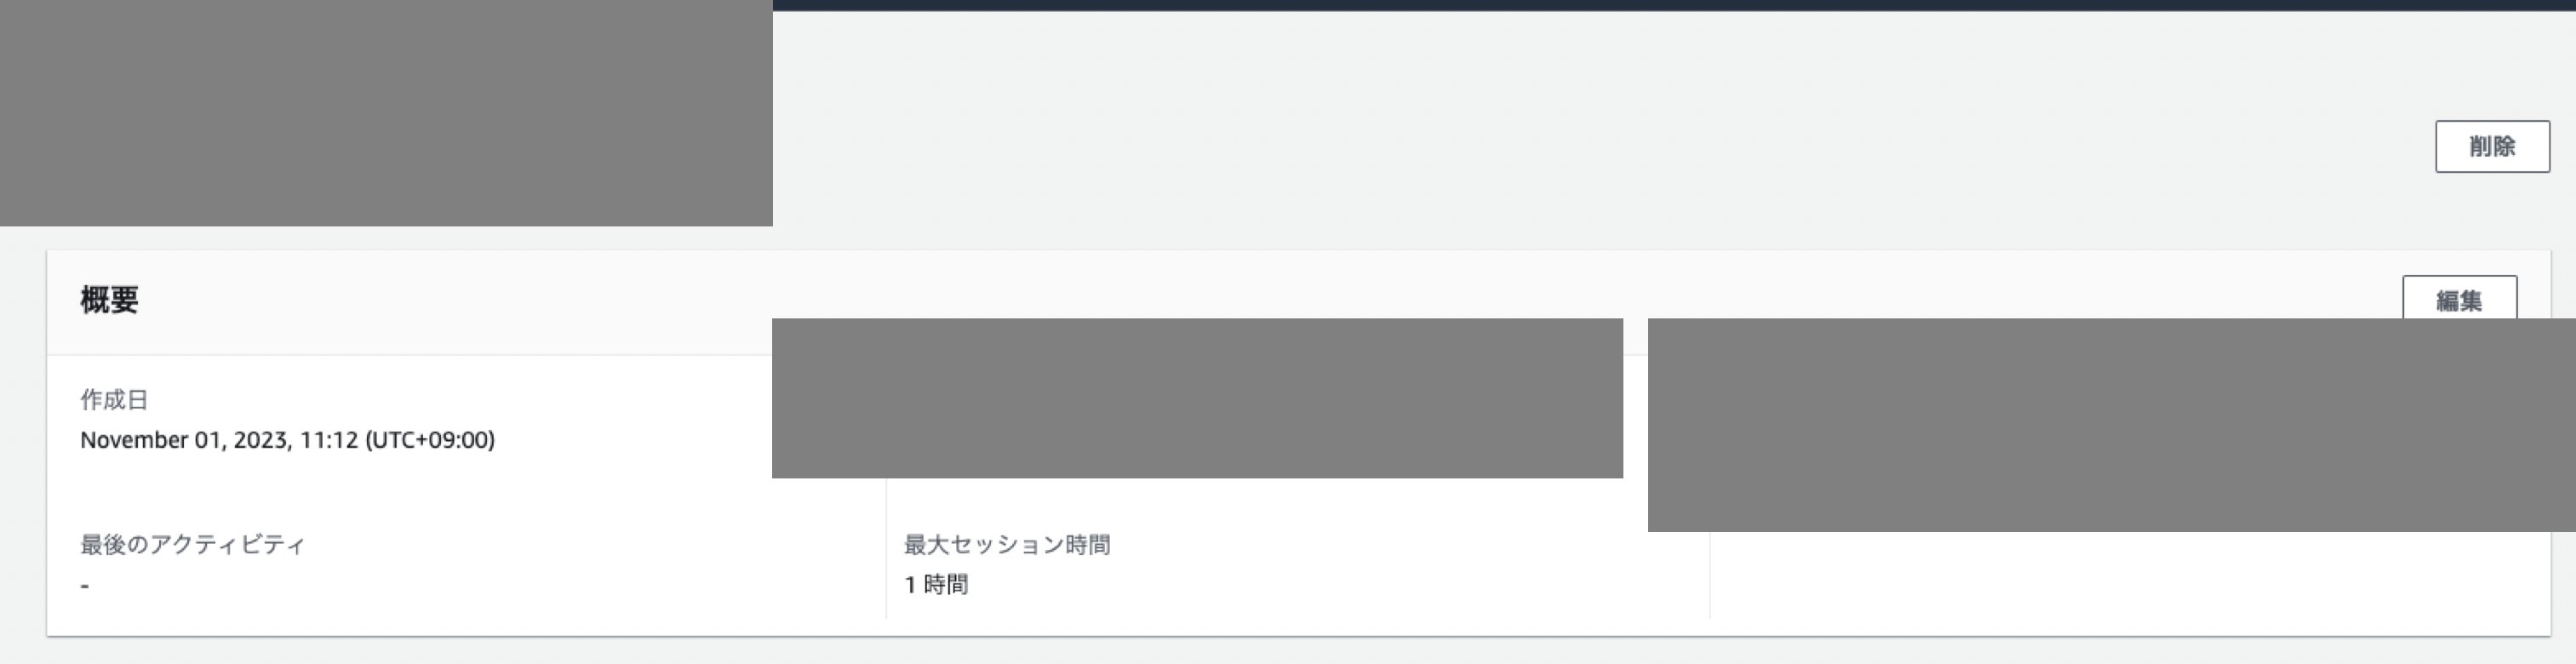
1. ロール画面で作成したロールを検索して表示、クリックします。
2. **Role ARN**が表示されるので、コピーして保存しておきます。
 ### Step4: リージョンとワークスペースキーの確認方法
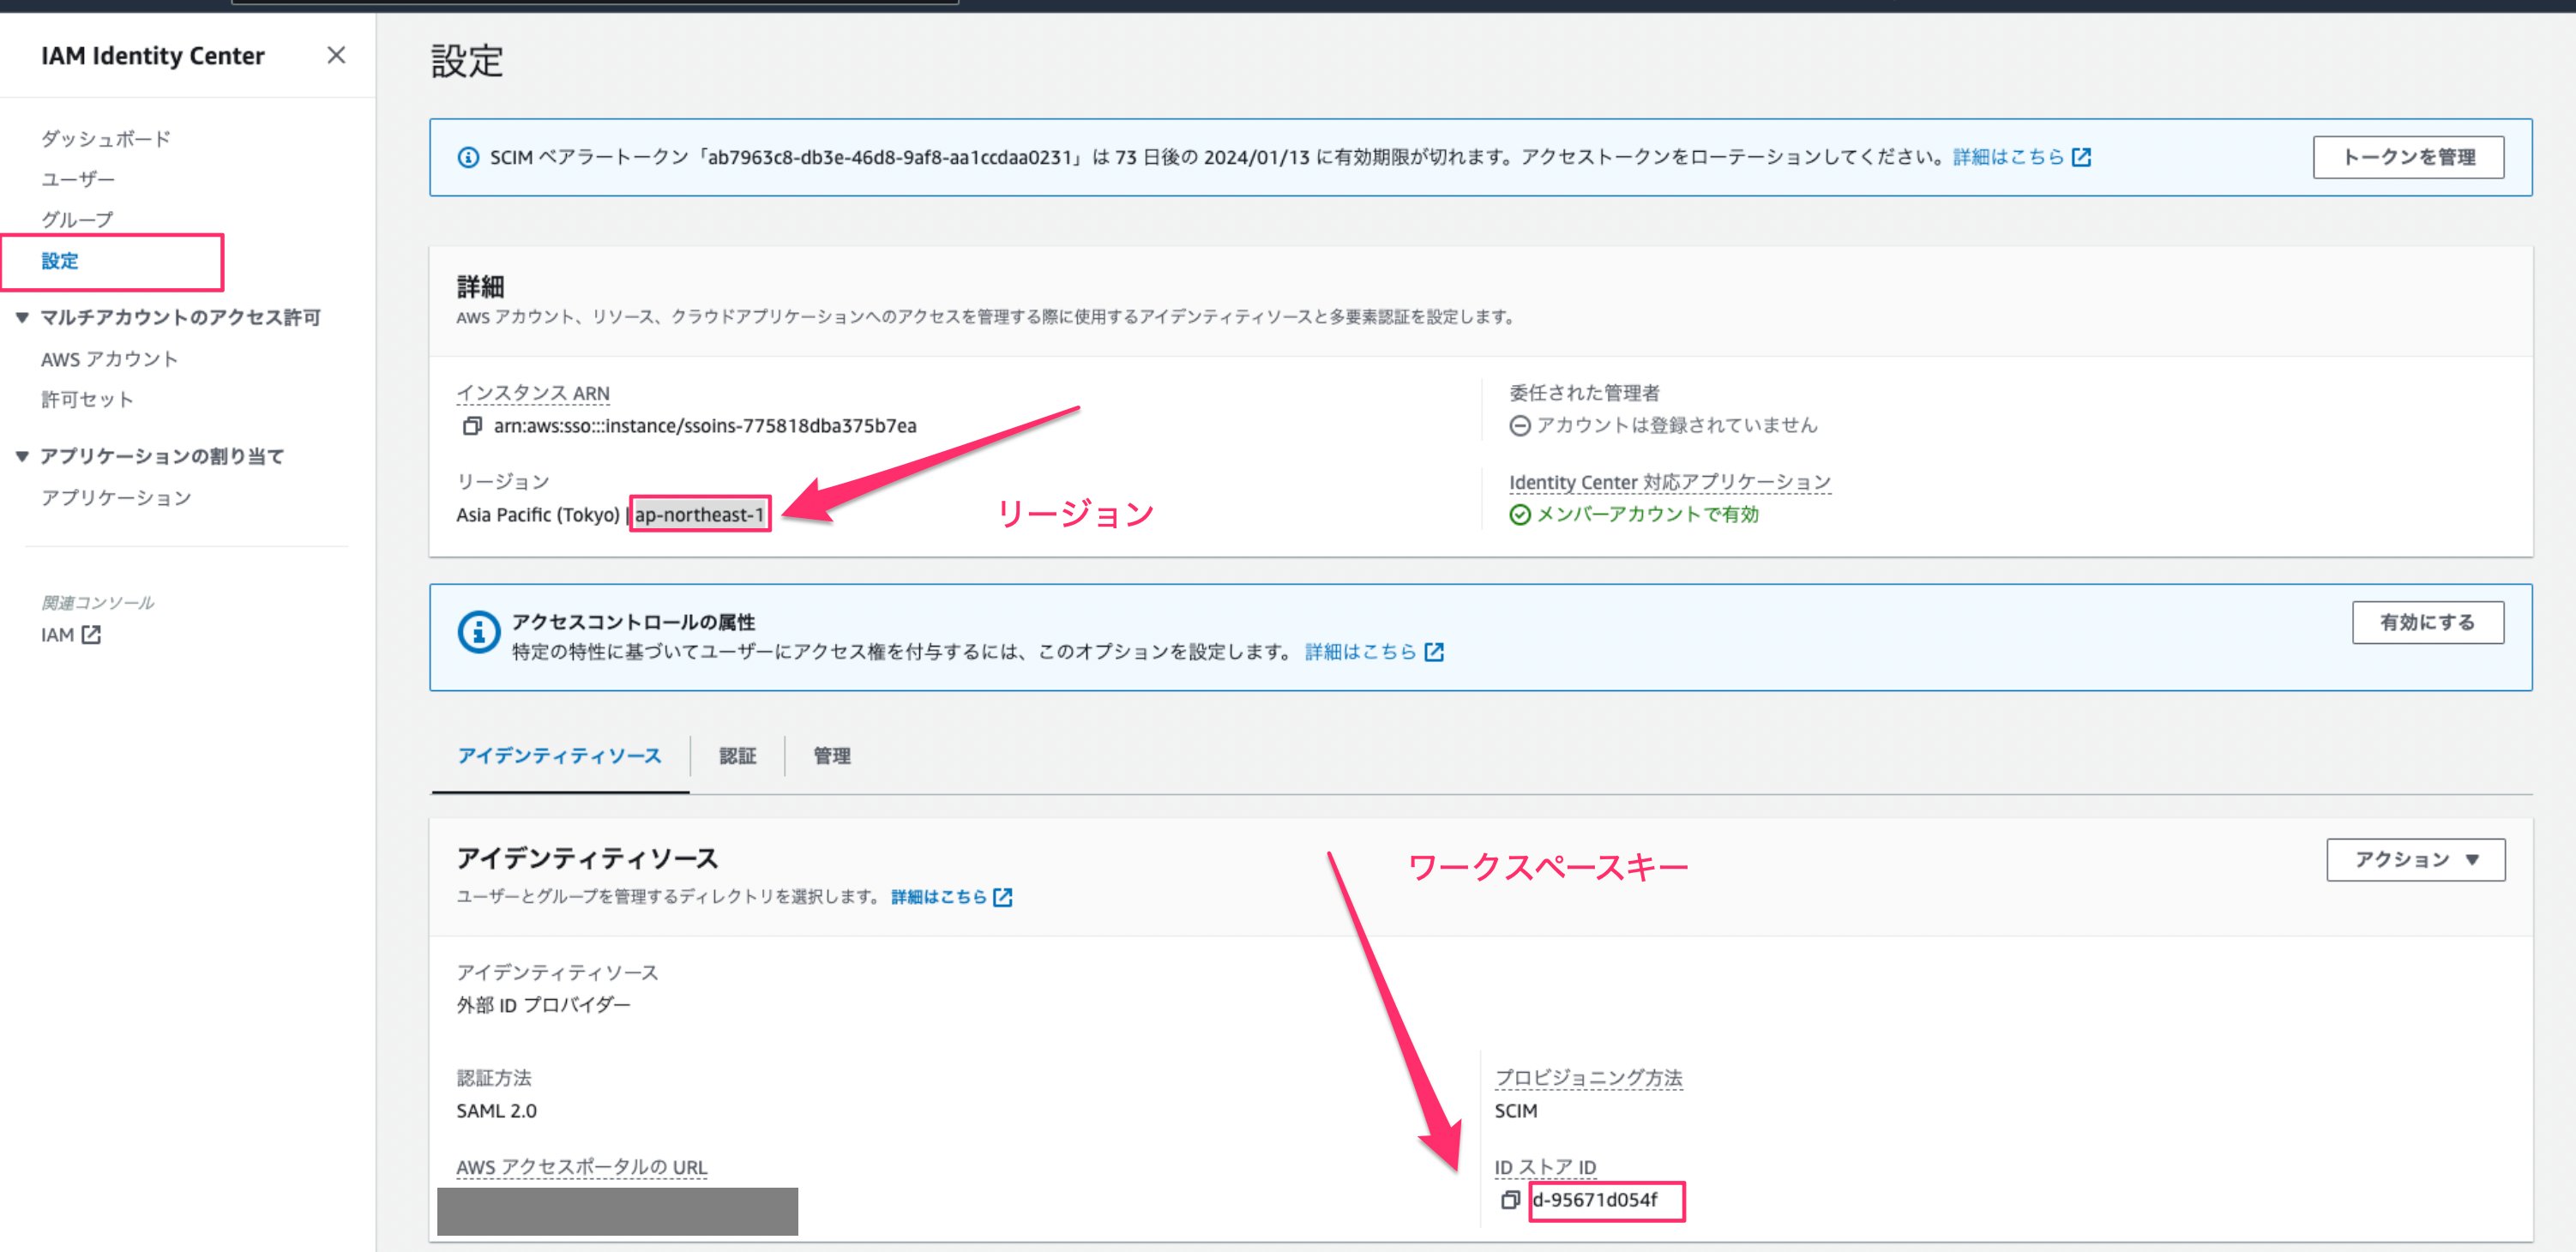
**IAM Identitiy Center > 設定**にアクセスし、`リージョン`と`IDストアID`をコピーして保存しておきます。
### Step4: リージョンとワークスペースキーの確認方法
**IAM Identitiy Center > 設定**にアクセスし、`リージョン`と`IDストアID`をコピーして保存しておきます。
 ## インテグレーションのセットアップ
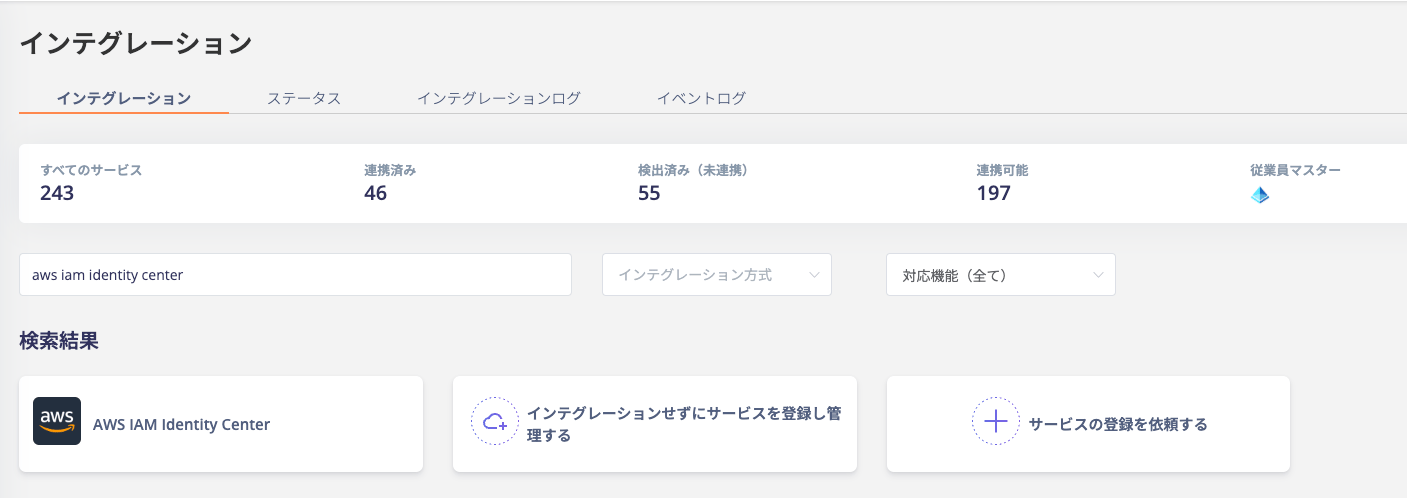
1. Adminaのインテグレーション > インテグレーションで「**AWS IAM Identity Center**」と検索します。
## インテグレーションのセットアップ
1. Adminaのインテグレーション > インテグレーションで「**AWS IAM Identity Center**」と検索します。
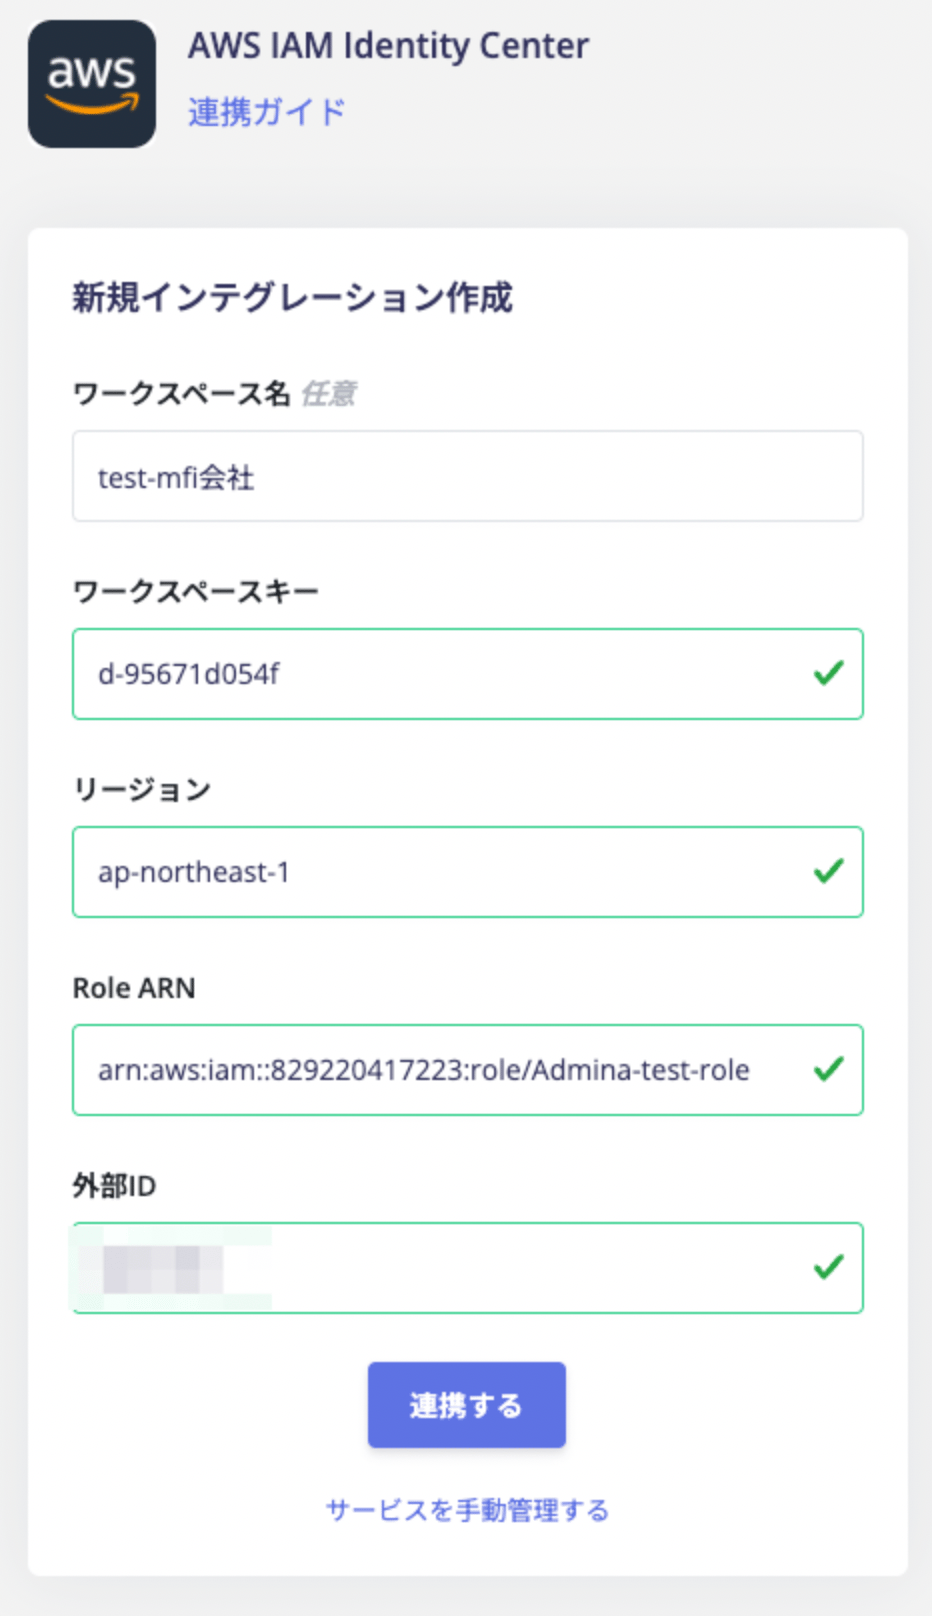
 2. 前の手順で取得した**ワークスペースキー**、**リージョン**、**Role ARN**、ロール作成時に設定した**外部ID**を入力し、連携するをクリックします。
 3. **AWS IAM Identity Center**との連携に成功すると、アカウント一覧に登録済みのユーザー情報が表示されます。
正常に完了しない場合は、インテグレーション画面のステータスタブから**編集**し、再度連携をお試しください。
解決しない場合はチャットにてお問い合わせください。AWS IAM Identity Centerの連携概要については[連携ページ](https://admina.moneyforward.com/jp/integrations/aws-iam-identity-center)をご覧ください。
## メールアドレスが取得出来ない場合のSaaSの手動紐づけ
メールアドレスが取得できないSaaSのため、ディレクトリ > ID種別「不明ID」と判定されます。
ユーザータイプが「不明ID」と判定された場合は、他のアカウントと手動で紐づけ(名寄・マージ)を行ってください。
設定の詳細についてはお問い合わせください。
3. **AWS IAM Identity Center**との連携に成功すると、アカウント一覧に登録済みのユーザー情報が表示されます。
正常に完了しない場合は、インテグレーション画面のステータスタブから**編集**し、再度連携をお試しください。
解決しない場合はチャットにてお問い合わせください。AWS IAM Identity Centerの連携概要については[連携ページ](https://admina.moneyforward.com/jp/integrations/aws-iam-identity-center)をご覧ください。
## メールアドレスが取得出来ない場合のSaaSの手動紐づけ
メールアドレスが取得できないSaaSのため、ディレクトリ > ID種別「不明ID」と判定されます。
ユーザータイプが「不明ID」と判定された場合は、他のアカウントと手動で紐づけ(名寄・マージ)を行ってください。
設定の詳細についてはお問い合わせください。