> ## Documentation Index
> Fetch the complete documentation index at: https://support.i.moneyforward.com/llms.txt
> Use this file to discover all available pages before exploring further.
# Google Drive
> サービスアカウントを用いたGoogle Driveとの連携手順です。
## サポートする機能
ファイル集計 ファイル権限管理
## Google Driveとの連携
Google Driveとの連携手順です。連携することで公開されているファイルの情報を取得します。([外部共有コンテンツ管理機能について](/it-management/file-management/aakpi1r7gq-file-management#1023961436))
* アカウント情報は取得いたしません。
* 共有ドライブ(マイドライブ含む)に公開(共有)されているファイル名とそのリンクを取得いたします。データはAdminaに同期しません。
* ファイルの閲覧には、AdminaのAdminロールが必要です。Adminaのロールについては次のページをご覧ください。
[Adminaの管理ユーザについて:ロールの違いを教えてください。](/it-management/settings/yne7fl2lcy-role-new)
## 事前準備
### APIの有効化(Google Cloud Platform)
1. Google Cloud Platformから連携用のアカウントを作成します。[Google Cloud Console](https://console.cloud.google.com/) にアクセスし、任意のプロジェクトを選択 or 新規作成します。
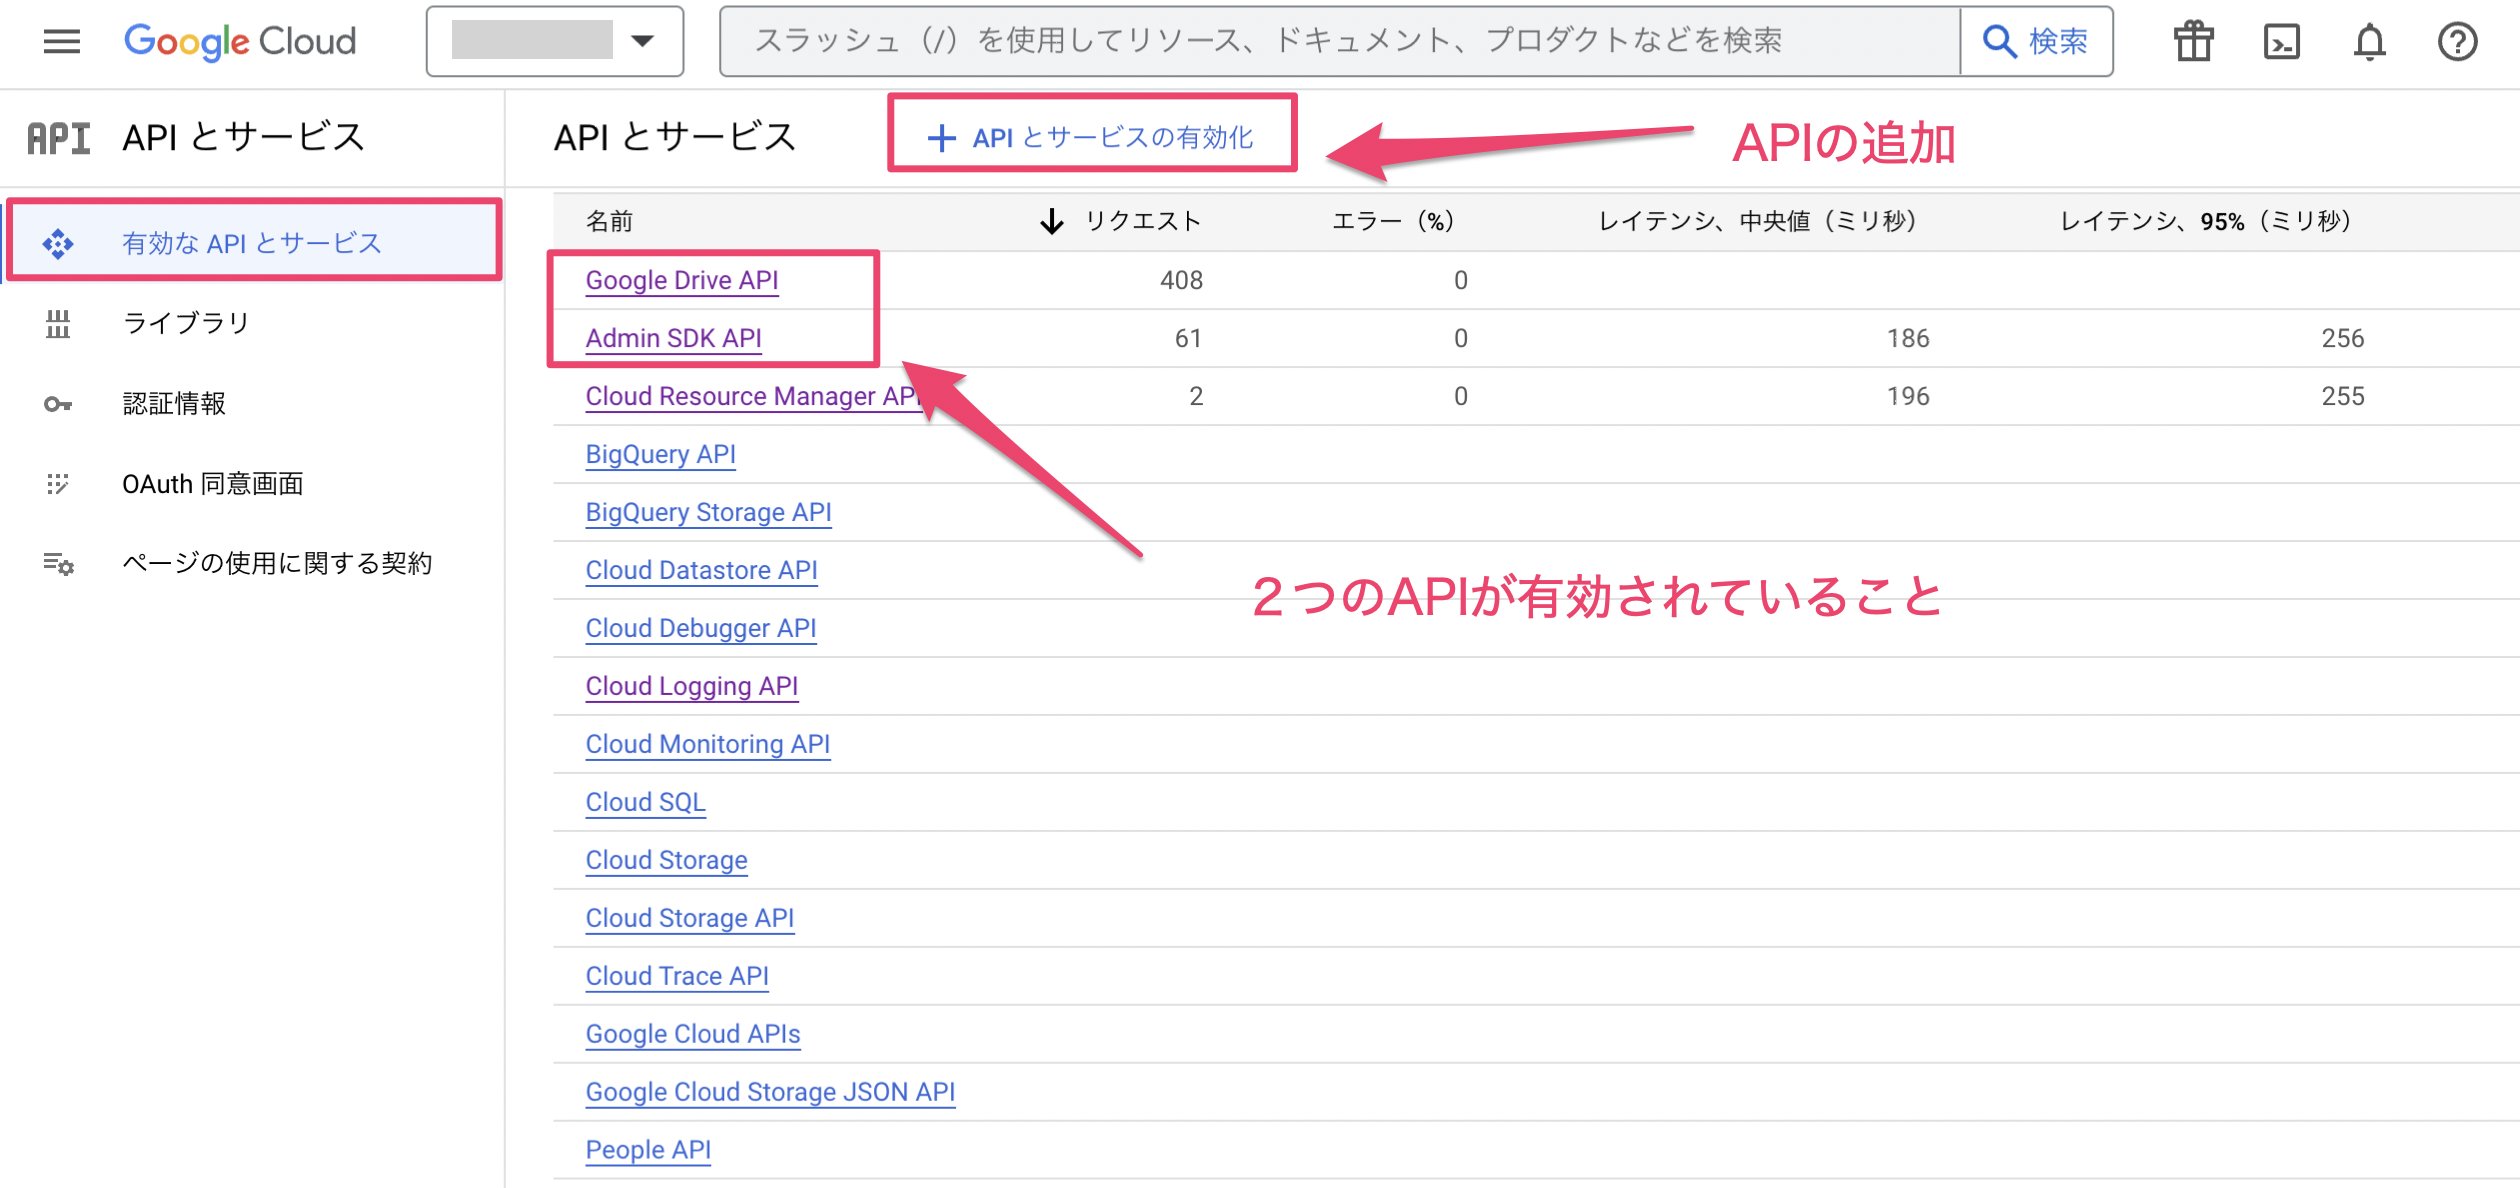
2. **API とサービス** > 有効化済みの **API** で、次の2つのAPIが有効になっていることを確認します。 有効になっていない場合、[API Library](https://console.cloud.google.com/apis/library)の一覧から追加します。
* **Google Drive API**
* **Admin SDK API**
 ### 連携用アカウントの作成
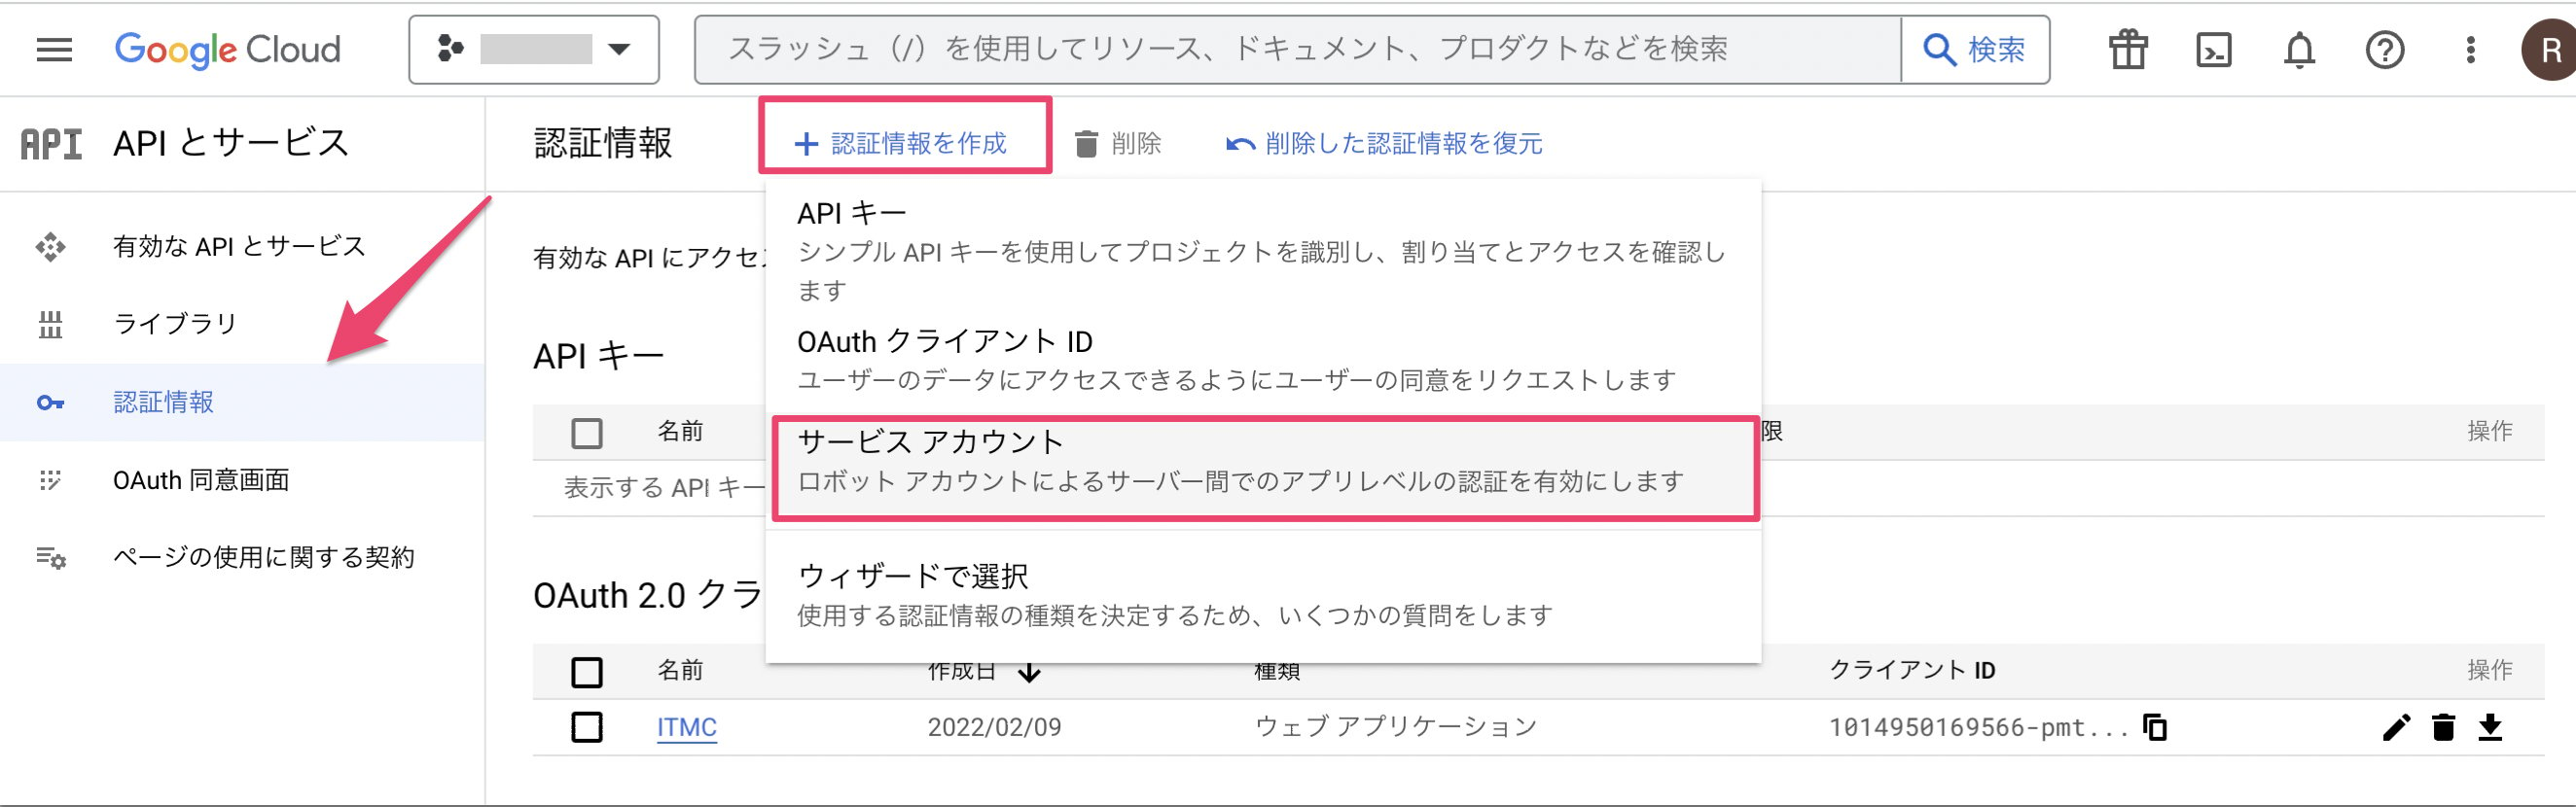
3. **API とサービス > 認証情報 > 認証情報を作成 > サービスアカウント**に移動します。
### 連携用アカウントの作成
3. **API とサービス > 認証情報 > 認証情報を作成 > サービスアカウント**に移動します。
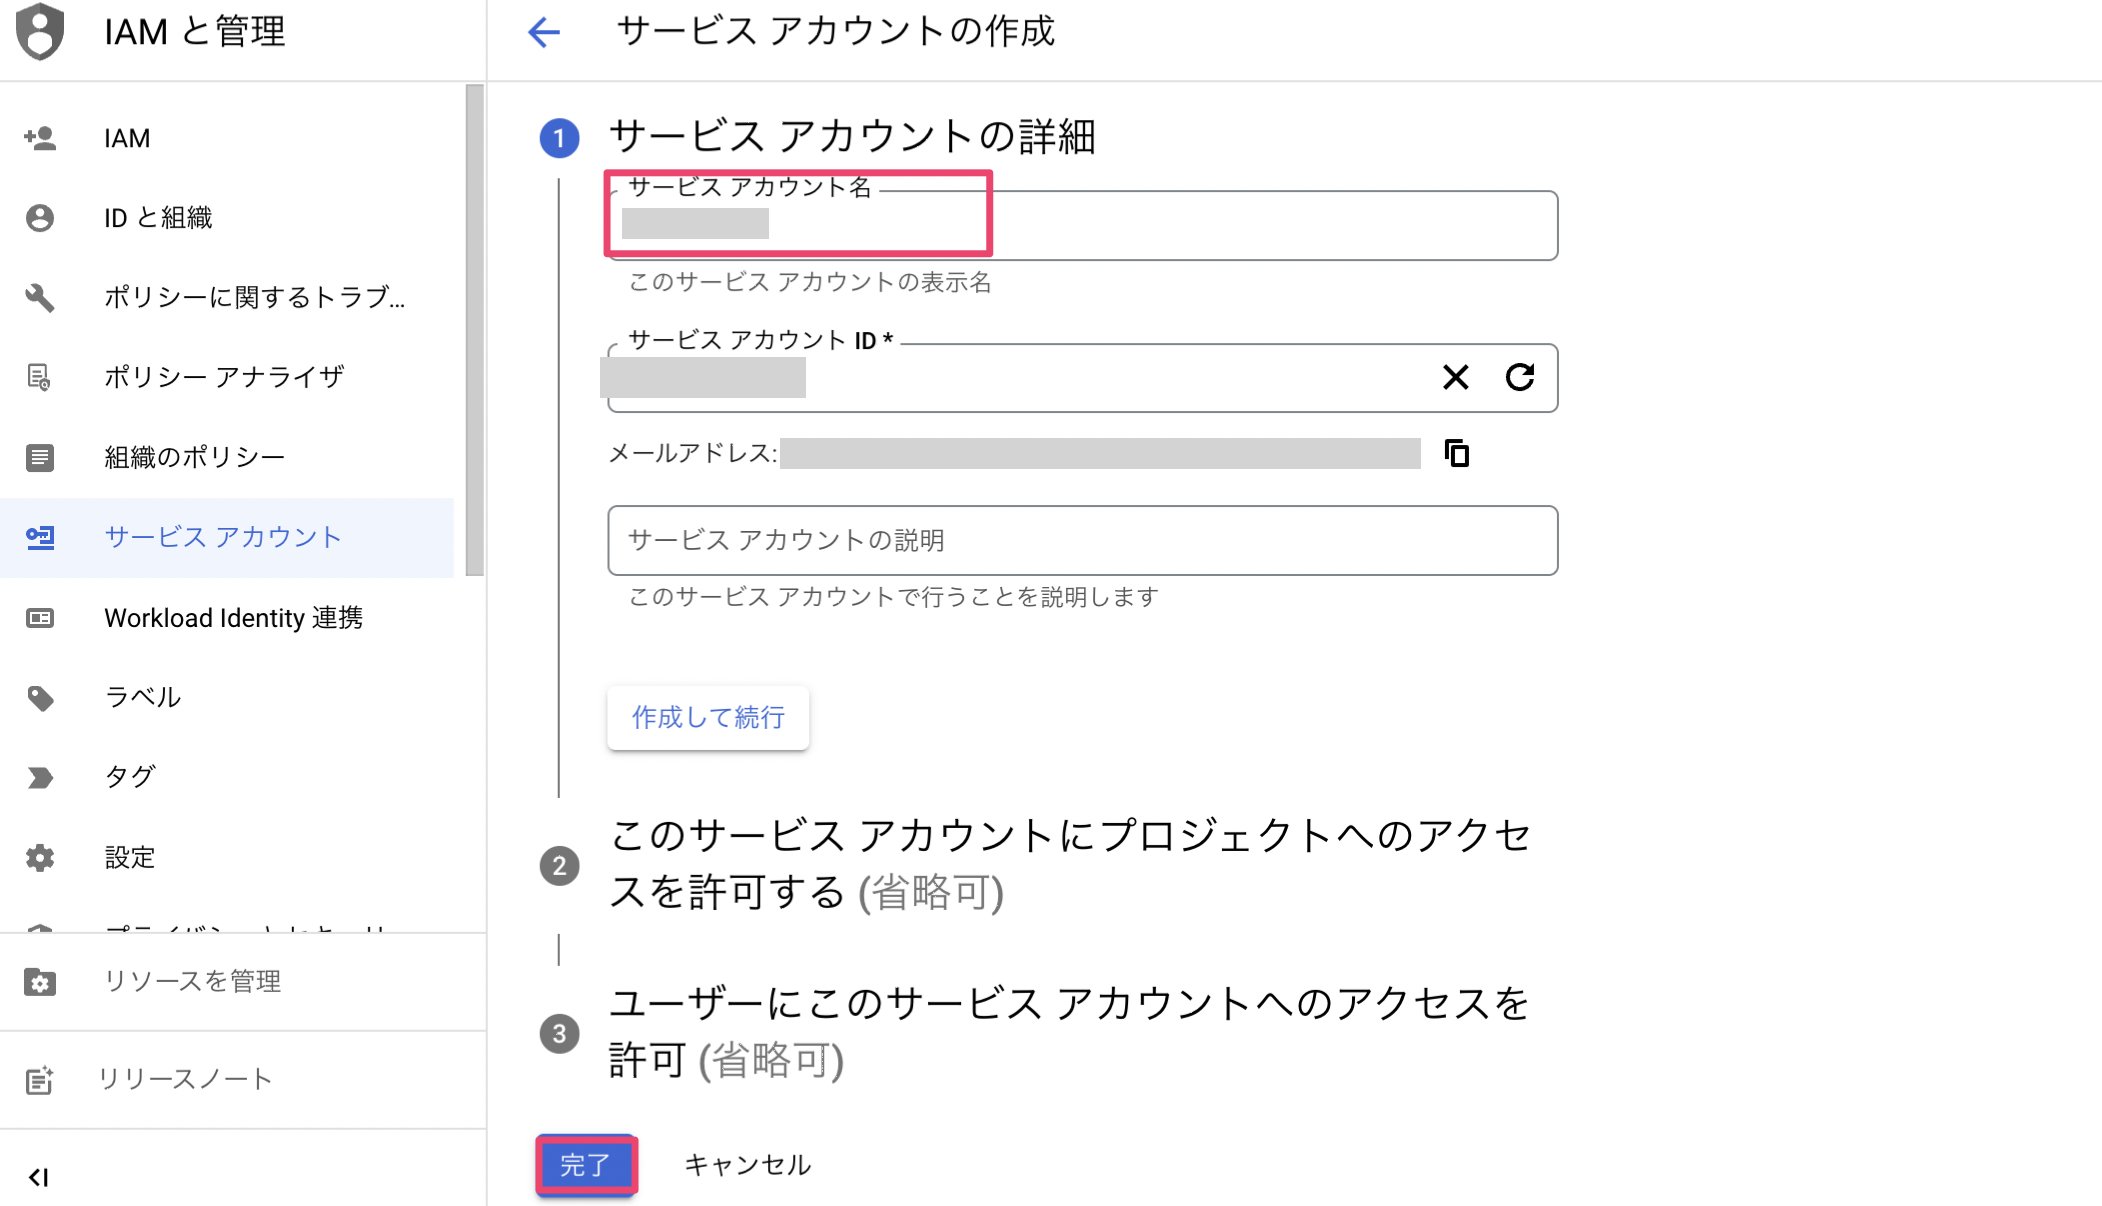
 4. サービスアカウント名に任意の名前を入力し、\[**完了**] をクリックします(step2,3は不要です)
 ### APIキーの発行
5. **API と サービス > 認証情報** に作成したサービスアカウントが表示されますのでクリックします。
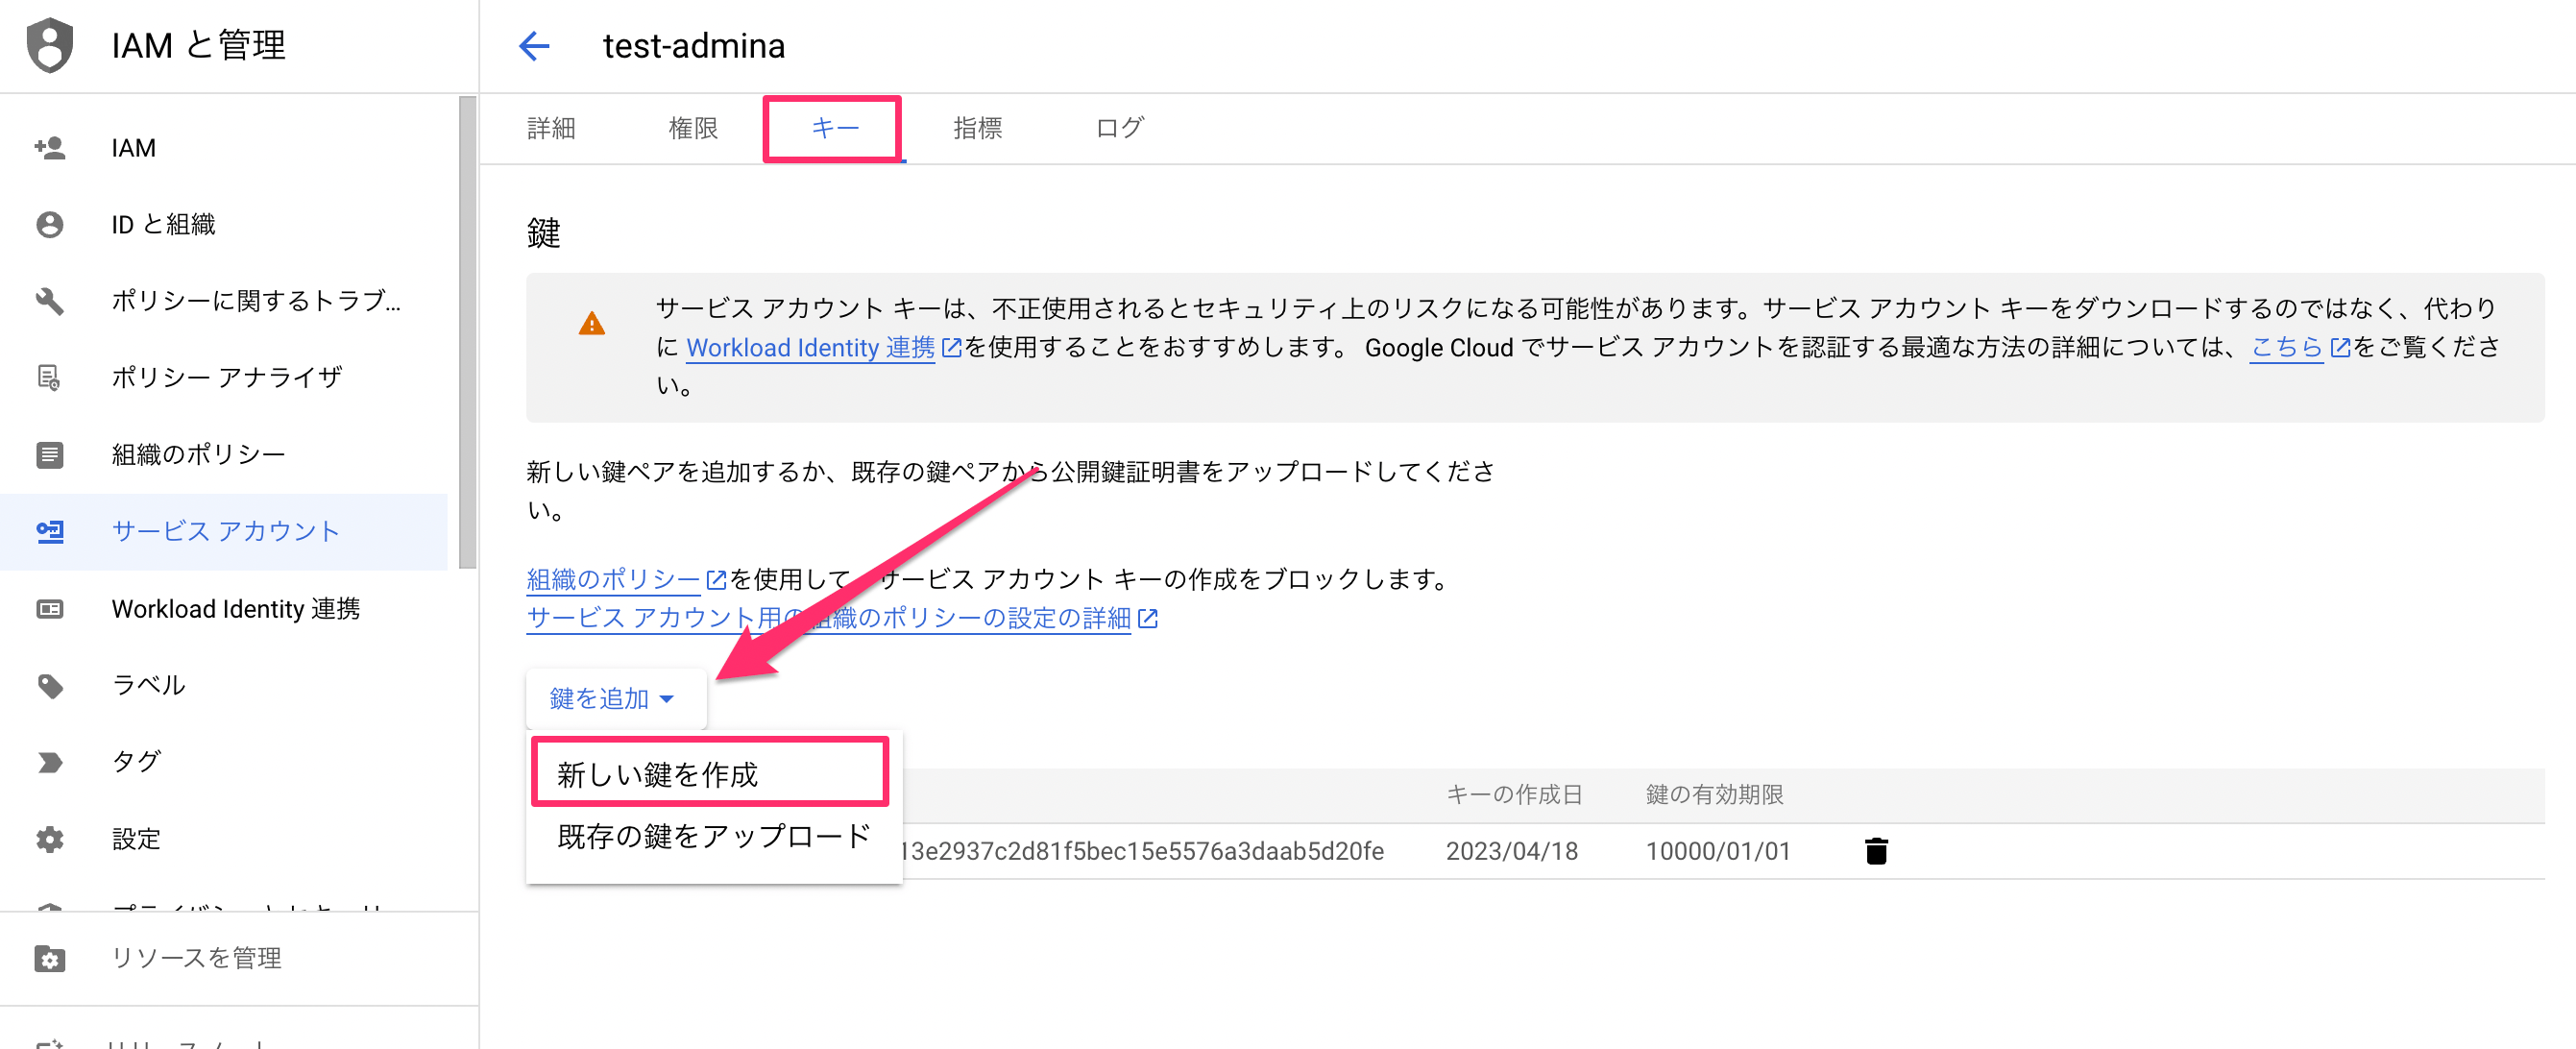
6. \[**キー**] タブに移動し、**鍵を追加 > 新しい鍵を作成** をクリックします。
### APIキーの発行
5. **API と サービス > 認証情報** に作成したサービスアカウントが表示されますのでクリックします。
6. \[**キー**] タブに移動し、**鍵を追加 > 新しい鍵を作成** をクリックします。
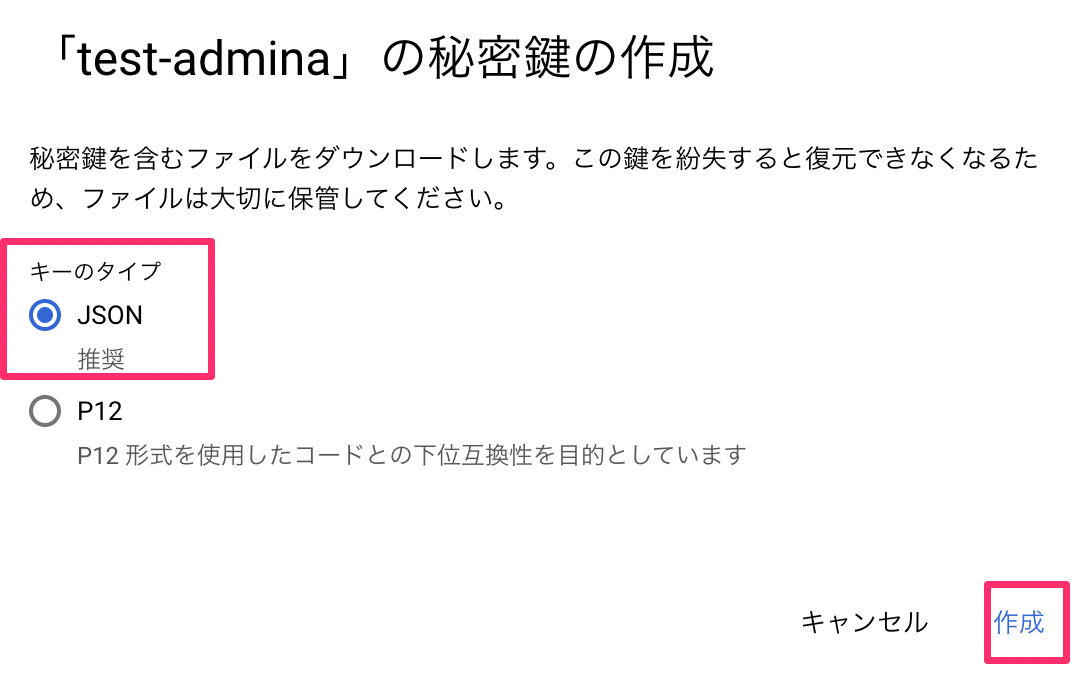
 7. **JSON**を選択し、\[作成] ボタンをクリックします。「秘密鍵がパソコンに保存されました」と表示され、JSONファイルが自動的にダウンロードされます。Client IDなど、Adminaとの連携に必要なパラメータが登録されているため、保管しておきます。
 ### ドメイン全体の委任の設定(Google Adminコンソール)
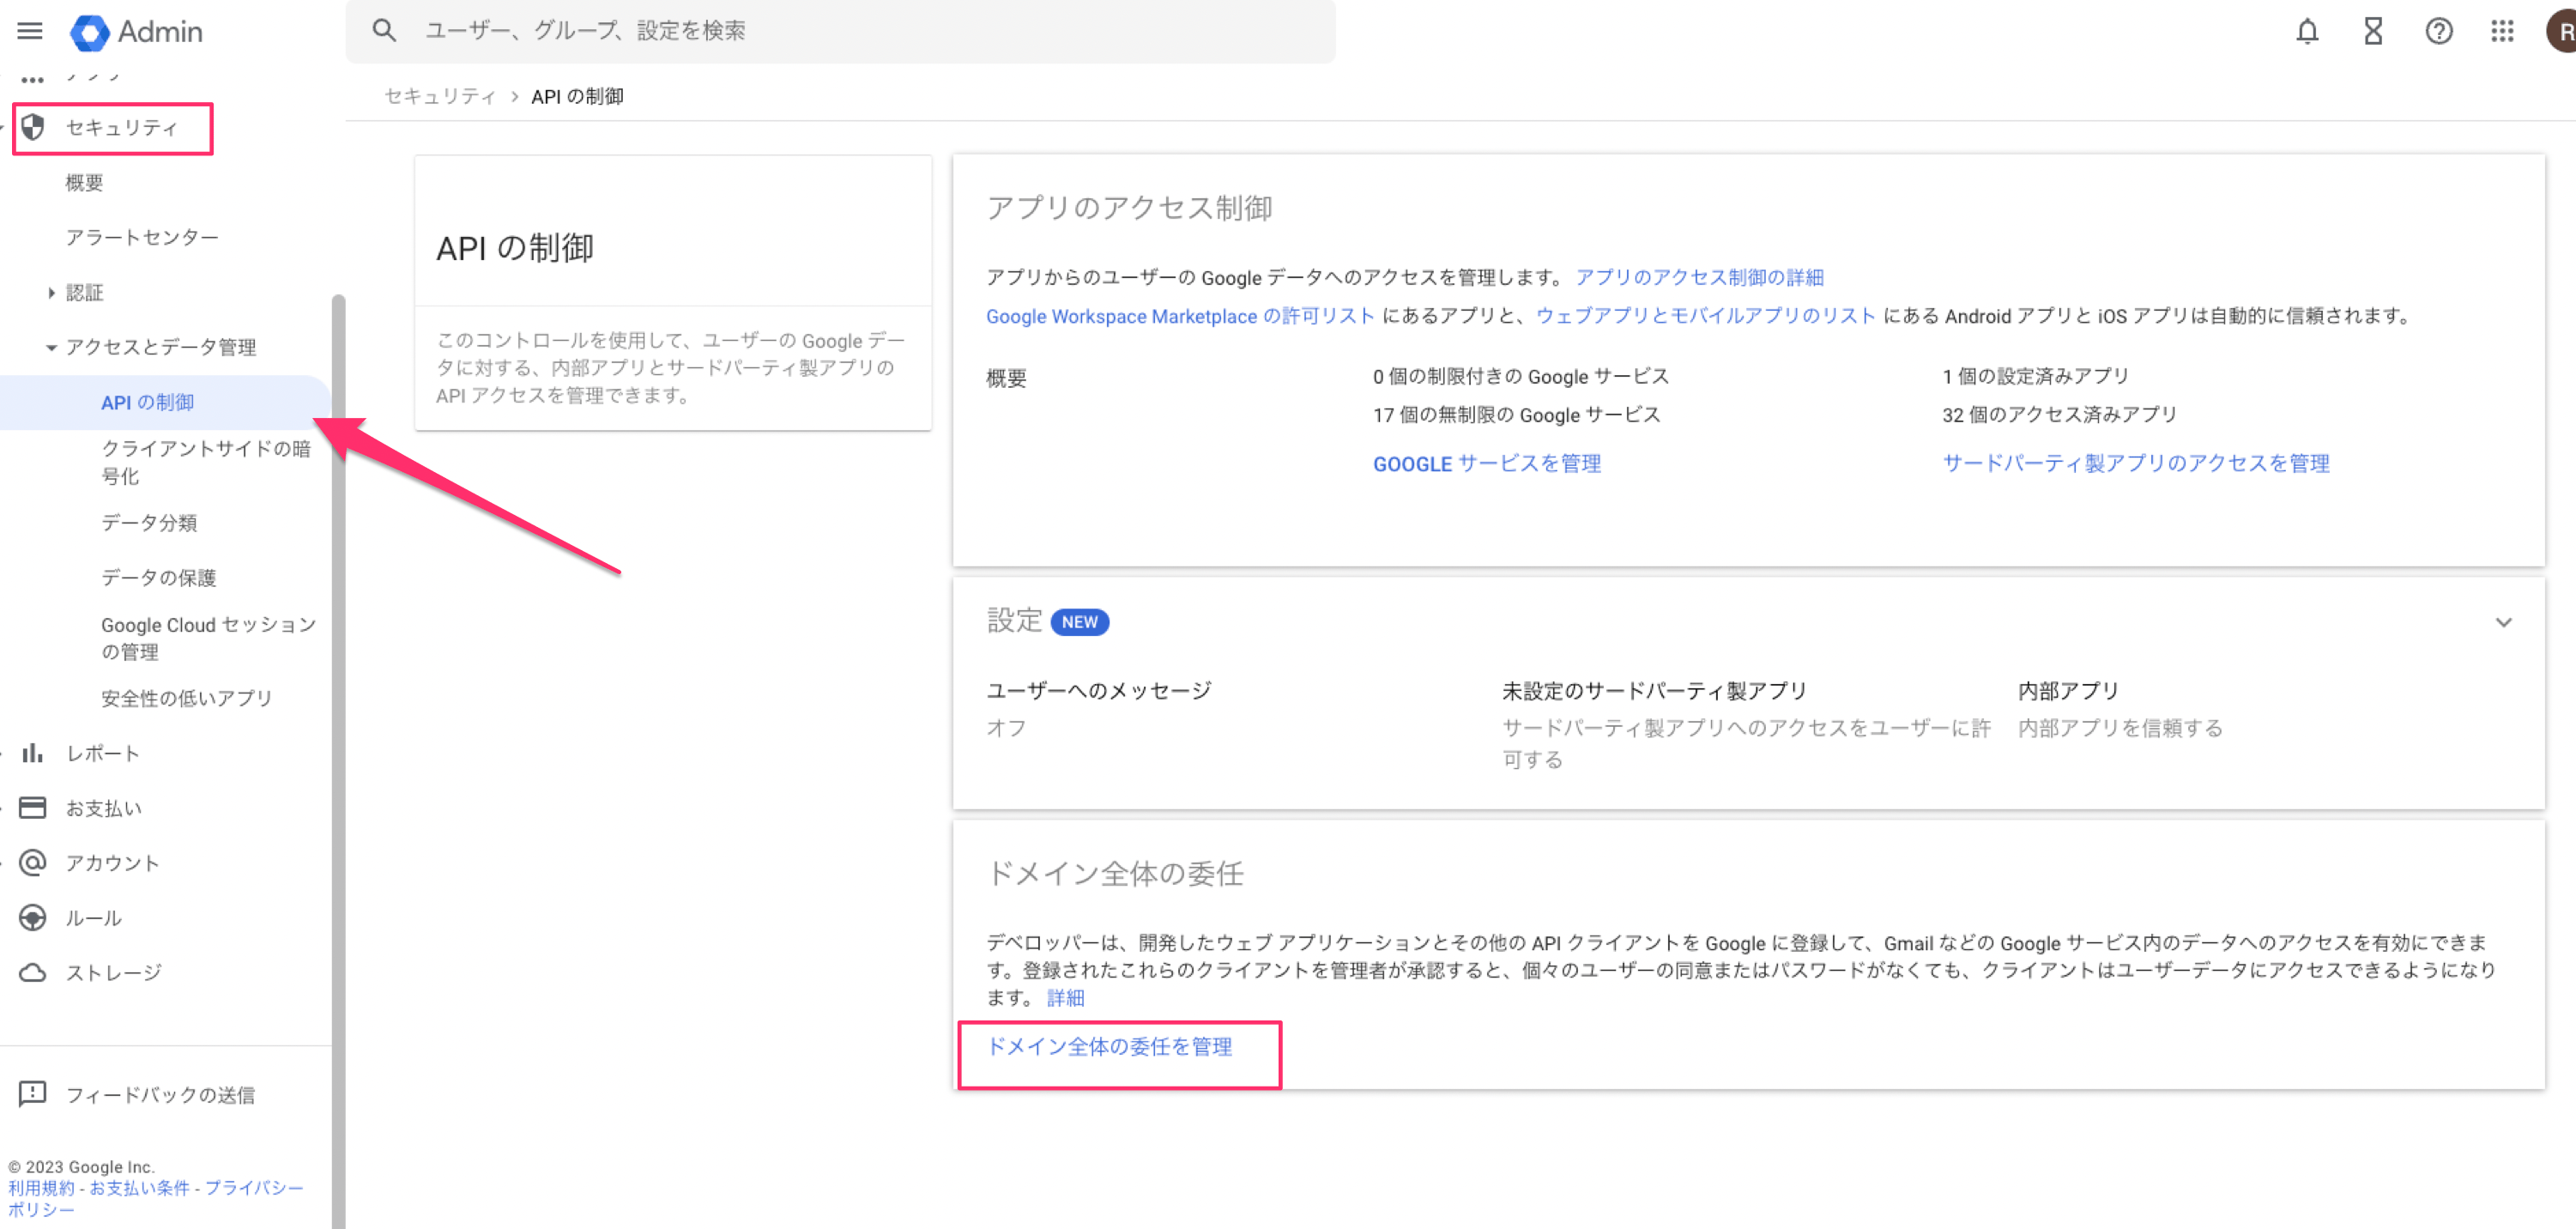
8. Google Workspaceの [Admin console](https://admin.google.com/)に移動し、 **セキュリティ > APIの制御 > \[ドメイン全体の委任を管理]** をクリックします。
### ドメイン全体の委任の設定(Google Adminコンソール)
8. Google Workspaceの [Admin console](https://admin.google.com/)に移動し、 **セキュリティ > APIの制御 > \[ドメイン全体の委任を管理]** をクリックします。
 9. \[**新しく追加**]ボタンをクリックします.
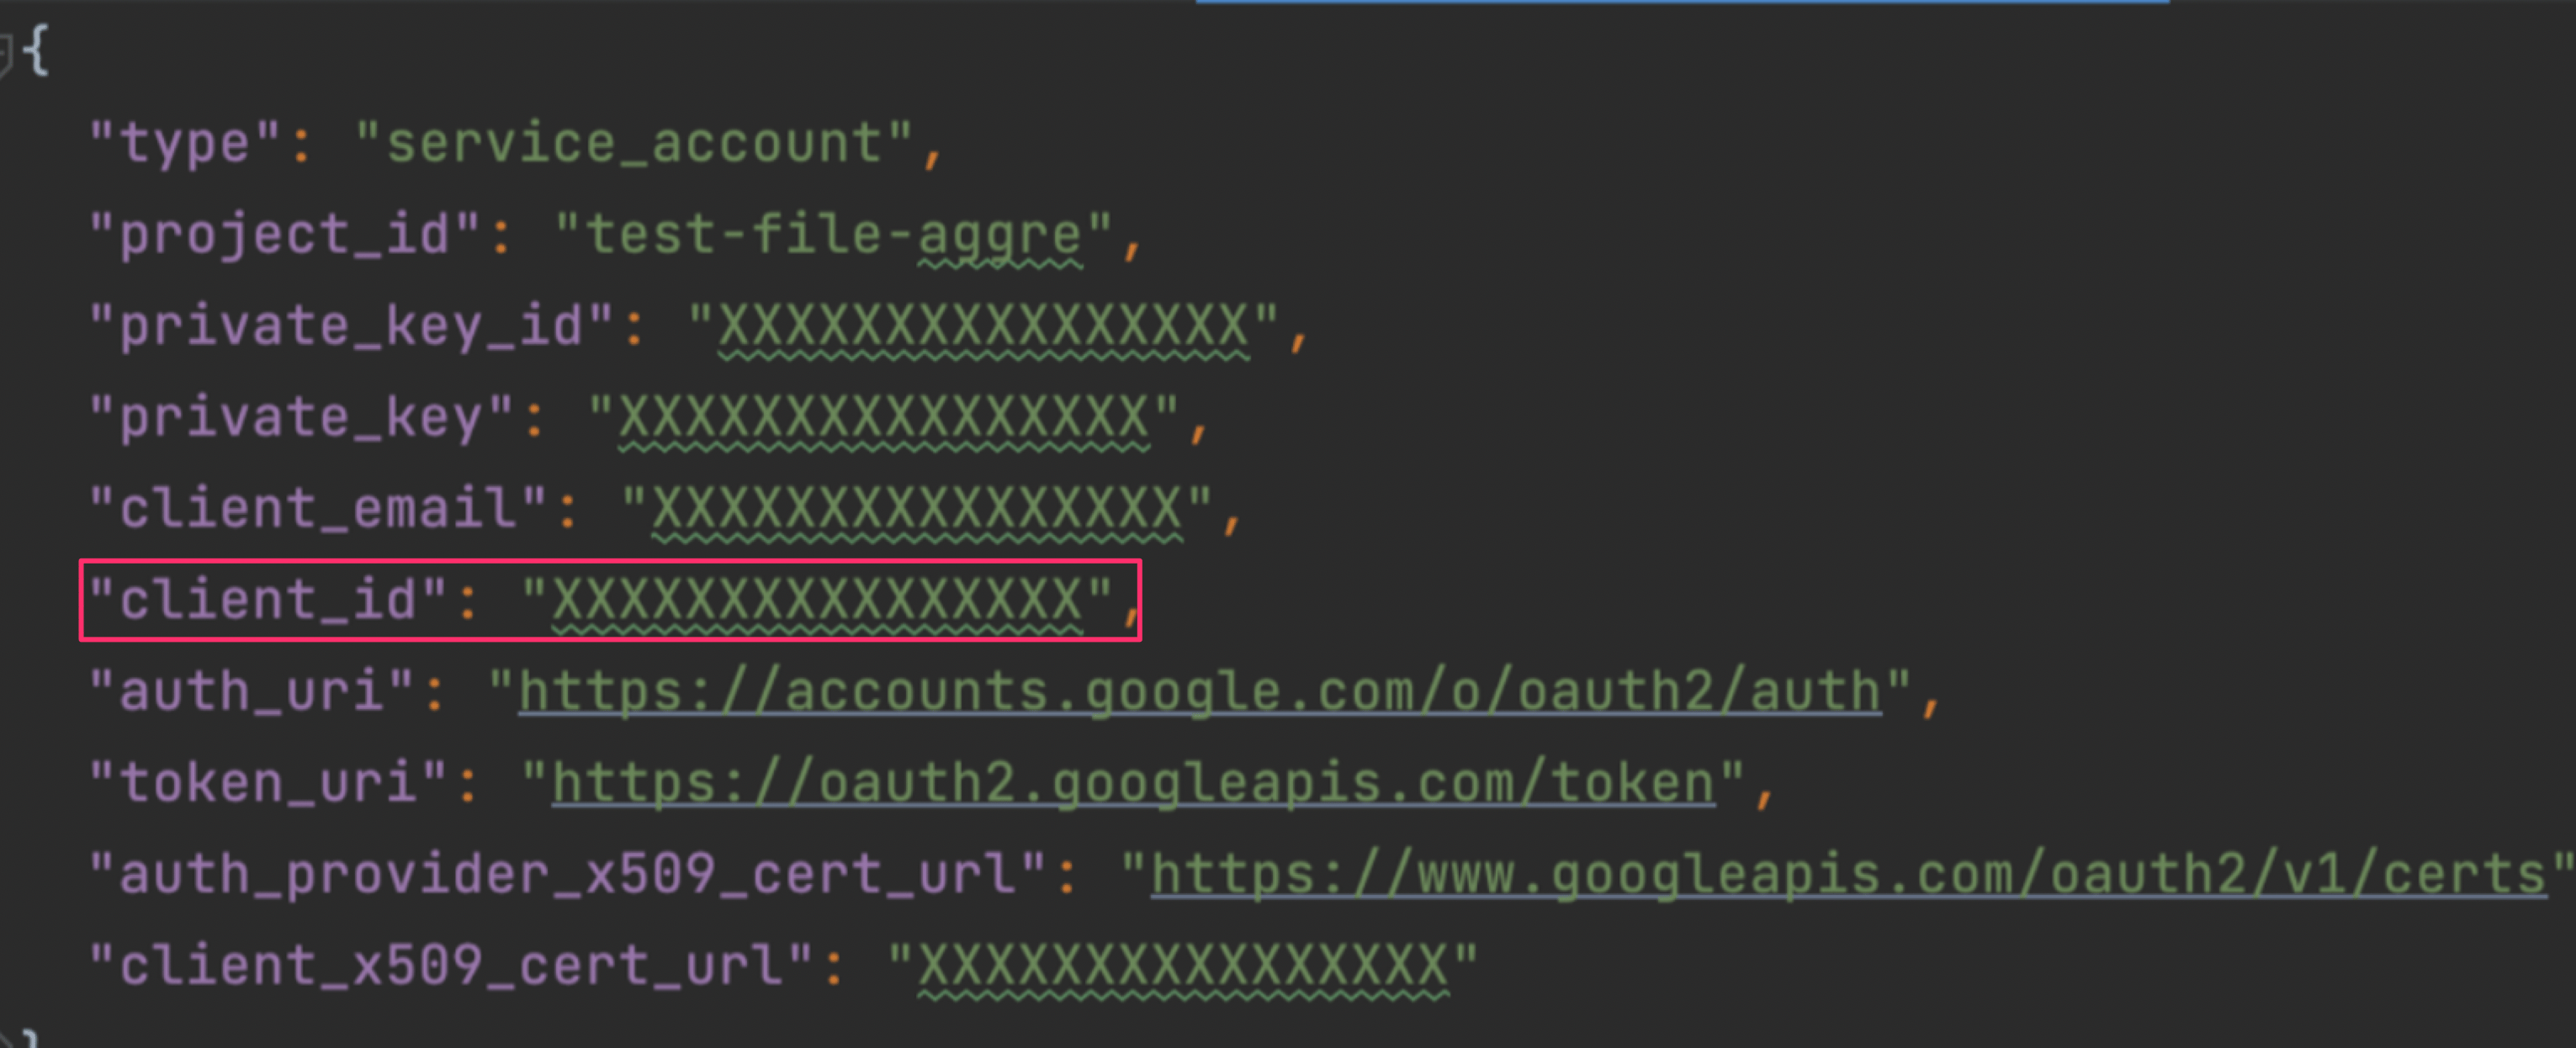
10. 保存しておいたJSONファイルを開きます。**Client ID** に、Jsonファイル内にある`client_id` の値を入力します。
9. \[**新しく追加**]ボタンをクリックします.
10. 保存しておいたJSONファイルを開きます。**Client ID** に、Jsonファイル内にある`client_id` の値を入力します。
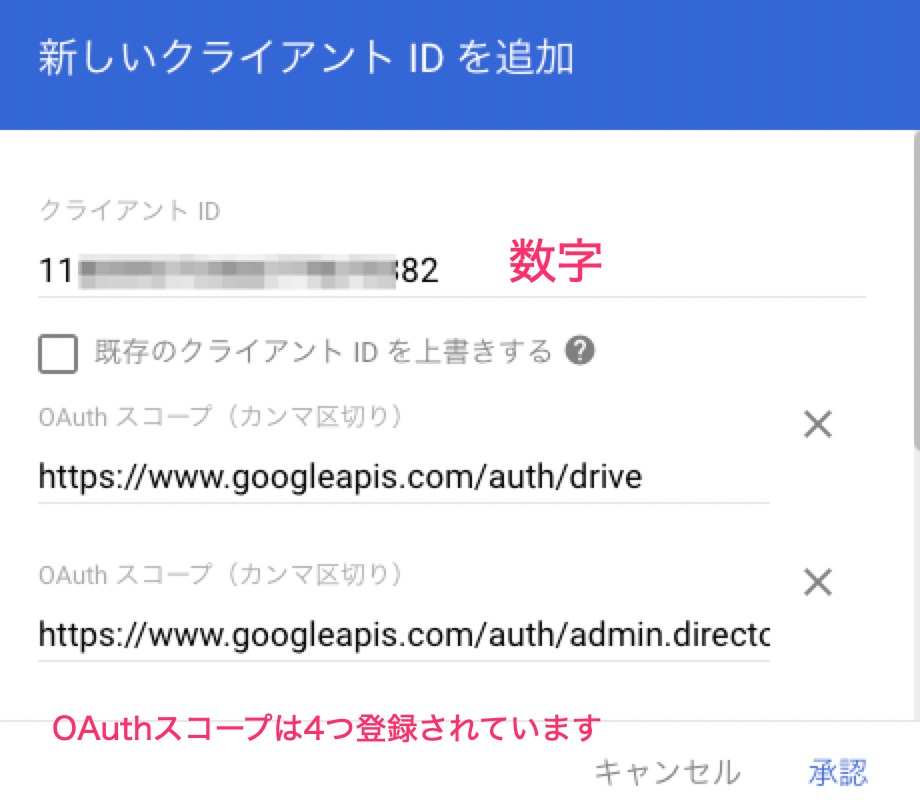
 11. **OAuth スコープ**に以下の4つの値を入力し、\*\*\[承認]\*\*をクリックします
1. `https://www.googleapis.com/auth/drive`
2. `https://www.googleapis.com/auth/admin.directory.user.readonly`
3. `https://www.googleapis.com/auth/admin.directory.group.readonly`
4. `https://www.googleapis.com/auth/admin.directory.domain.readonly`
11. **OAuth スコープ**に以下の4つの値を入力し、\*\*\[承認]\*\*をクリックします
1. `https://www.googleapis.com/auth/drive`
2. `https://www.googleapis.com/auth/admin.directory.user.readonly`
3. `https://www.googleapis.com/auth/admin.directory.group.readonly`
4. `https://www.googleapis.com/auth/admin.directory.domain.readonly`
 a.のスコープを`https://www.googleapis.com/auth/drive.readonly`と設定もできます。
この場合、すべてRead Onlyで連携することが可能になりますが、「マイドライブ」のみの取得(共有ドライブのファイルは取得不可)となります。
## インテグレーションのセットアップ
1. Adminaのインテグレーション画面にて、**Google Drive**で検索します。
2. 保存しておいたJSONファイルを開きます。以下の値をそれぞれ入力し、\[**連携する**]をクリックします。
a.のスコープを`https://www.googleapis.com/auth/drive.readonly`と設定もできます。
この場合、すべてRead Onlyで連携することが可能になりますが、「マイドライブ」のみの取得(共有ドライブのファイルは取得不可)となります。
## インテグレーションのセットアップ
1. Adminaのインテグレーション画面にて、**Google Drive**で検索します。
2. 保存しておいたJSONファイルを開きます。以下の値をそれぞれ入力し、\[**連携する**]をクリックします。
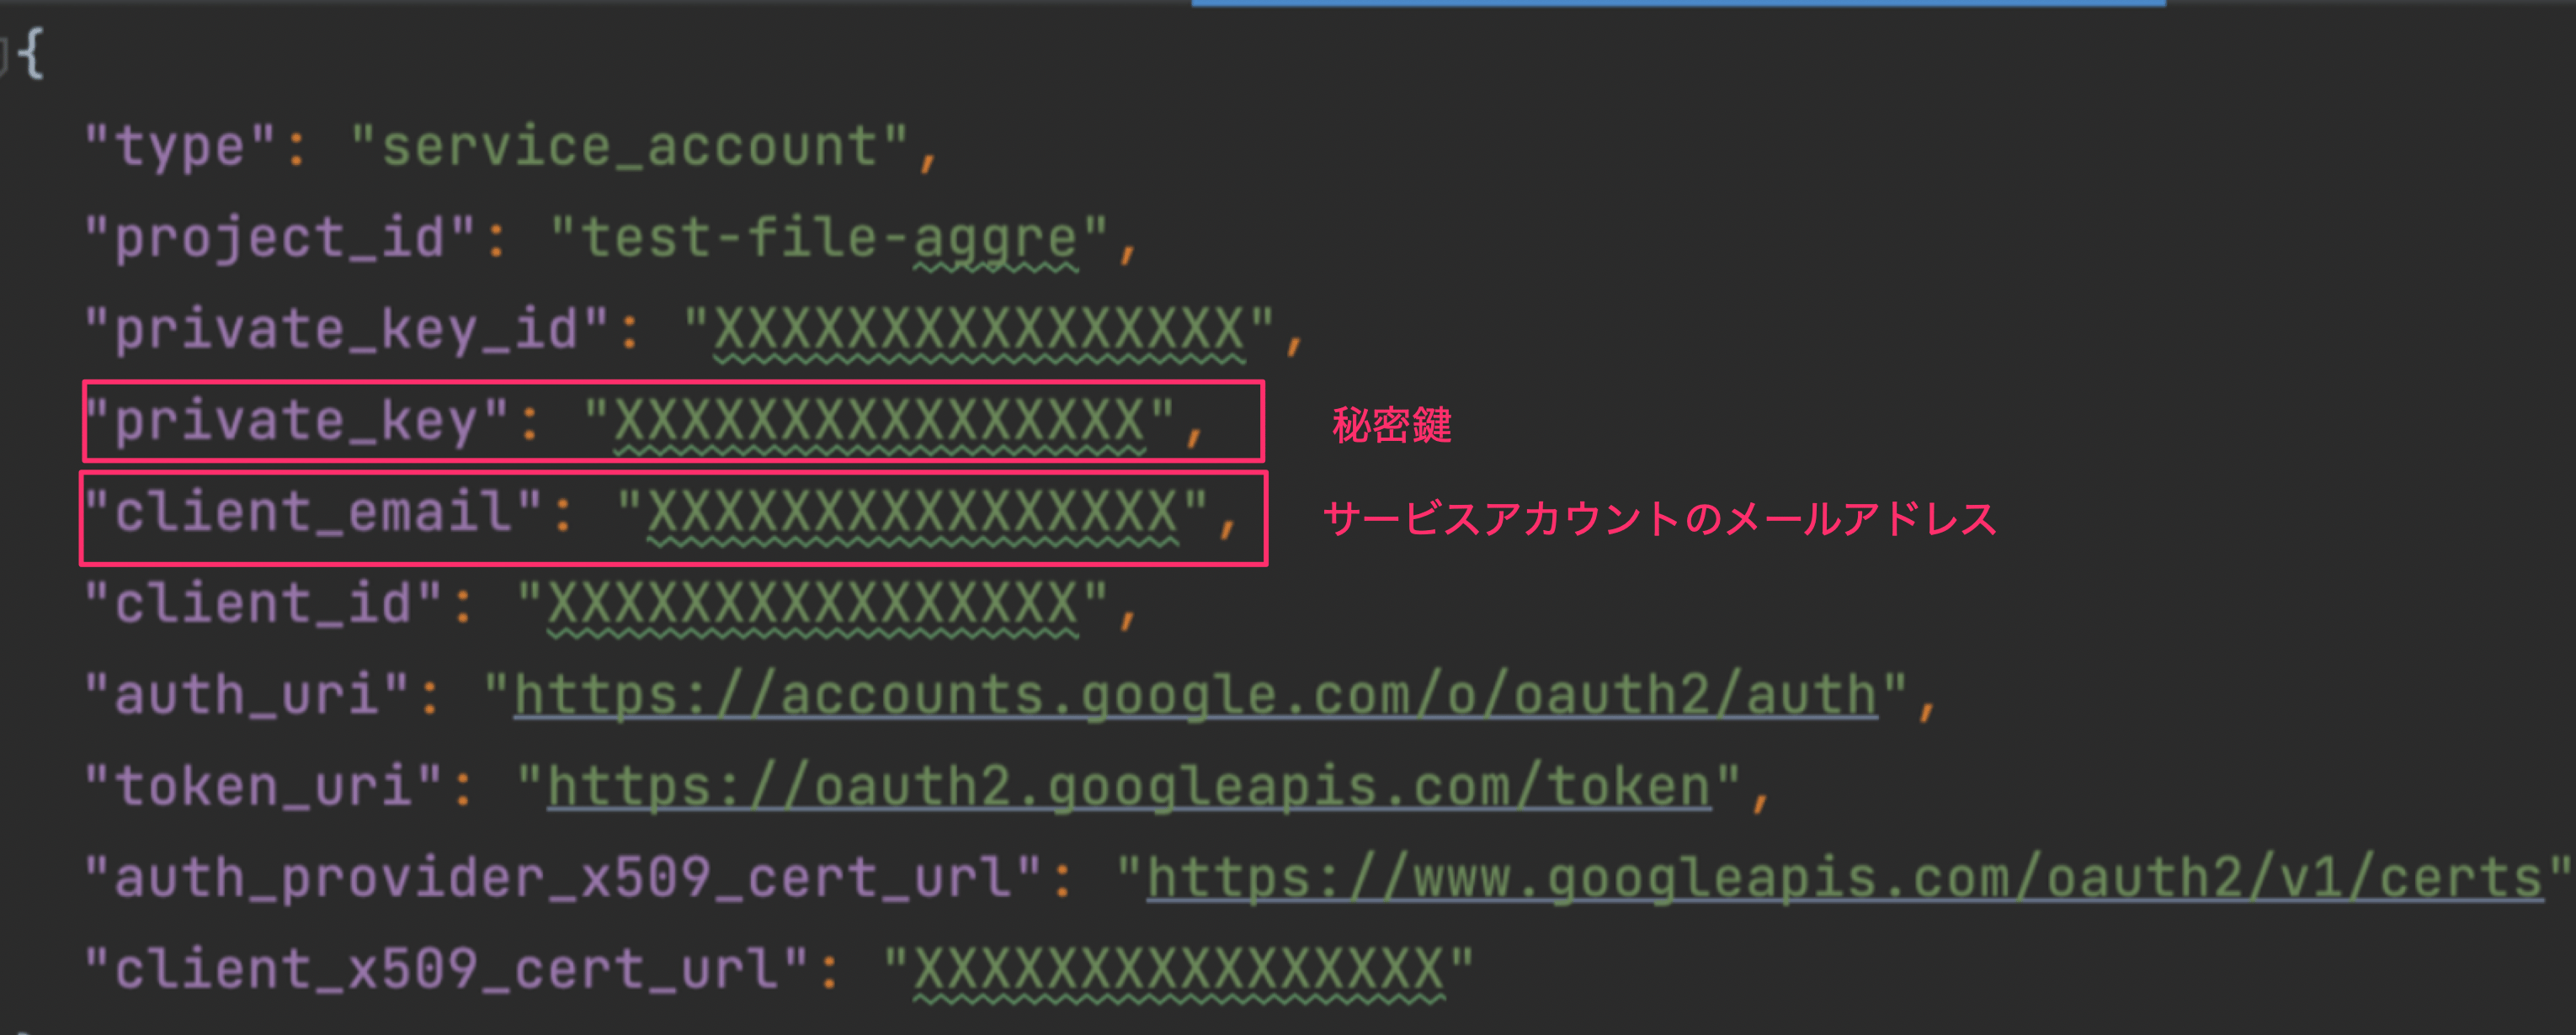 3. サービスアカウントのメールアドレス:JSONファイル内の`client_email` の値を入力します。
4. 秘密鍵:JSONファイル内の秘密鍵`private_key`を入力します。
**-----BEGIN PRIVATE KEY-----** から **-----END PRIVATE KEY-----** までを入力ください。(先頭の `"` やおよび最後の`\n",`は不要です。)
5. **メールアドレス:** **Google Workspace** の特権管理者のメールアドレスを入力ください。
3. サービスアカウントのメールアドレス:JSONファイル内の`client_email` の値を入力します。
4. 秘密鍵:JSONファイル内の秘密鍵`private_key`を入力します。
**-----BEGIN PRIVATE KEY-----** から **-----END PRIVATE KEY-----** までを入力ください。(先頭の `"` やおよび最後の`\n",`は不要です。)
5. **メールアドレス:** **Google Workspace** の特権管理者のメールアドレスを入力ください。
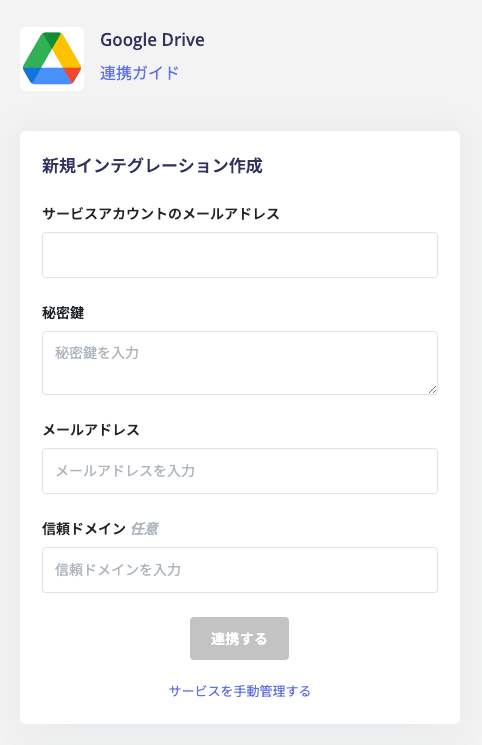 信頼ドメイン:指定したドメインを、外部公開ファイルの検知から除外できます。グループ会社のドメインなど、外部として検知させたくない場合に指定します。複数存在する場合、次のように , (カンマ)で区切って入力ください。(自社ドメインの入力は不要です)
`moneyfoward.co.jp, i.moneyfoward.com`
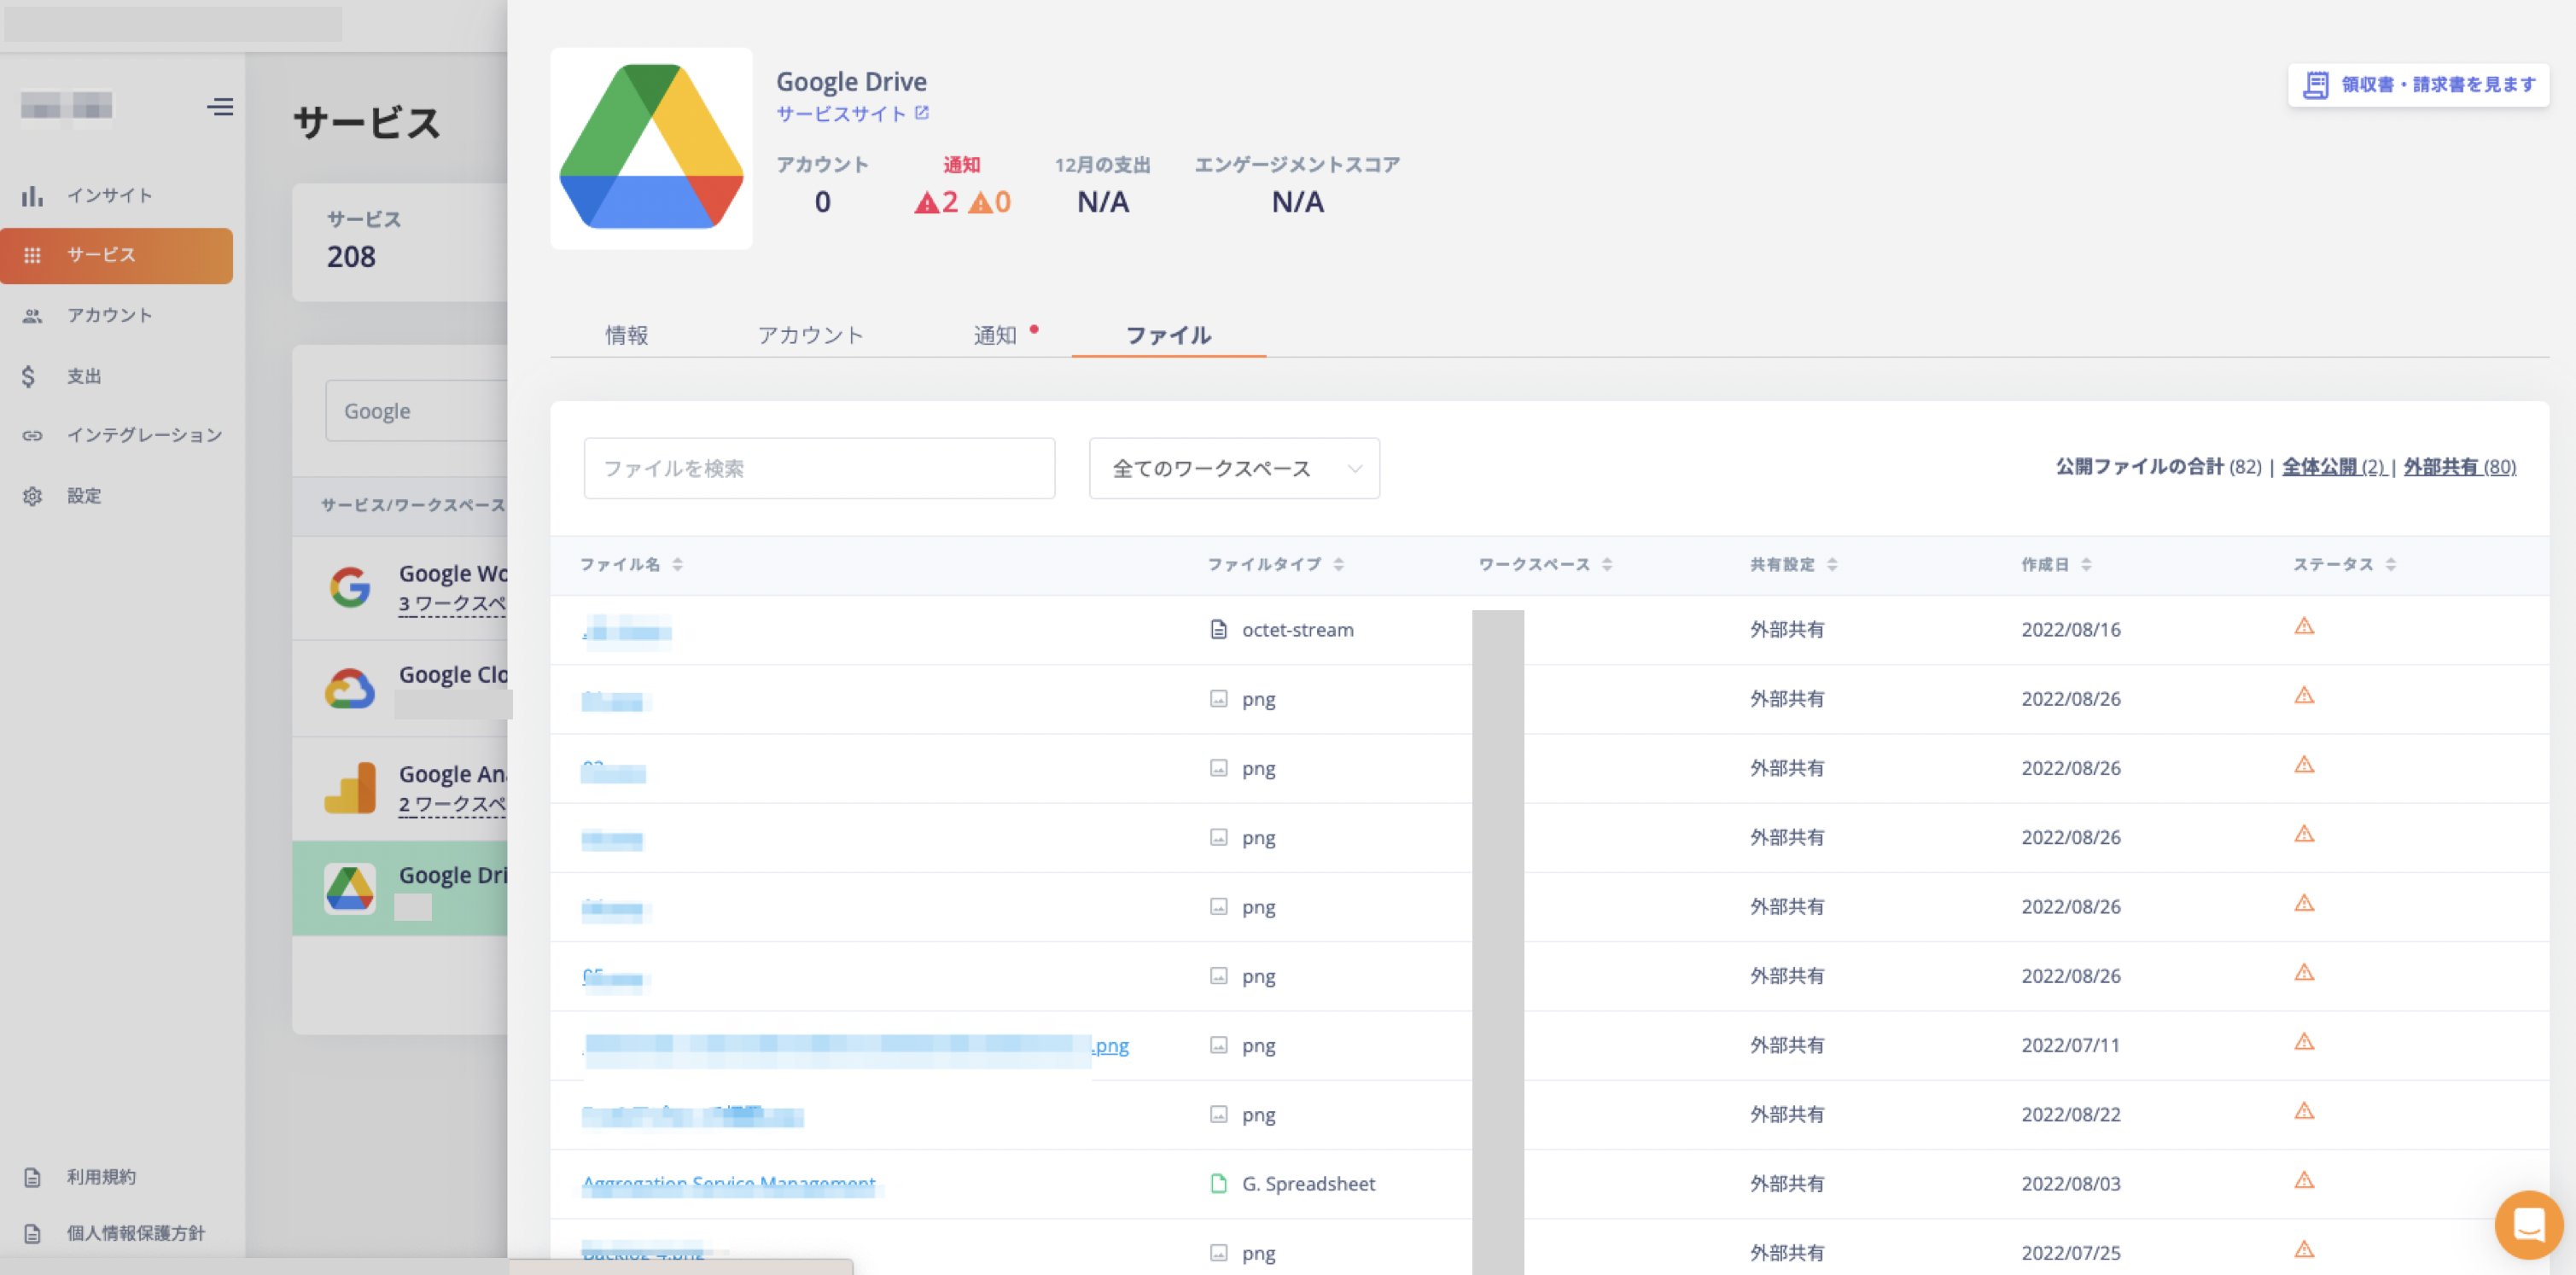
6. Google Drive との連携に成功すると、サービス >「ファイル」タブが表示され、共有されているファイルの情報が表示されます。(同期完了までにはファイル数によって時間がかかります。)
信頼ドメイン:指定したドメインを、外部公開ファイルの検知から除外できます。グループ会社のドメインなど、外部として検知させたくない場合に指定します。複数存在する場合、次のように , (カンマ)で区切って入力ください。(自社ドメインの入力は不要です)
`moneyfoward.co.jp, i.moneyfoward.com`
6. Google Drive との連携に成功すると、サービス >「ファイル」タブが表示され、共有されているファイルの情報が表示されます。(同期完了までにはファイル数によって時間がかかります。)
 正常に完了しない場合は、インテグレーション画面のステータスタブから**編集**し、再度連携をお試しください。
解決しない場合はチャットにてお問い合わせください。
Google Driveの連携概要については[連携ページ](https://admina.moneyforward.com/jp/integrations/google-drive)をご覧ください。
## 共有の停止
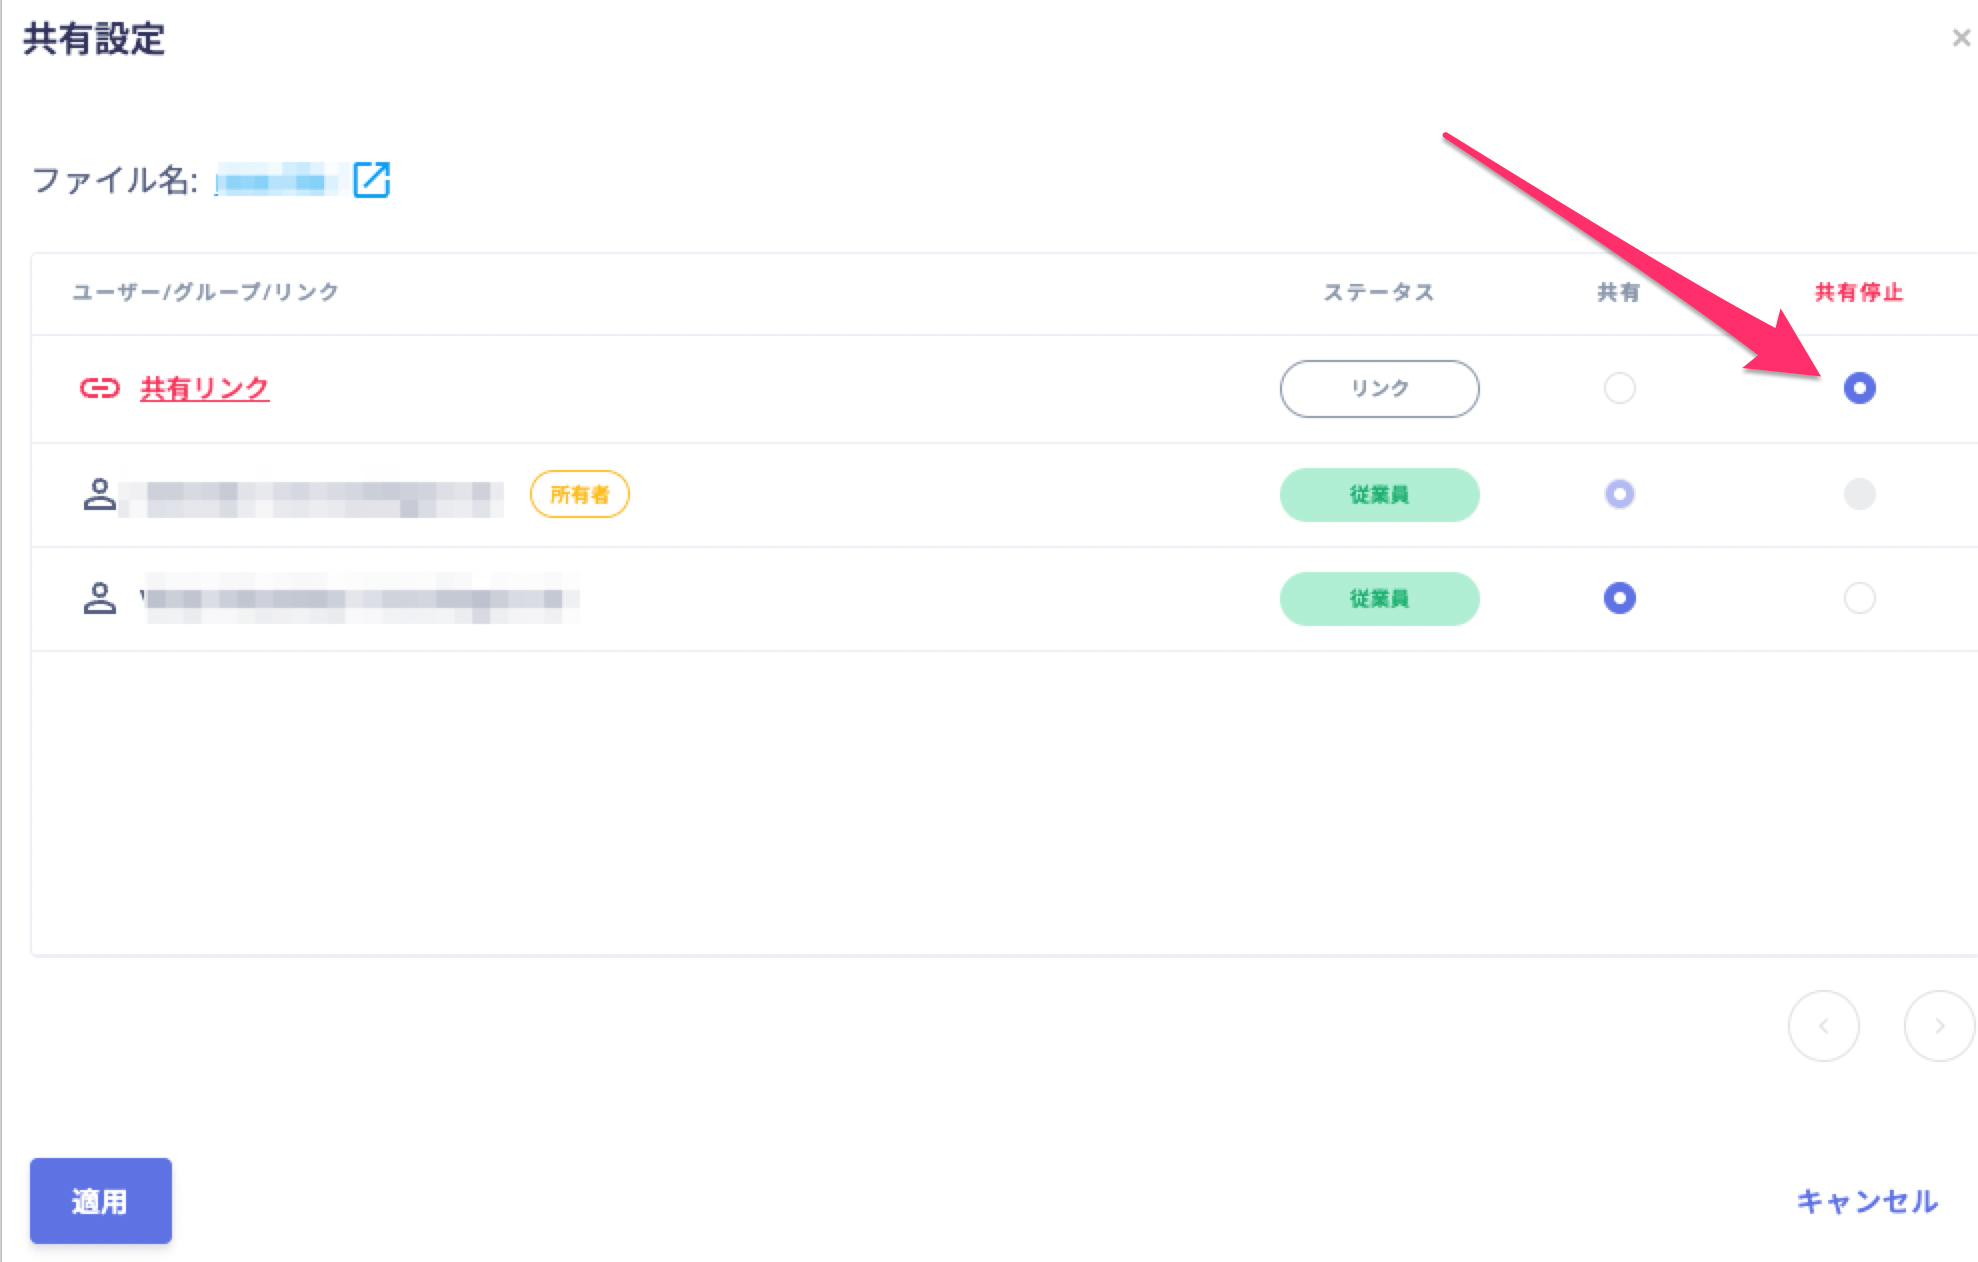
取得した共有ファイルのステータスを確認し、共有を停止できます。
右端の引き出しから、\[共有]ボタンをクリックします。
正常に完了しない場合は、インテグレーション画面のステータスタブから**編集**し、再度連携をお試しください。
解決しない場合はチャットにてお問い合わせください。
Google Driveの連携概要については[連携ページ](https://admina.moneyforward.com/jp/integrations/google-drive)をご覧ください。
## 共有の停止
取得した共有ファイルのステータスを確認し、共有を停止できます。
右端の引き出しから、\[共有]ボタンをクリックします。
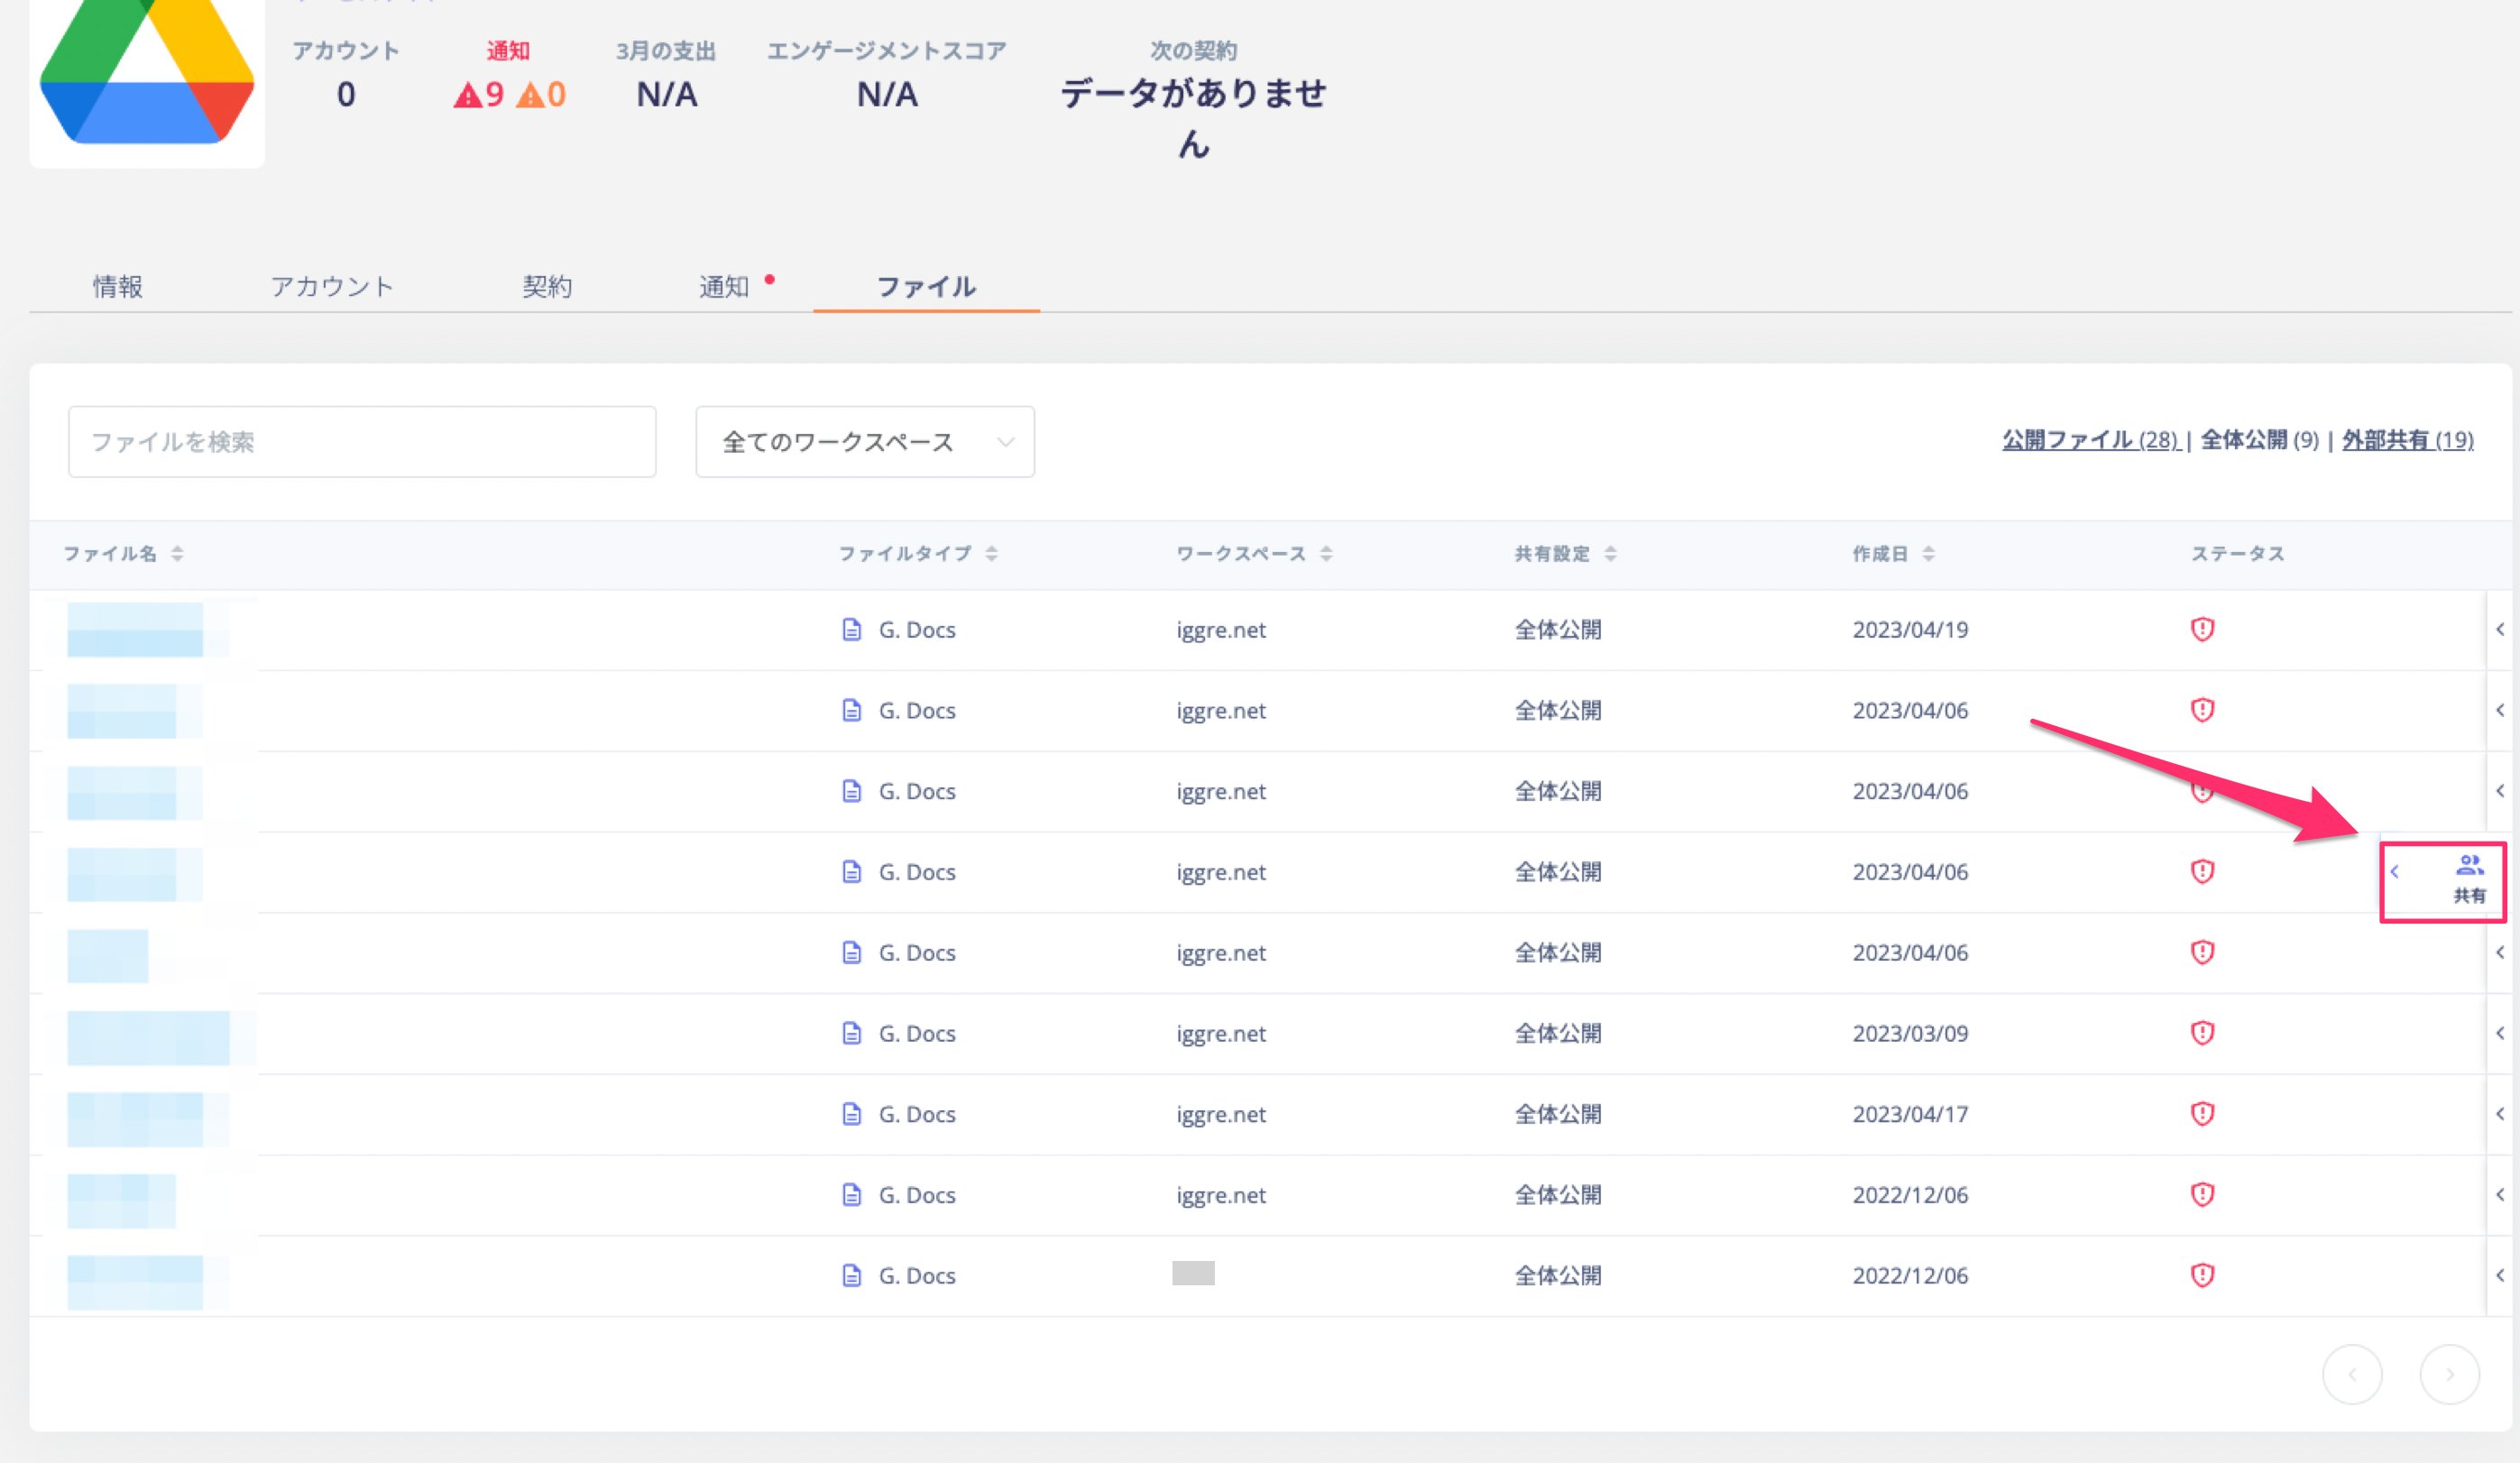 共有を停止したいユーザー・グループ・リンクを選択し、\[適用]をクリックします。
 ## FAQ
### Q. 各ファイルの公開ステータスについて教えてください。
A. 以下をご参照ください。
| ステータス | 説明 |
| -------- | --------------------------------------------------------------- |
| **外部公開** | Google Workspaceに登録されているドメイン以外のアドレスに共有されているファイルを「外部共有」と判定しています。 |
| **全体公開** | 「リンクを知っている全員」に公開されているファイルを「全体公開」として表示します。 |
## FAQ
### Q. 各ファイルの公開ステータスについて教えてください。
A. 以下をご参照ください。
| ステータス | 説明 |
| -------- | --------------------------------------------------------------- |
| **外部公開** | Google Workspaceに登録されているドメイン以外のアドレスに共有されているファイルを「外部共有」と判定しています。 |
| **全体公開** | 「リンクを知っている全員」に公開されているファイルを「全体公開」として表示します。 |