> ## Documentation Index
> Fetch the complete documentation index at: https://support.i.moneyforward.com/llms.txt
> Use this file to discover all available pages before exploring further.

# X-Point Cloud

> X-Point Cloud管理サイトでクライアントID生成、Adminaで簡単システム連携手順を解説

## サポートする機能

<Badge color="blue">アカウント作成</Badge> <Badge color="blue">アカウント削除</Badge>

## 事前準備

### クライアントIDの確認方法

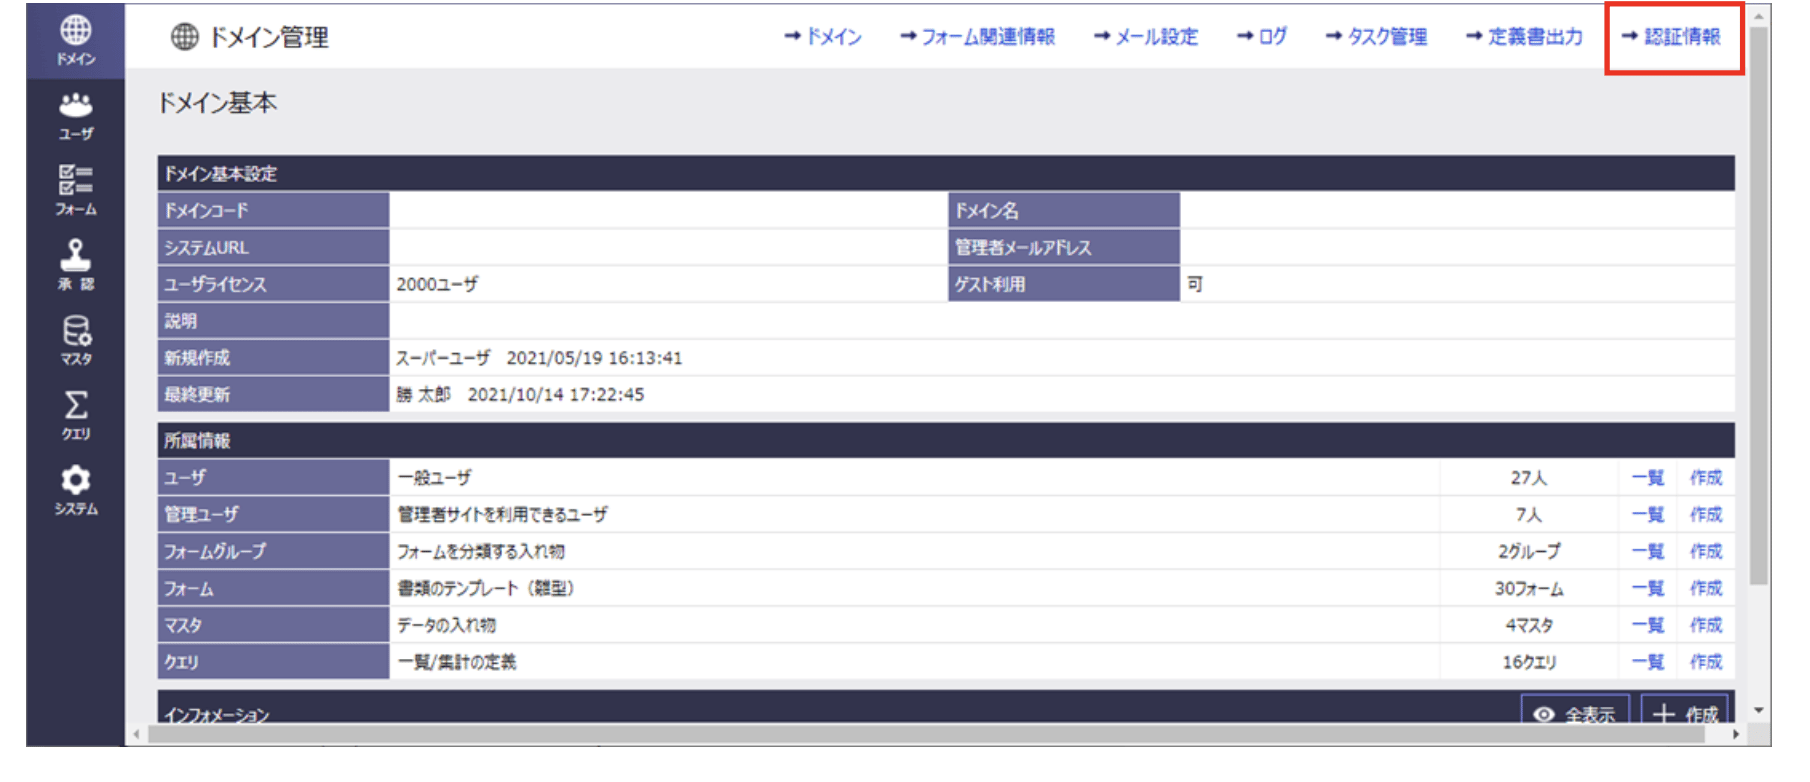
**X-Point Cloud 管理サイト**にアクセスし、**ドメイン管理**ページを開きます。

右上の**認証情報**をクリックします。
<img src="https://mintcdn.com/moneyforwardi/cYHdVshJUSVuJ5aA/images/integrations/m4sqkj2l08/screenshot-2025-03-11-at-16-24-04.png?fit=max&auto=format&n=cYHdVshJUSVuJ5aA&q=85&s=fe7aa9df438ef8320f3b2b650fbcaf8c" alt="X-Point Cloud認証情報ページへのアクセス" width="1810" height="782" data-path="images/integrations/m4sqkj2l08/screenshot-2025-03-11-at-16-24-04.png" />

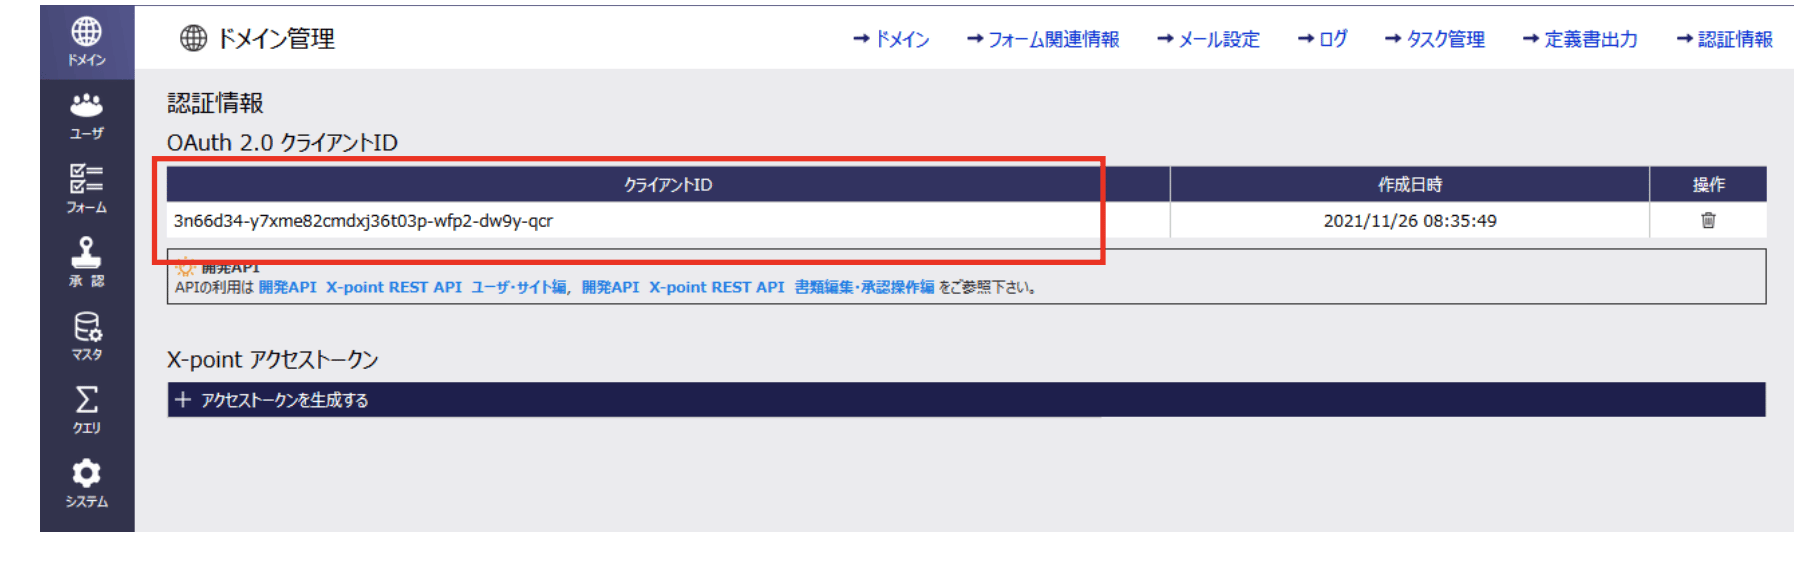
**認証情報**ページで **+クライアント ID を生成する** をクリックし、**クライアント ID** を生成します。
<img src="https://mintcdn.com/moneyforwardi/cYHdVshJUSVuJ5aA/images/integrations/m4sqkj2l08/screenshot-2025-03-11-at-16-24-16.png?fit=max&auto=format&n=cYHdVshJUSVuJ5aA&q=85&s=b863717fc36ddd3d695d73da7d6487dc" alt="クライアントIDの生成" width="1818" height="567" data-path="images/integrations/m4sqkj2l08/screenshot-2025-03-11-at-16-24-16.png" />

### ドメインの確認方法

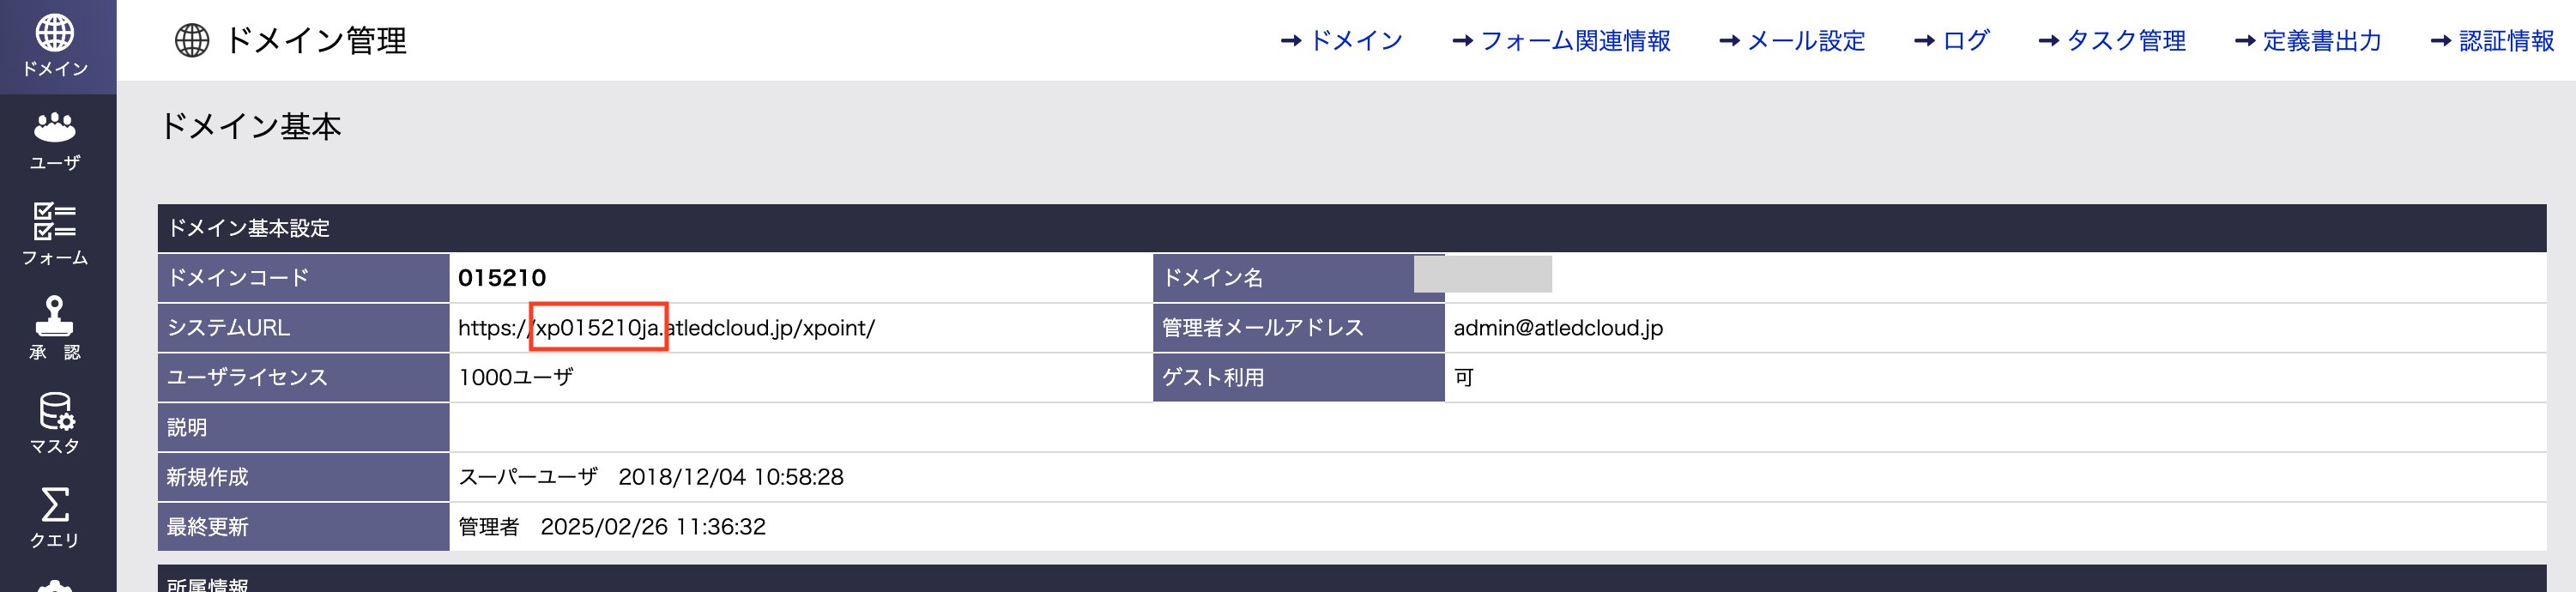
**ドメイン管理**＞**ドメイン基本設定**＞**システムURL** の **赤枠部分** が **ドメイン** となります。
<img src="https://mintcdn.com/moneyforwardi/cYHdVshJUSVuJ5aA/images/integrations/m4sqkj2l08/screenshot-2025-03-11-at-16-20-07.png?fit=max&auto=format&n=cYHdVshJUSVuJ5aA&q=85&s=4b183bf7bd87049bb8e65689076dfc67" alt="システムURLからドメインを確認" width="3002" height="690" data-path="images/integrations/m4sqkj2l08/screenshot-2025-03-11-at-16-20-07.png" />

### ドメインコードの確認方法

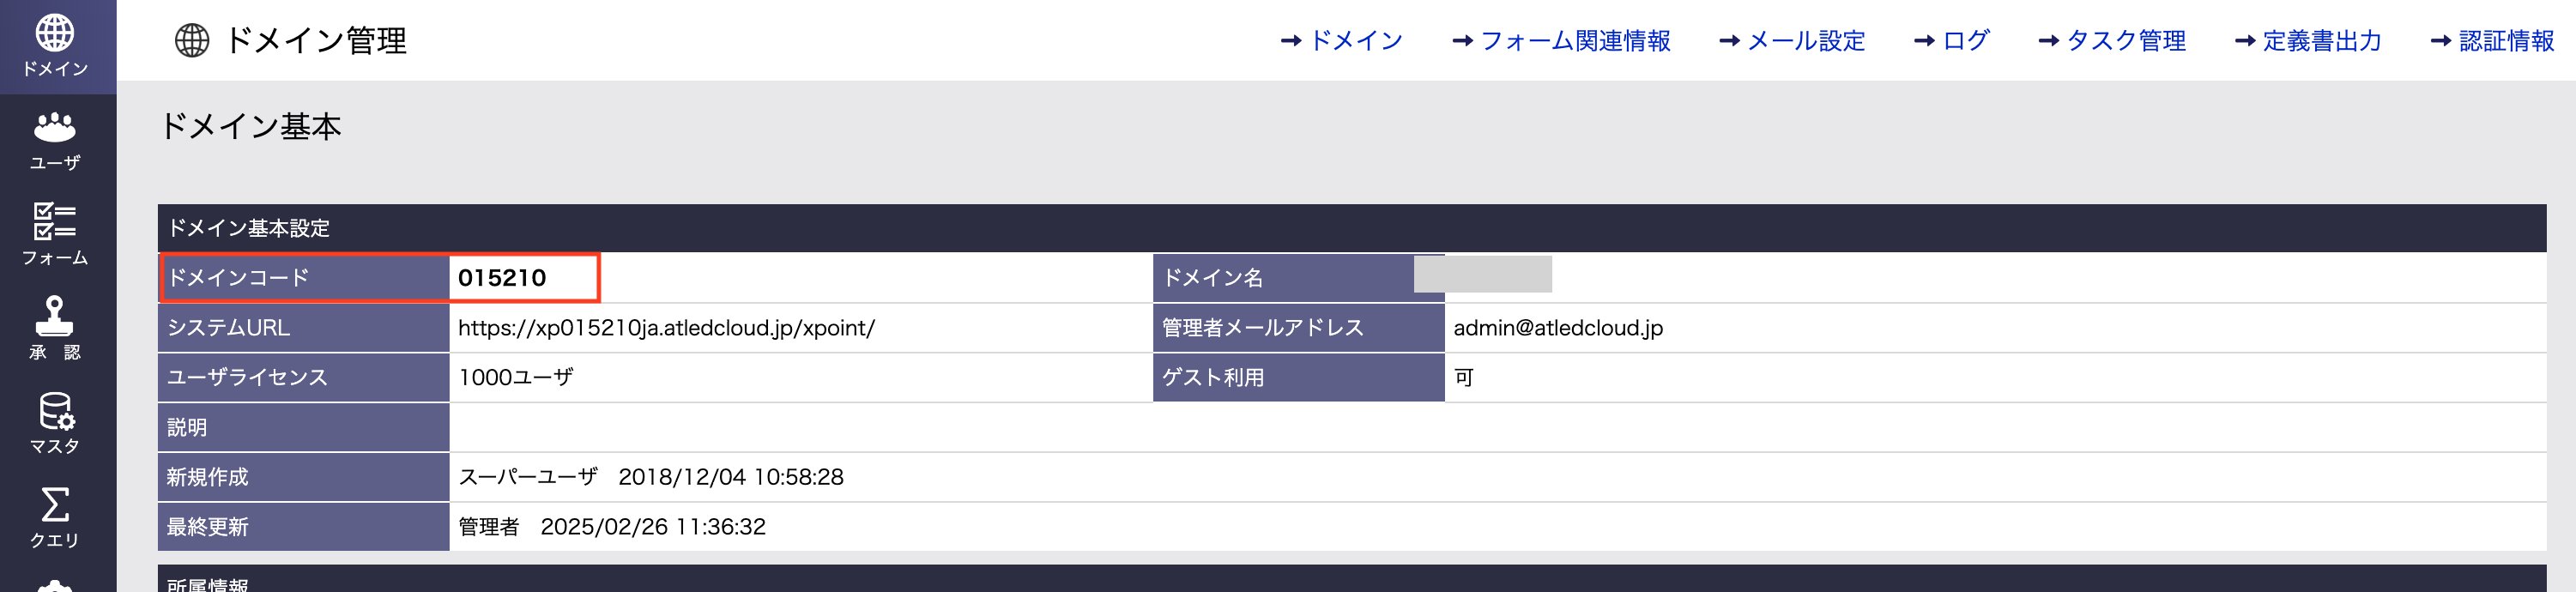
**ドメイン管理**＞**ドメイン基本設定**＞**ドメインコード**に記載されております。

<img src="https://mintcdn.com/moneyforwardi/cYHdVshJUSVuJ5aA/images/integrations/m4sqkj2l08/screenshot-2025-03-11-at-16-20-06.png?fit=max&auto=format&n=cYHdVshJUSVuJ5aA&q=85&s=e7a49d56a38349e171b36549bf712517" alt="ドメインコードの確認" width="3002" height="690" data-path="images/integrations/m4sqkj2l08/screenshot-2025-03-11-at-16-20-06.png" />

## インテグレーションのセットアップ

インテグレーション画面にて、**X-Point Cloud**で検索します。

**ワークスペース名**、前の手順で確認した**クライアントID**、**ドメイン**、**ドメインコード**を入力し、**連携する**をクリックします。
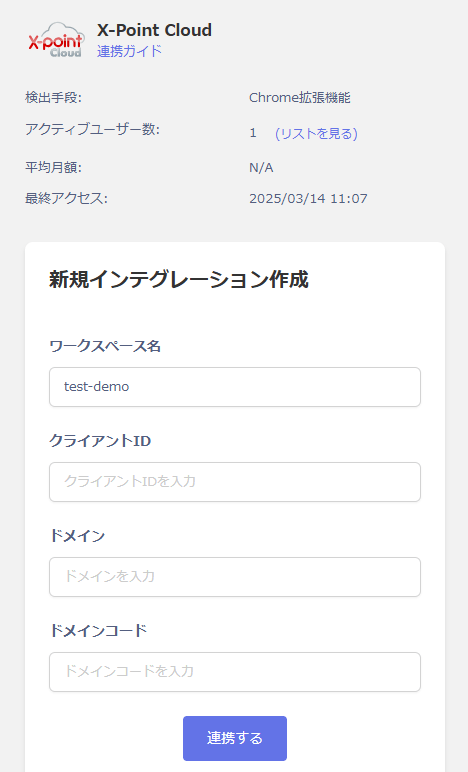
<img src="https://mintcdn.com/moneyforwardi/cYHdVshJUSVuJ5aA/images/integrations/m4sqkj2l08/2025-04-18-145412.png?fit=max&auto=format&n=cYHdVshJUSVuJ5aA&q=85&s=d870e7135948fa903d1f22a57d5d8b86" alt="X-Point Cloud連携設定画面" width="468" height="772" data-path="images/integrations/m4sqkj2l08/2025-04-18-145412.png" />

連携に成功すると、アカウント一覧に登録済みのユーザー情報が表示されます。

正常に完了しない場合は、インテグレーション画面のステータスタブから**編集**し、再度連携をお試しください。

<Info>
  解決しない場合はチャットにてお問い合わせください。
</Info>