> ## Documentation Index
> Fetch the complete documentation index at: https://support.i.moneyforward.com/llms.txt
> Use this file to discover all available pages before exploring further.
# GitHub
> Githubとの連携の手順です。
## サポートする機能
アカウント削除 アカウント作成
## 事前準備
### 組織の作成
Githubとの連携には組織の作成が必要です。Githubの[管理画面](https://github.com/settings/organizations)にアクセスし、組織が作成されているかご確認ください。
組織がない場合、新たに組織を作成してください。組織がない状態で連携するとエラー(`errors.ids.oauth_no_workspace`)になります。
組織を作成済でエラーになる場合、以下の「複数の組織を連携する場合」をご覧ください。
## インテグレーションのセットアップ
「新規インテグレーション作成」は以下の方法があります。
* **General(Enterprise以外のPlan・OAuth)**
* **General(Enterprise以外のPlan・App)**
* **Enterprise Plan**
### General(Enterprise以外のPlan・OAuth)
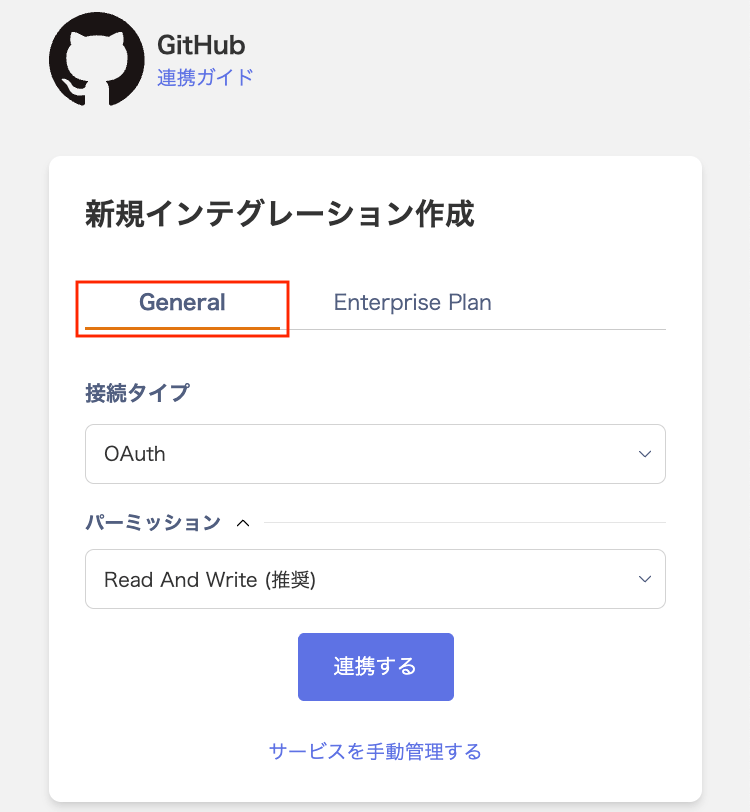
1. インテグレーション > インテグレーションで「**Github**」と検索し、「**General**」タブを選択します。
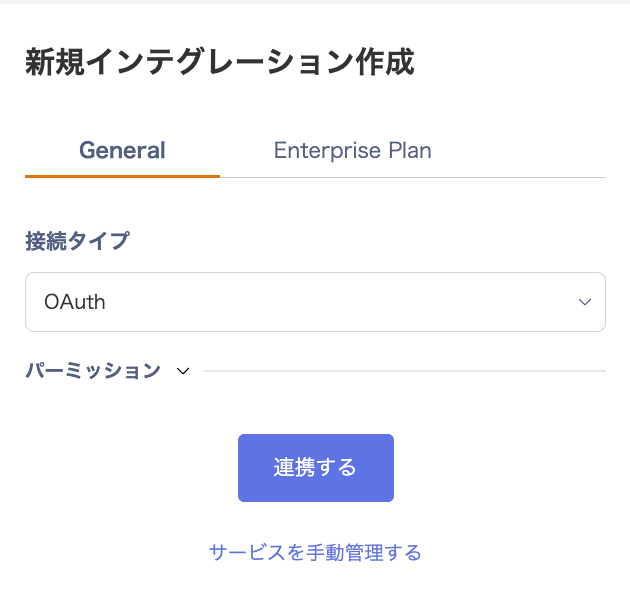
 2. 接続タイプ「OAuth」をプルダウンから選択します。
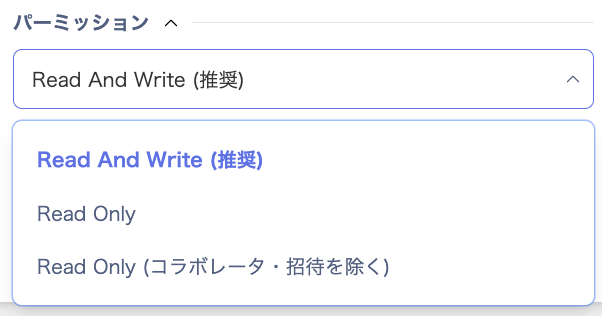
 3. パーミッション「Read And Write(推奨)/Read Only/ Read Only(コラボレーター・招待を除く)」を選択し、[**連携する**]をクリックします。
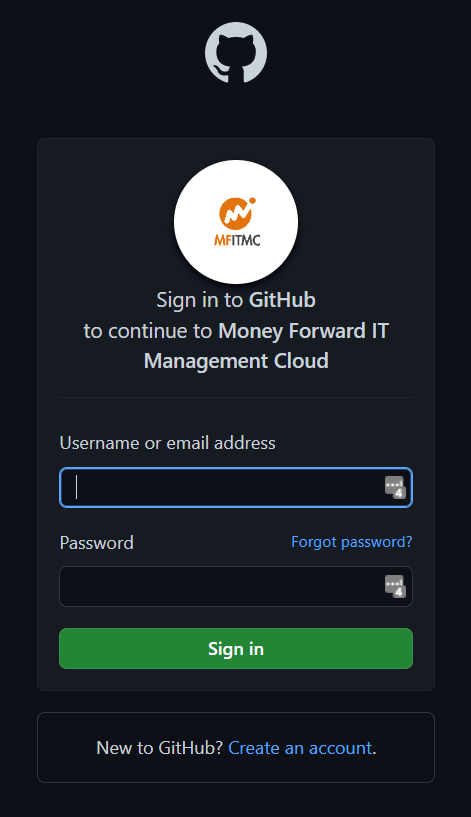
 4. GitHubのログインページに移動します。GitHubユーザー名またはメールアドレス・パスワードを入力しログインします。
 5. GitHubにログイン後、次のように権限の付与を許可する確認画面が表示されます。
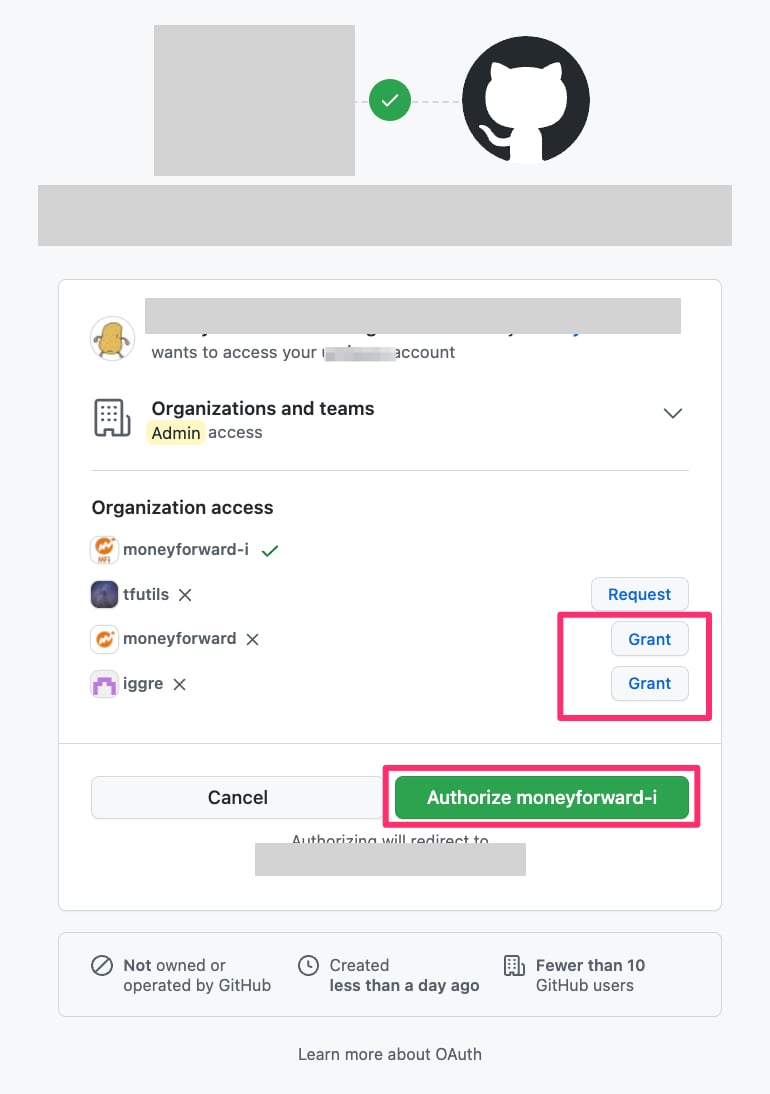 6. 付与する権限の内容を確認し、組織に対して\[**Grant**]をクリック後、\[**Authorize**]を**クリック**してください。
7. GitHubとの連携に成功すると、アカウント一覧に登録済みのユーザー情報が表示されます。
正常に完了しない場合は、インテグレーション画面のステータスタブから**編集**し、再度連携をお試しください。
解決しない場合はチャットにてお問い合わせください。GitHubの連携概要については[連携ページ](https://admina.moneyforward.com/jp/integrations/github)をご覧ください。
複数の組織をご利用でGrantを押し忘れてAuthorizeした場合、以下の「複数の組織を連携する場合」をご覧ください
### General(Enterprise以外のPlan・App)
1. 接続タイプ「App」を選択する場合、事前に[アプリ](https://github.com/apps/admina-organization-manager)をインストールしてください。
[アプリ](https://github.com/apps/admina-organization-manager)インストールの際、組織名を選択します。連携時に組織名=ワークスペースキーが必要です。
※「App」を選択した場合、連携したユーザーが組織を離れても再連携が不要です。
2. インテグレーション > インテグレーションで「**Github**」と検索し、「**General**」タブを選択します。
3. 接続タイプ「App」をプルダウンから選択し、ワークスペースキーに「組織名」を入力して[適用する]をクリックします。
6. 付与する権限の内容を確認し、組織に対して\[**Grant**]をクリック後、\[**Authorize**]を**クリック**してください。
7. GitHubとの連携に成功すると、アカウント一覧に登録済みのユーザー情報が表示されます。
正常に完了しない場合は、インテグレーション画面のステータスタブから**編集**し、再度連携をお試しください。
解決しない場合はチャットにてお問い合わせください。GitHubの連携概要については[連携ページ](https://admina.moneyforward.com/jp/integrations/github)をご覧ください。
複数の組織をご利用でGrantを押し忘れてAuthorizeした場合、以下の「複数の組織を連携する場合」をご覧ください
### General(Enterprise以外のPlan・App)
1. 接続タイプ「App」を選択する場合、事前に[アプリ](https://github.com/apps/admina-organization-manager)をインストールしてください。
[アプリ](https://github.com/apps/admina-organization-manager)インストールの際、組織名を選択します。連携時に組織名=ワークスペースキーが必要です。
※「App」を選択した場合、連携したユーザーが組織を離れても再連携が不要です。
2. インテグレーション > インテグレーションで「**Github**」と検索し、「**General**」タブを選択します。
3. 接続タイプ「App」をプルダウンから選択し、ワークスペースキーに「組織名」を入力して[適用する]をクリックします。
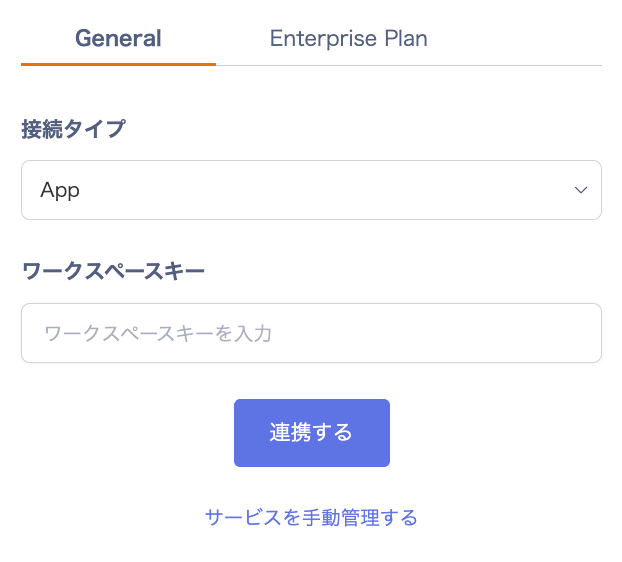 4. 組織を選択します。GitHubとの連携に成功すると、アカウント一覧に登録済みのユーザー情報が表示されます。
正常に完了しない場合は、インテグレーション画面のステータスタブから**編集**し、再度連携をお試しください。
解決しない場合はチャットにてお問い合わせください。GitHubの連携概要については[連携ページ](https://admina.moneyforward.com/jp/integrations/github)をご覧ください。
### Github Enterprise(セルフホステッド)との連携
Github Enterpriseをご利用の場合、連携方法が異なります。次の手順で連携してください。
Githubをセルフホステッドでご利用の場合の連携手順です。github.comのURLでご利用の場合、「General」タブから連携してください。
#### OAuth アプリの作成
1. [Githubページの手順](https://docs.github.com/ja/enterprise-server@3.3/developers/apps/building-oauth-apps/creating-an-oauth-app)でOAuthアプリを作成します。以下、入力するパラメータを補足します。
4. 組織を選択します。GitHubとの連携に成功すると、アカウント一覧に登録済みのユーザー情報が表示されます。
正常に完了しない場合は、インテグレーション画面のステータスタブから**編集**し、再度連携をお試しください。
解決しない場合はチャットにてお問い合わせください。GitHubの連携概要については[連携ページ](https://admina.moneyforward.com/jp/integrations/github)をご覧ください。
### Github Enterprise(セルフホステッド)との連携
Github Enterpriseをご利用の場合、連携方法が異なります。次の手順で連携してください。
Githubをセルフホステッドでご利用の場合の連携手順です。github.comのURLでご利用の場合、「General」タブから連携してください。
#### OAuth アプリの作成
1. [Githubページの手順](https://docs.github.com/ja/enterprise-server@3.3/developers/apps/building-oauth-apps/creating-an-oauth-app)でOAuthアプリを作成します。以下、入力するパラメータを補足します。
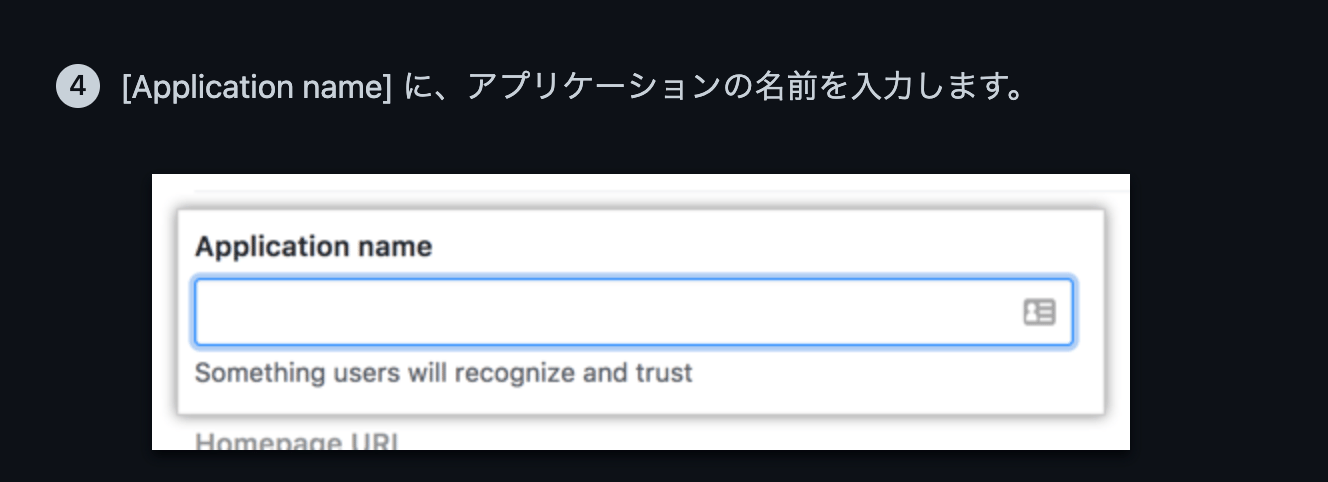 2. \[Application name] **`Admina by Moneyfoward`** と入力してください。
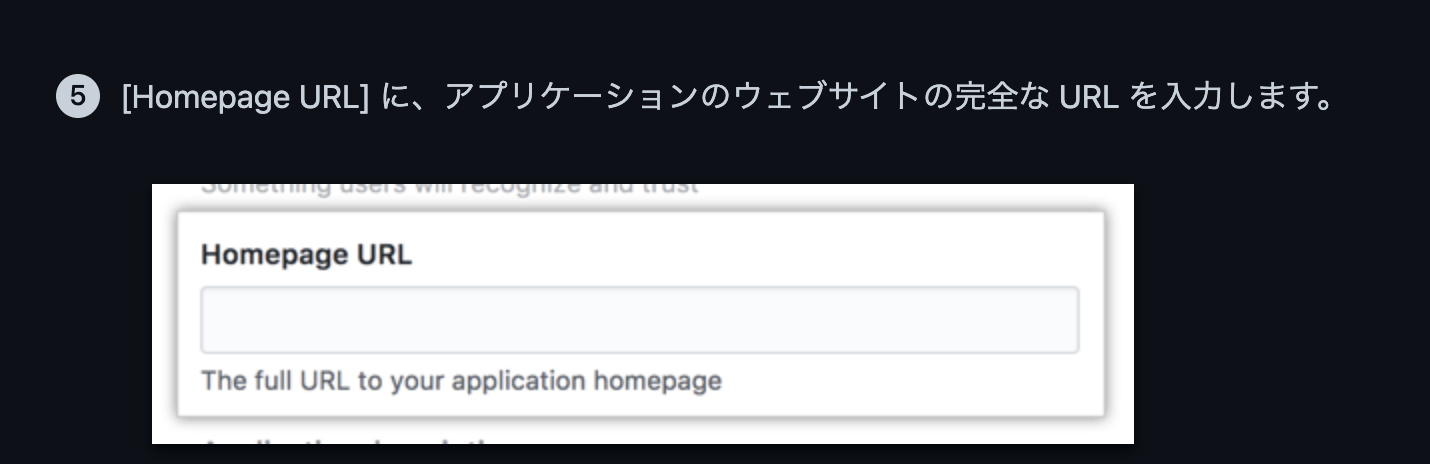 3. \[HomepageURLに] `**https://itmc.i.moneyforward.com/**` と入力してください。
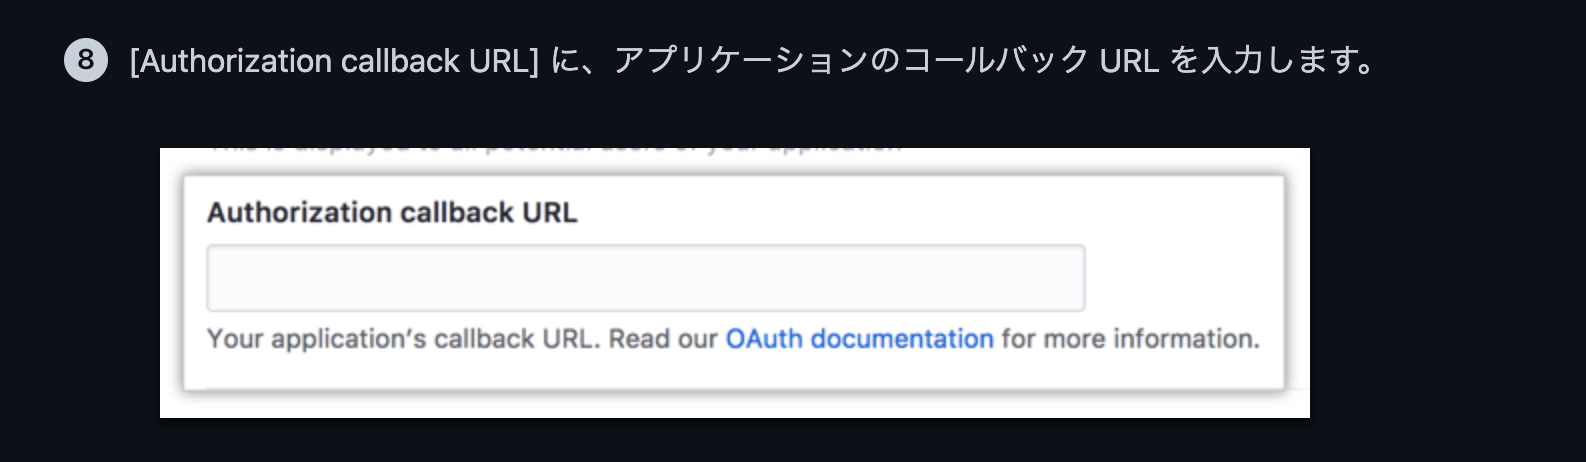 4. \[Authorization callback URL] `**https://itmc.i.moneyforward.com/oauth/callback**` と入力してください。
#### Base URIの確認
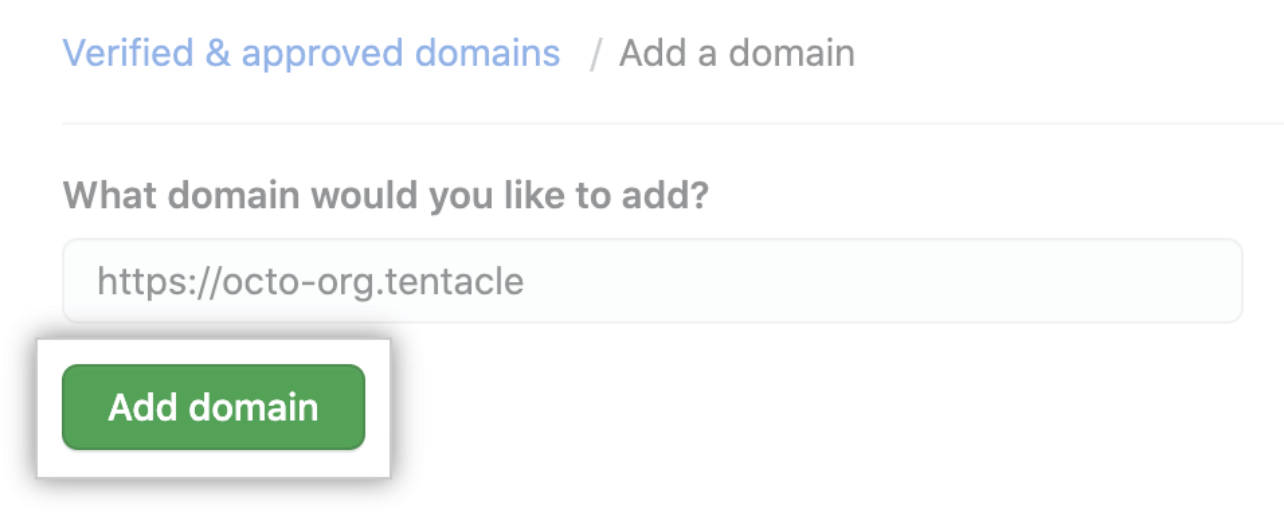
[Github Enterpriseで利用するドメインの検証・承認](https://docs.github.com/ja/enterprise-cloud@latest/organizations/managing-organization-settings/verifying-or-approving-a-domain-for-your-organization)時に追加したドメインを確認します。(「https\://」を含みます)
コピーして保存しておきます。
4. \[Authorization callback URL] `**https://itmc.i.moneyforward.com/oauth/callback**` と入力してください。
#### Base URIの確認
[Github Enterpriseで利用するドメインの検証・承認](https://docs.github.com/ja/enterprise-cloud@latest/organizations/managing-organization-settings/verifying-or-approving-a-domain-for-your-organization)時に追加したドメインを確認します。(「https\://」を含みます)
コピーして保存しておきます。
 #### クライアントIDとクライアントシークレットの確認
1. OAuthアプリの作成後、**Client ID**が表示されます。**Client IDがクライアントID**となるので保存します。
#### クライアントIDとクライアントシークレットの確認
1. OAuthアプリの作成後、**Client ID**が表示されます。**Client IDがクライアントID**となるので保存します。
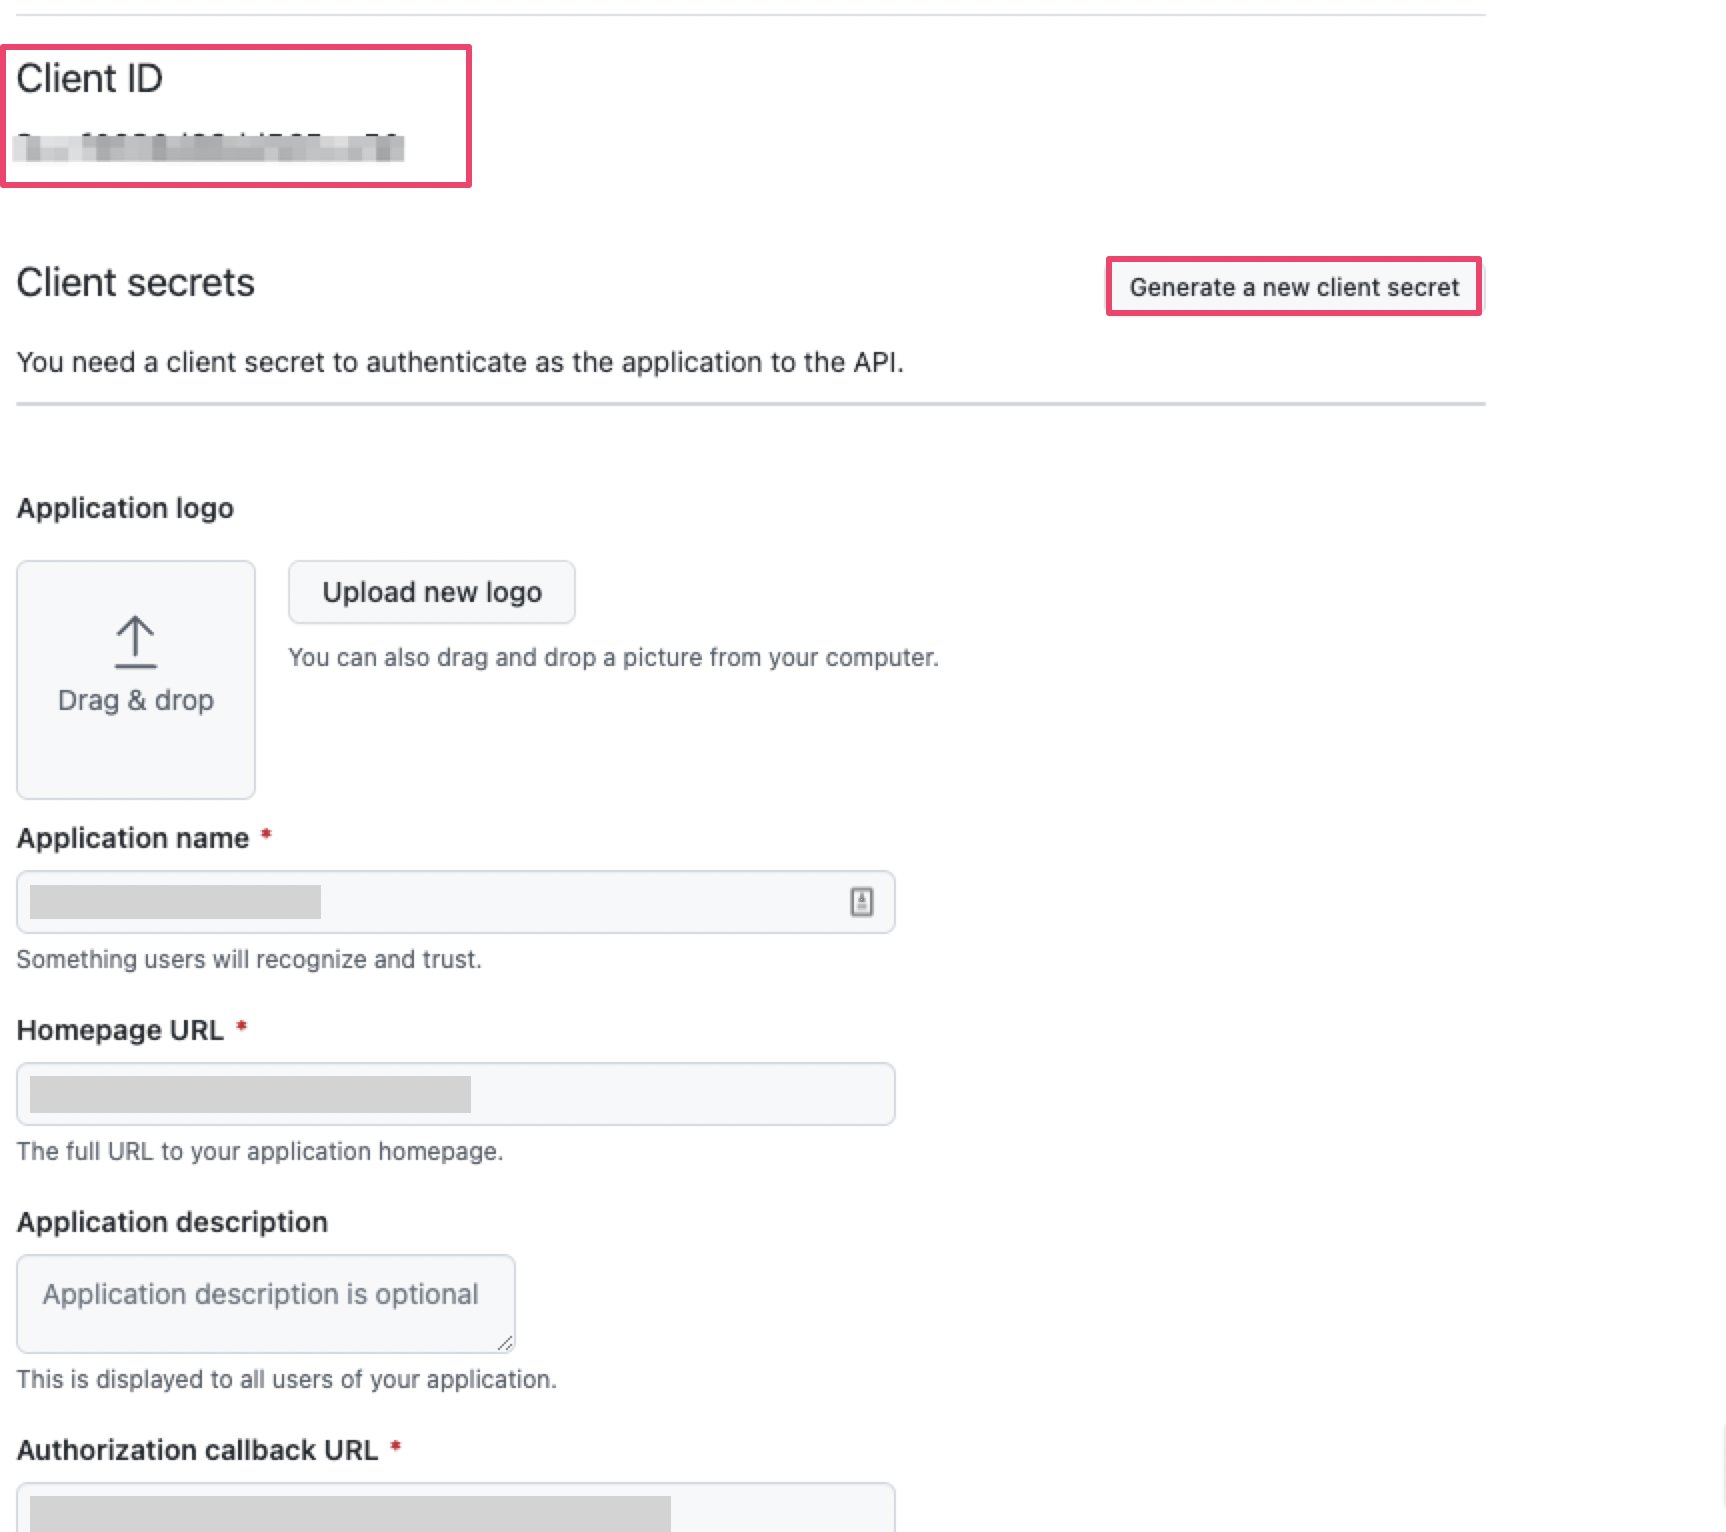 2. **\[Generate a new client secret]** ボタンをクリックします。
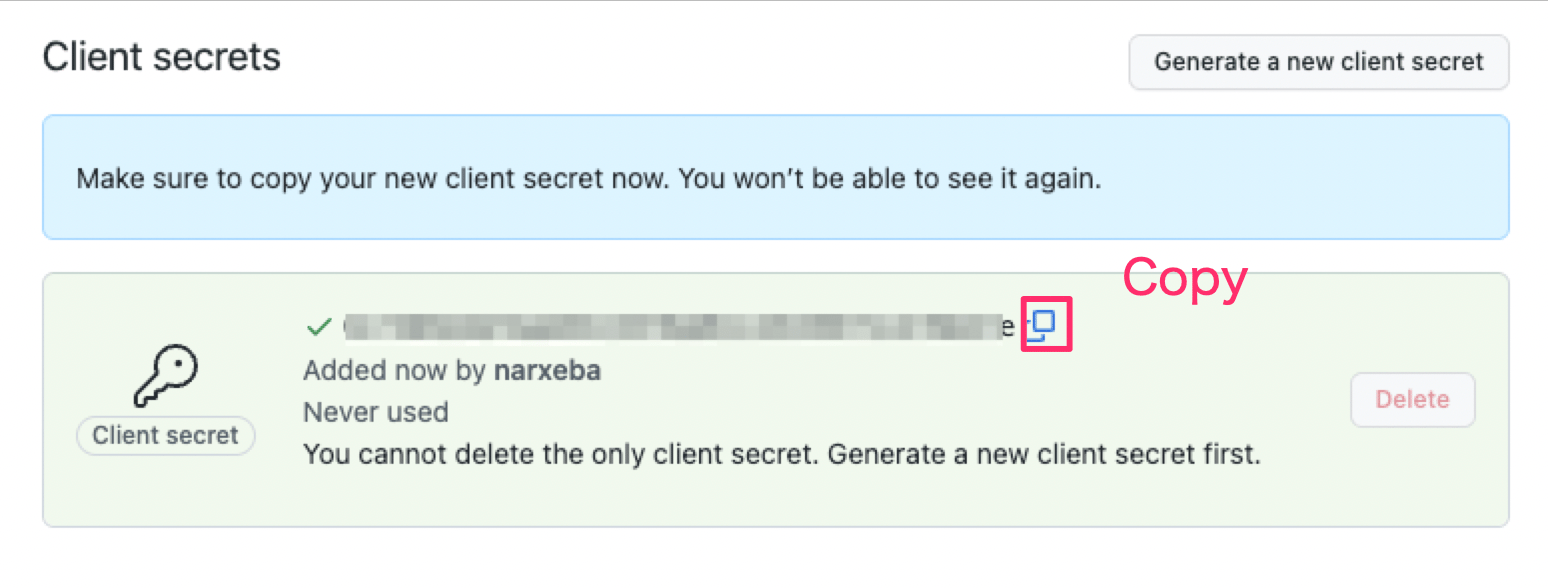
3. **Client secret**が表示されます。**Client secretがクライアントシークレット**となるので保存します。
2. **\[Generate a new client secret]** ボタンをクリックします。
3. **Client secret**が表示されます。**Client secretがクライアントシークレット**となるので保存します。
 #### インテグレーションのセットアップ
1. インテグレーション > インテグレーションで「**Github**」と検索し、「**Enterprise Plan**」タブを選択します。
#### インテグレーションのセットアップ
1. インテグレーション > インテグレーションで「**Github**」と検索し、「**Enterprise Plan**」タブを選択します。
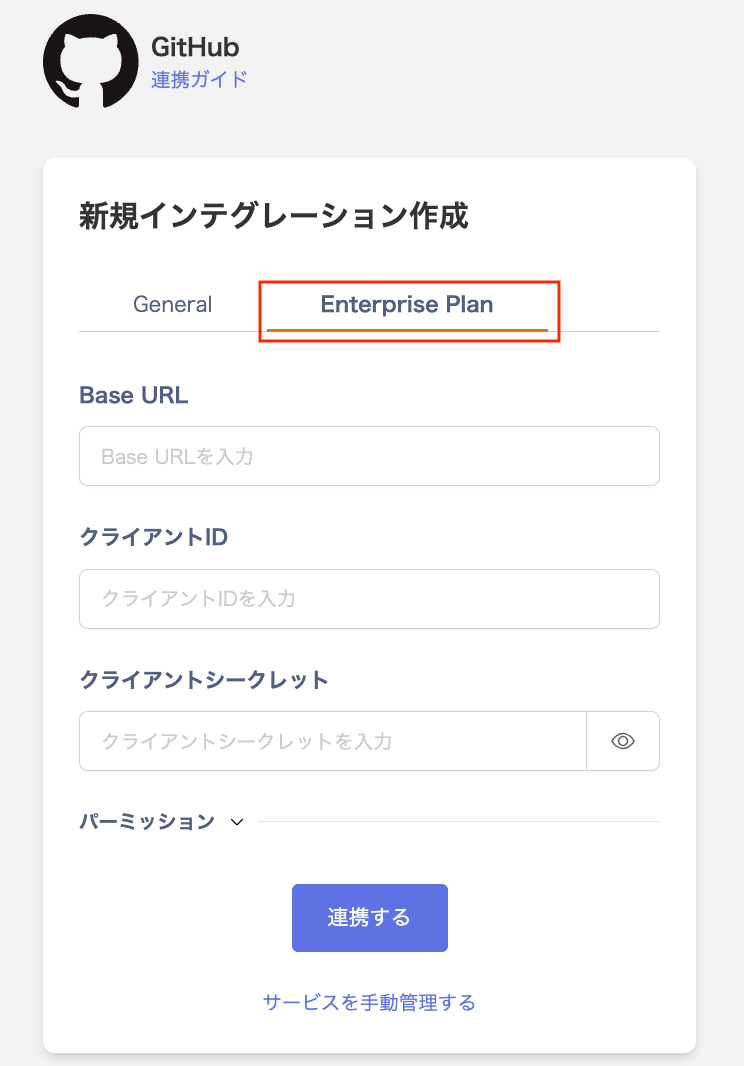 2. 前の手順で確認した**Base URI、クライアントID、クライアントシークレット**を入力します。
3. パーミッション「Read And Write(推奨)/Read Only/ Read Only(コラボレーター・招待を除く)」を選択し、[**連携する**]をクリックします。
4. GitHubとの連携に成功すると、アカウント一覧に登録済みのユーザー情報が表示されます。
正常に完了しない場合は、インテグレーション画面のステータスタブから**編集**し、再度連携をお試しください。
解決しない場合はチャットにてお問い合わせください。GitHubの連携概要については[連携ページ](https://admina.moneyforward.com/jp/integrations/github)をご覧ください。
## メールアドレスが取得出来ない場合のSaaSの手動紐づけ
本サービスはメールアドレスが取得できないSaaSのため、ユーザータイプが「不明」と判定されます。
ユーザータイプが「不明」と判定された場合は、他のアカウントと手動で紐づけ(名寄・マージ)を行ってください。
設定は[SaaSアカウントを他のアカウントに手動で紐付け(名寄せ/マージ)する](/it-management/saas-management/d97dy5z2l7-merge) をご参照ください。
## 複数の組織を連携する場合
以下のようなケースの場合、Github側で操作が必要になります。
* Github連携後、追加で新しい組織を連携させたい場合
* 新規連携時にGrantを押し忘れてAuthorizeしてしまった場合(組織が選択できない場合)
### Github側での操作
以下の操作を実施し、追加した組織、あるいはGrantし忘れた組織に対して、Grantを実行します。
1. [https://github.com/settings/applications](https://github.com/settings/applications) にアクセスします。
2. **Admina by Money Forward** アプリをクリックします。
2. 前の手順で確認した**Base URI、クライアントID、クライアントシークレット**を入力します。
3. パーミッション「Read And Write(推奨)/Read Only/ Read Only(コラボレーター・招待を除く)」を選択し、[**連携する**]をクリックします。
4. GitHubとの連携に成功すると、アカウント一覧に登録済みのユーザー情報が表示されます。
正常に完了しない場合は、インテグレーション画面のステータスタブから**編集**し、再度連携をお試しください。
解決しない場合はチャットにてお問い合わせください。GitHubの連携概要については[連携ページ](https://admina.moneyforward.com/jp/integrations/github)をご覧ください。
## メールアドレスが取得出来ない場合のSaaSの手動紐づけ
本サービスはメールアドレスが取得できないSaaSのため、ユーザータイプが「不明」と判定されます。
ユーザータイプが「不明」と判定された場合は、他のアカウントと手動で紐づけ(名寄・マージ)を行ってください。
設定は[SaaSアカウントを他のアカウントに手動で紐付け(名寄せ/マージ)する](/it-management/saas-management/d97dy5z2l7-merge) をご参照ください。
## 複数の組織を連携する場合
以下のようなケースの場合、Github側で操作が必要になります。
* Github連携後、追加で新しい組織を連携させたい場合
* 新規連携時にGrantを押し忘れてAuthorizeしてしまった場合(組織が選択できない場合)
### Github側での操作
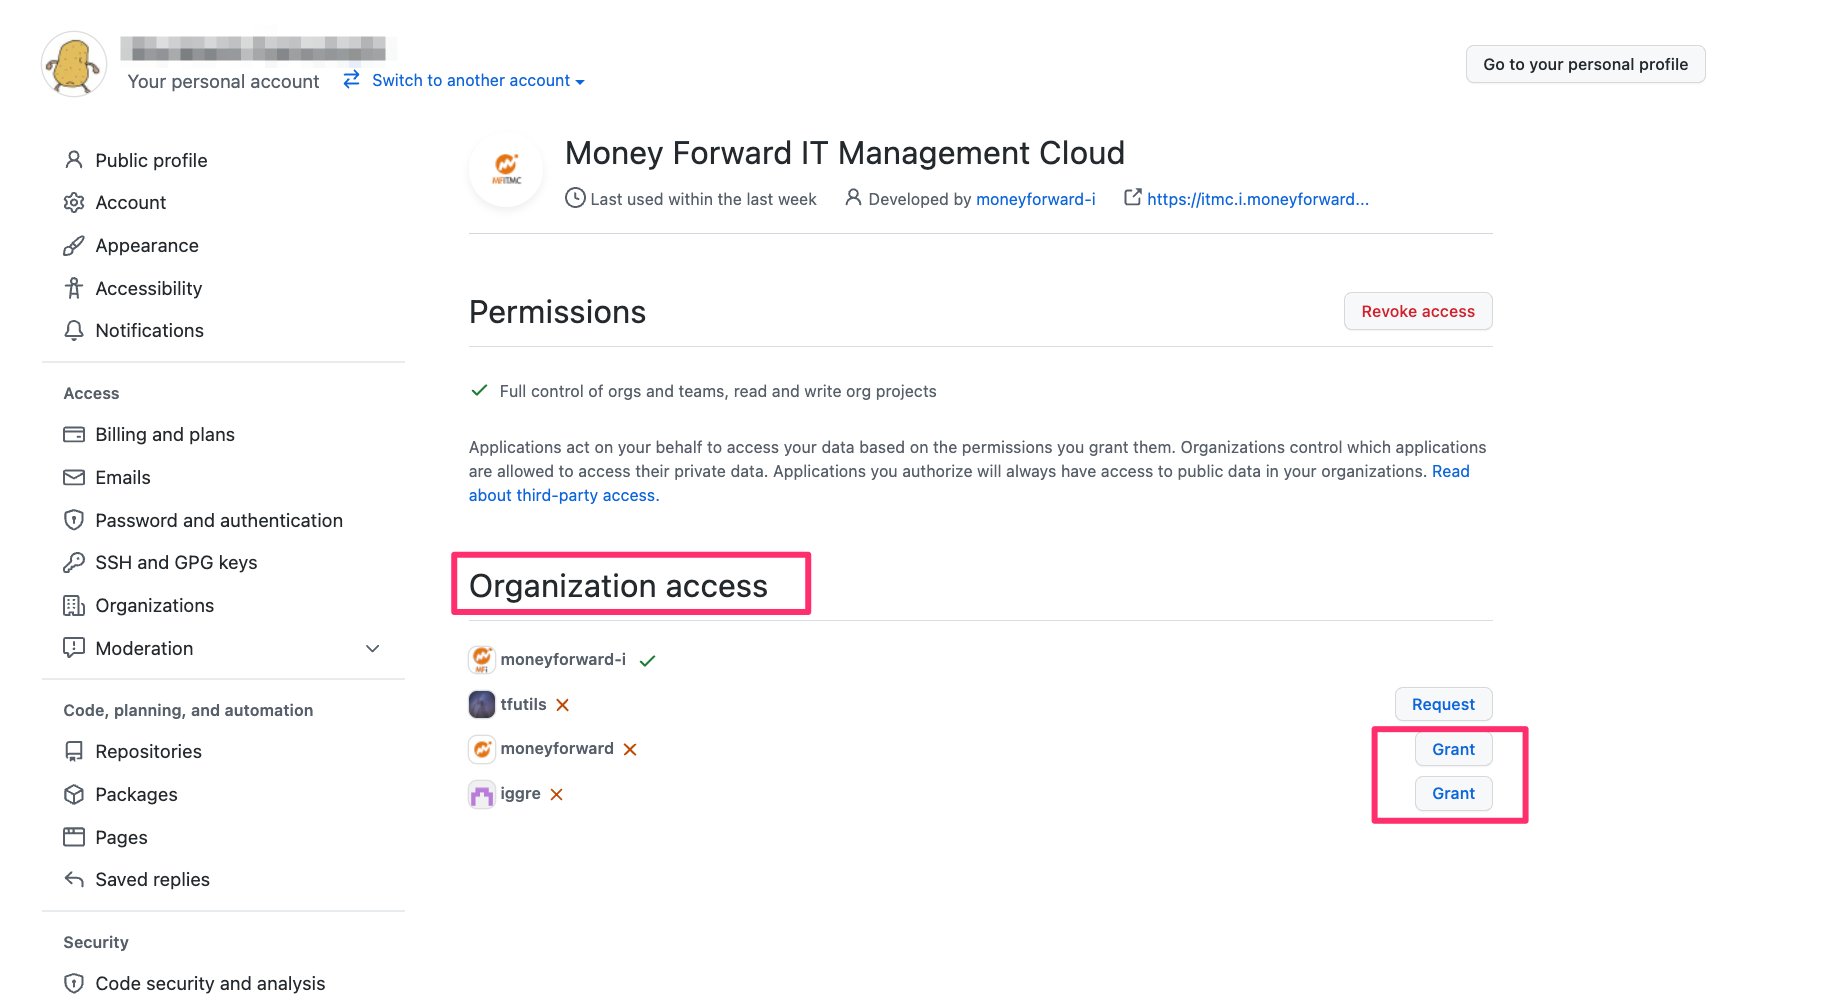
以下の操作を実施し、追加した組織、あるいはGrantし忘れた組織に対して、Grantを実行します。
1. [https://github.com/settings/applications](https://github.com/settings/applications) にアクセスします。
2. **Admina by Money Forward** アプリをクリックします。
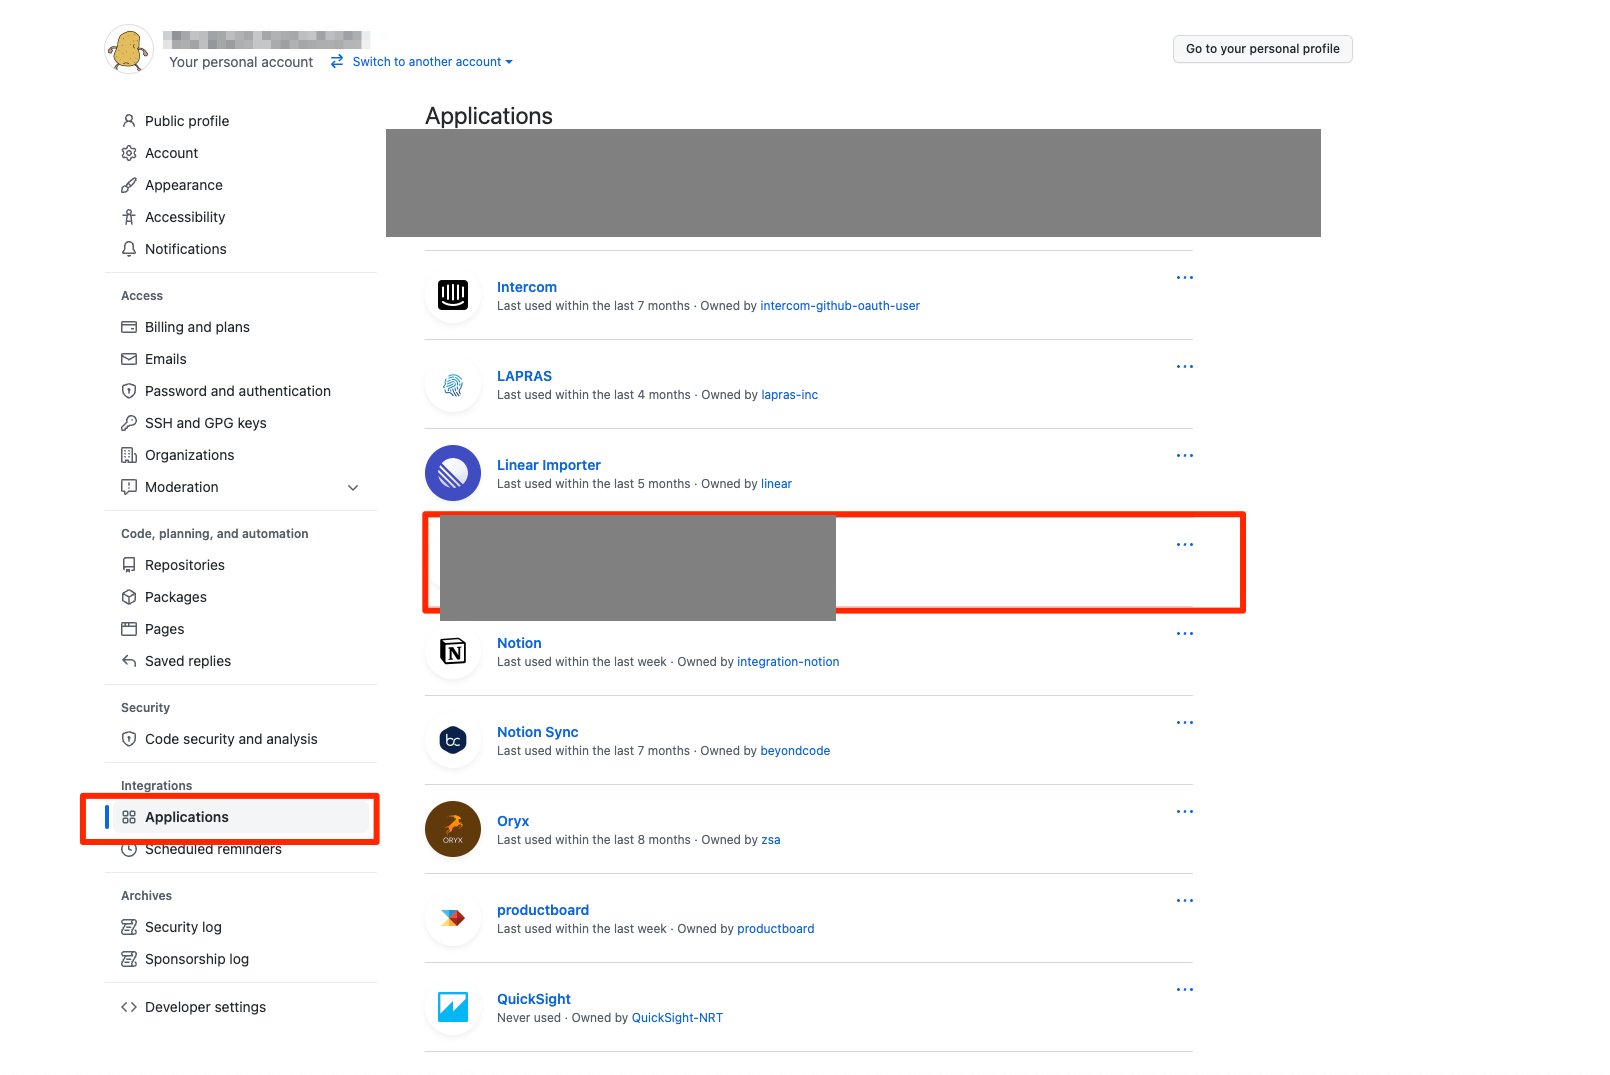 3. Organization accessの下の**Grant**ボタンを押します 。
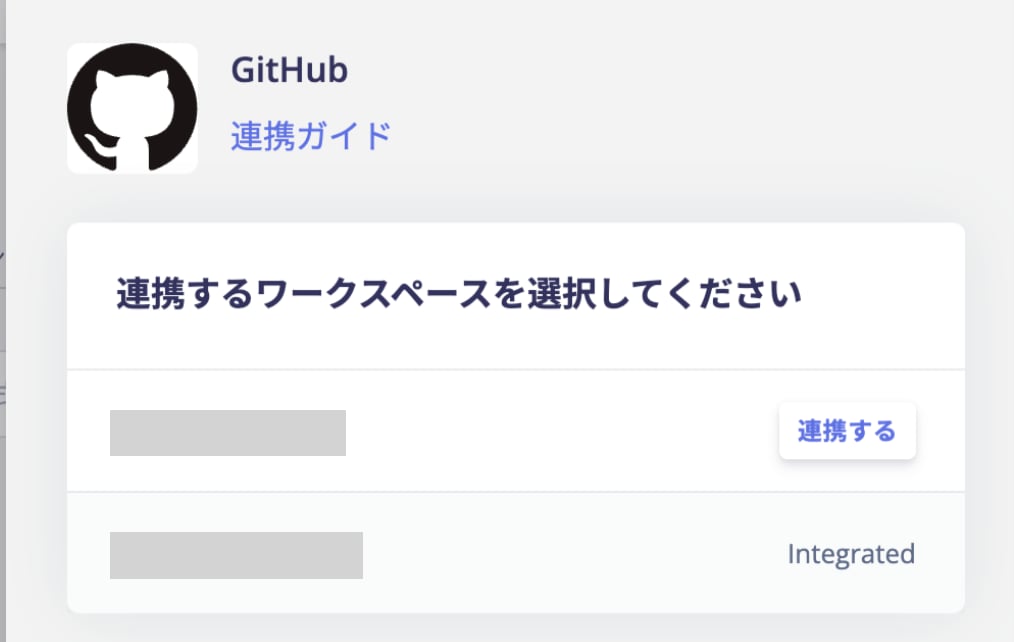
 4. マネーフォワードAdminaで再度連携をします。次の画像のとおり、Grantを実施した組織が選択できるようになります。
 ## 11個以上の組織を連携する場合
GithubのOAuthトークンは、**ユーザ/アプリケーション/スコープの組み合わせごと**に、発行できるトークン数には`**10**`**という上限**があります。 アプリケーションで同じユーザーと同じスコープに対して 10 個を超えるトークンが作成された場合、同じユーザー/アプリケーション/スコープの組み合わせを持つ最も古いトークンが取り消されます。
[同じスコープを持つ OAuth appのトークン数が多すぎるために取り消されるトークン](https://docs.github.com/ja/authentication/keeping-your-account-and-data-secure/token-expiration-and-revocation#%E5%90%8C%E3%81%98%E3%82%B9%E3%82%B3%E3%83%BC%E3%83%97%E3%82%92%E6%8C%81%E3%81%A4-oauth-app%E3%81%AE%E3%83%88%E3%83%BC%E3%82%AF%E3%83%B3%E6%95%B0%E3%81%8C%E5%A4%9A%E3%81%99%E3%81%8E%E3%82%8B%E3%81%9F%E3%82%81%E3%81%AB%E5%8F%96%E3%82%8A%E6%B6%88%E3%81%95%E3%82%8C%E3%82%8B%E3%83%88%E3%83%BC%E3%82%AF%E3%83%B3)
11個以上の組織(ワークスペース)を連携する場合、連携するアカウントを変更してインテグレーションを実行してください。
## 11個以上の組織を連携する場合
GithubのOAuthトークンは、**ユーザ/アプリケーション/スコープの組み合わせごと**に、発行できるトークン数には`**10**`**という上限**があります。 アプリケーションで同じユーザーと同じスコープに対して 10 個を超えるトークンが作成された場合、同じユーザー/アプリケーション/スコープの組み合わせを持つ最も古いトークンが取り消されます。
[同じスコープを持つ OAuth appのトークン数が多すぎるために取り消されるトークン](https://docs.github.com/ja/authentication/keeping-your-account-and-data-secure/token-expiration-and-revocation#%E5%90%8C%E3%81%98%E3%82%B9%E3%82%B3%E3%83%BC%E3%83%97%E3%82%92%E6%8C%81%E3%81%A4-oauth-app%E3%81%AE%E3%83%88%E3%83%BC%E3%82%AF%E3%83%B3%E6%95%B0%E3%81%8C%E5%A4%9A%E3%81%99%E3%81%8E%E3%82%8B%E3%81%9F%E3%82%81%E3%81%AB%E5%8F%96%E3%82%8A%E6%B6%88%E3%81%95%E3%82%8C%E3%82%8B%E3%83%88%E3%83%BC%E3%82%AF%E3%83%B3)
11個以上の組織(ワークスペース)を連携する場合、連携するアカウントを変更してインテグレーションを実行してください。