> ## Documentation Index
> Fetch the complete documentation index at: https://support.i.moneyforward.com/llms.txt
> Use this file to discover all available pages before exploring further.
# Okta Integration NetworkでのSAML/SCIM設定手順
> Okta Integration Network(OIN)を利用したSAMLおよびSCIMの設定手順です。
## Okta Integration NetworkによるSAMLの設定
Okta Integration Network(OIN)経由でSAML設定に対応しました。値を細かく設定する必要がなく、簡単にOktaにアプリケーションの追加が可能です。
1. [OINの当サービス](https://www.okta.com/integrations/admina-by-money-forward/) のページにアクセスします。
2. **\[Add this integration]** ボタンをクリックします。
 3. 管理者画面にログイン後、以下の画面で\[Done]をクリックします。
4. Applicationsに **当サービス** が追加されたことを確認します。
3. 管理者画面にログイン後、以下の画面で\[Done]をクリックします。
4. Applicationsに **当サービス** が追加されたことを確認します。
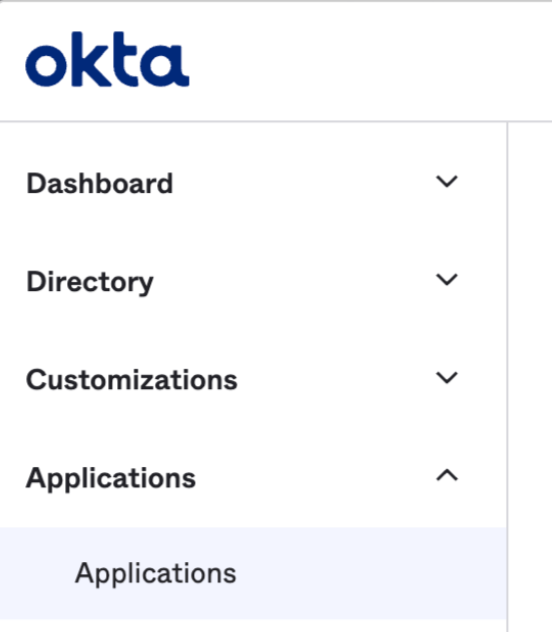 5. \[Sign On]タブに移動し、SettingsのEditボタンをクリックします。
6. Advanced Sign-on Settingsにスクロールし、`SAML entity ID`と`SAML reply URL`をそれぞれ入力します。
5. \[Sign On]タブに移動し、SettingsのEditボタンをクリックします。
6. Advanced Sign-on Settingsにスクロールし、`SAML entity ID`と`SAML reply URL`をそれぞれ入力します。
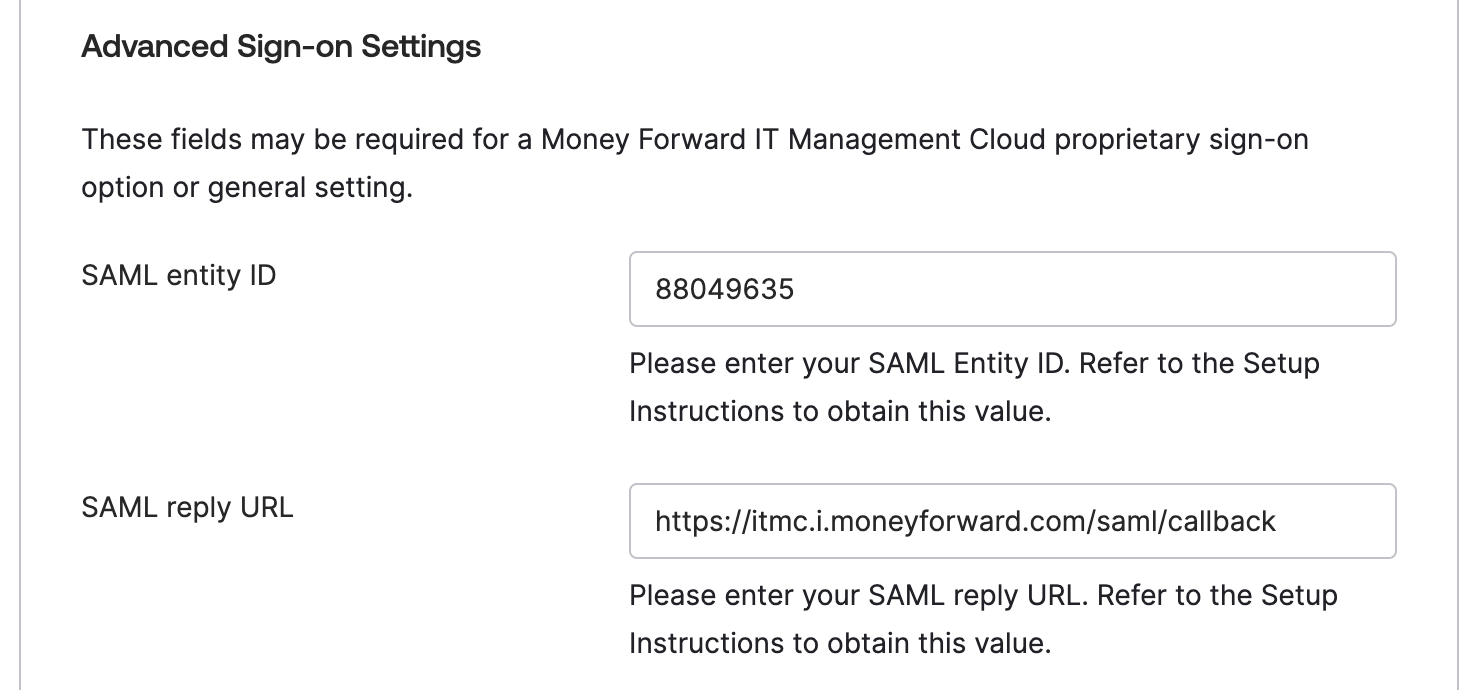 `SAML entity ID`と`SAML reply URL`の各値は、当サービスの【設定】> SAML/SCIMタブからご確認いただけます。
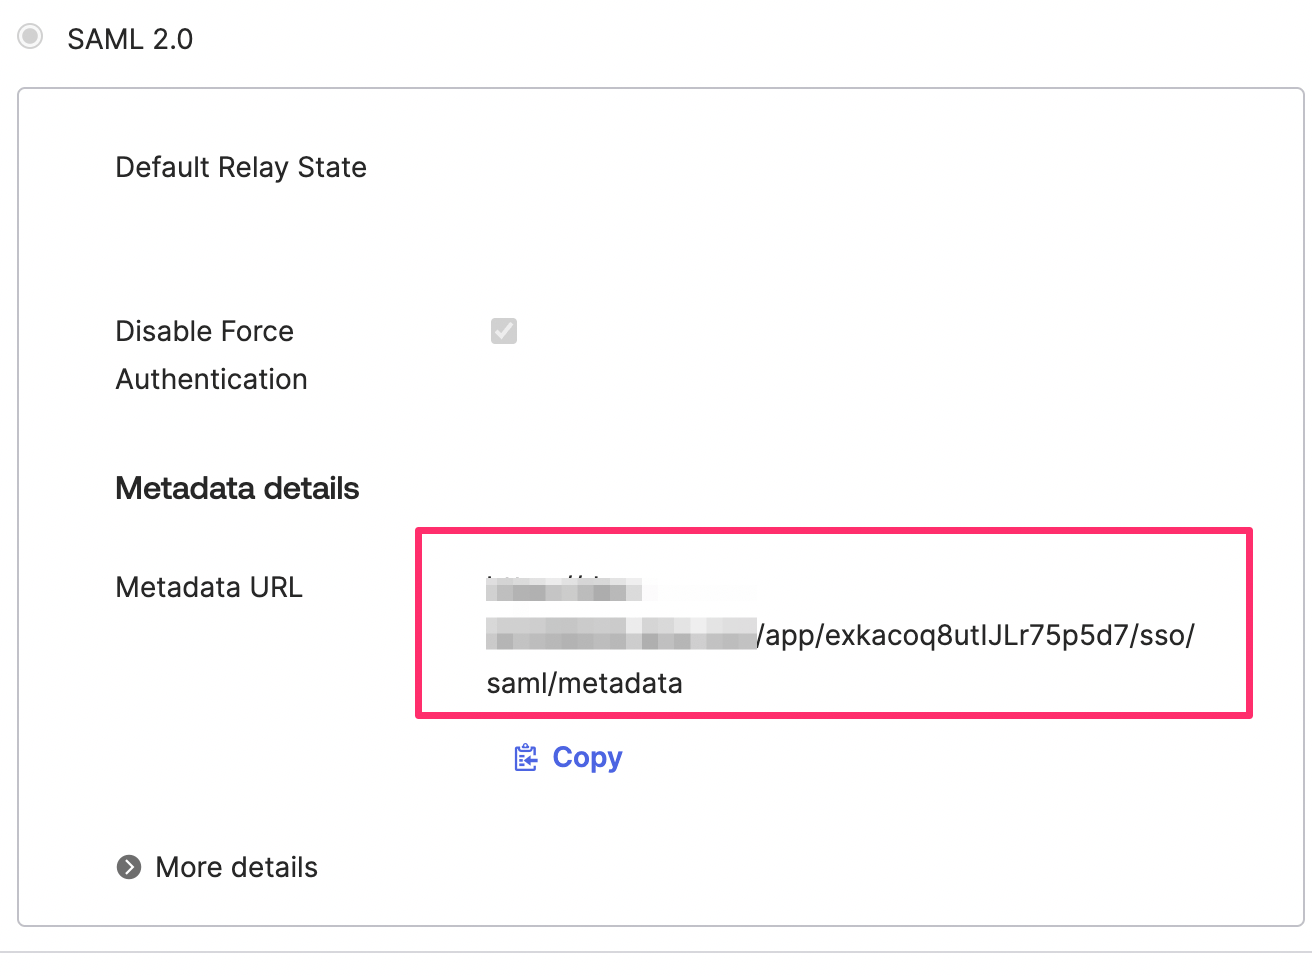
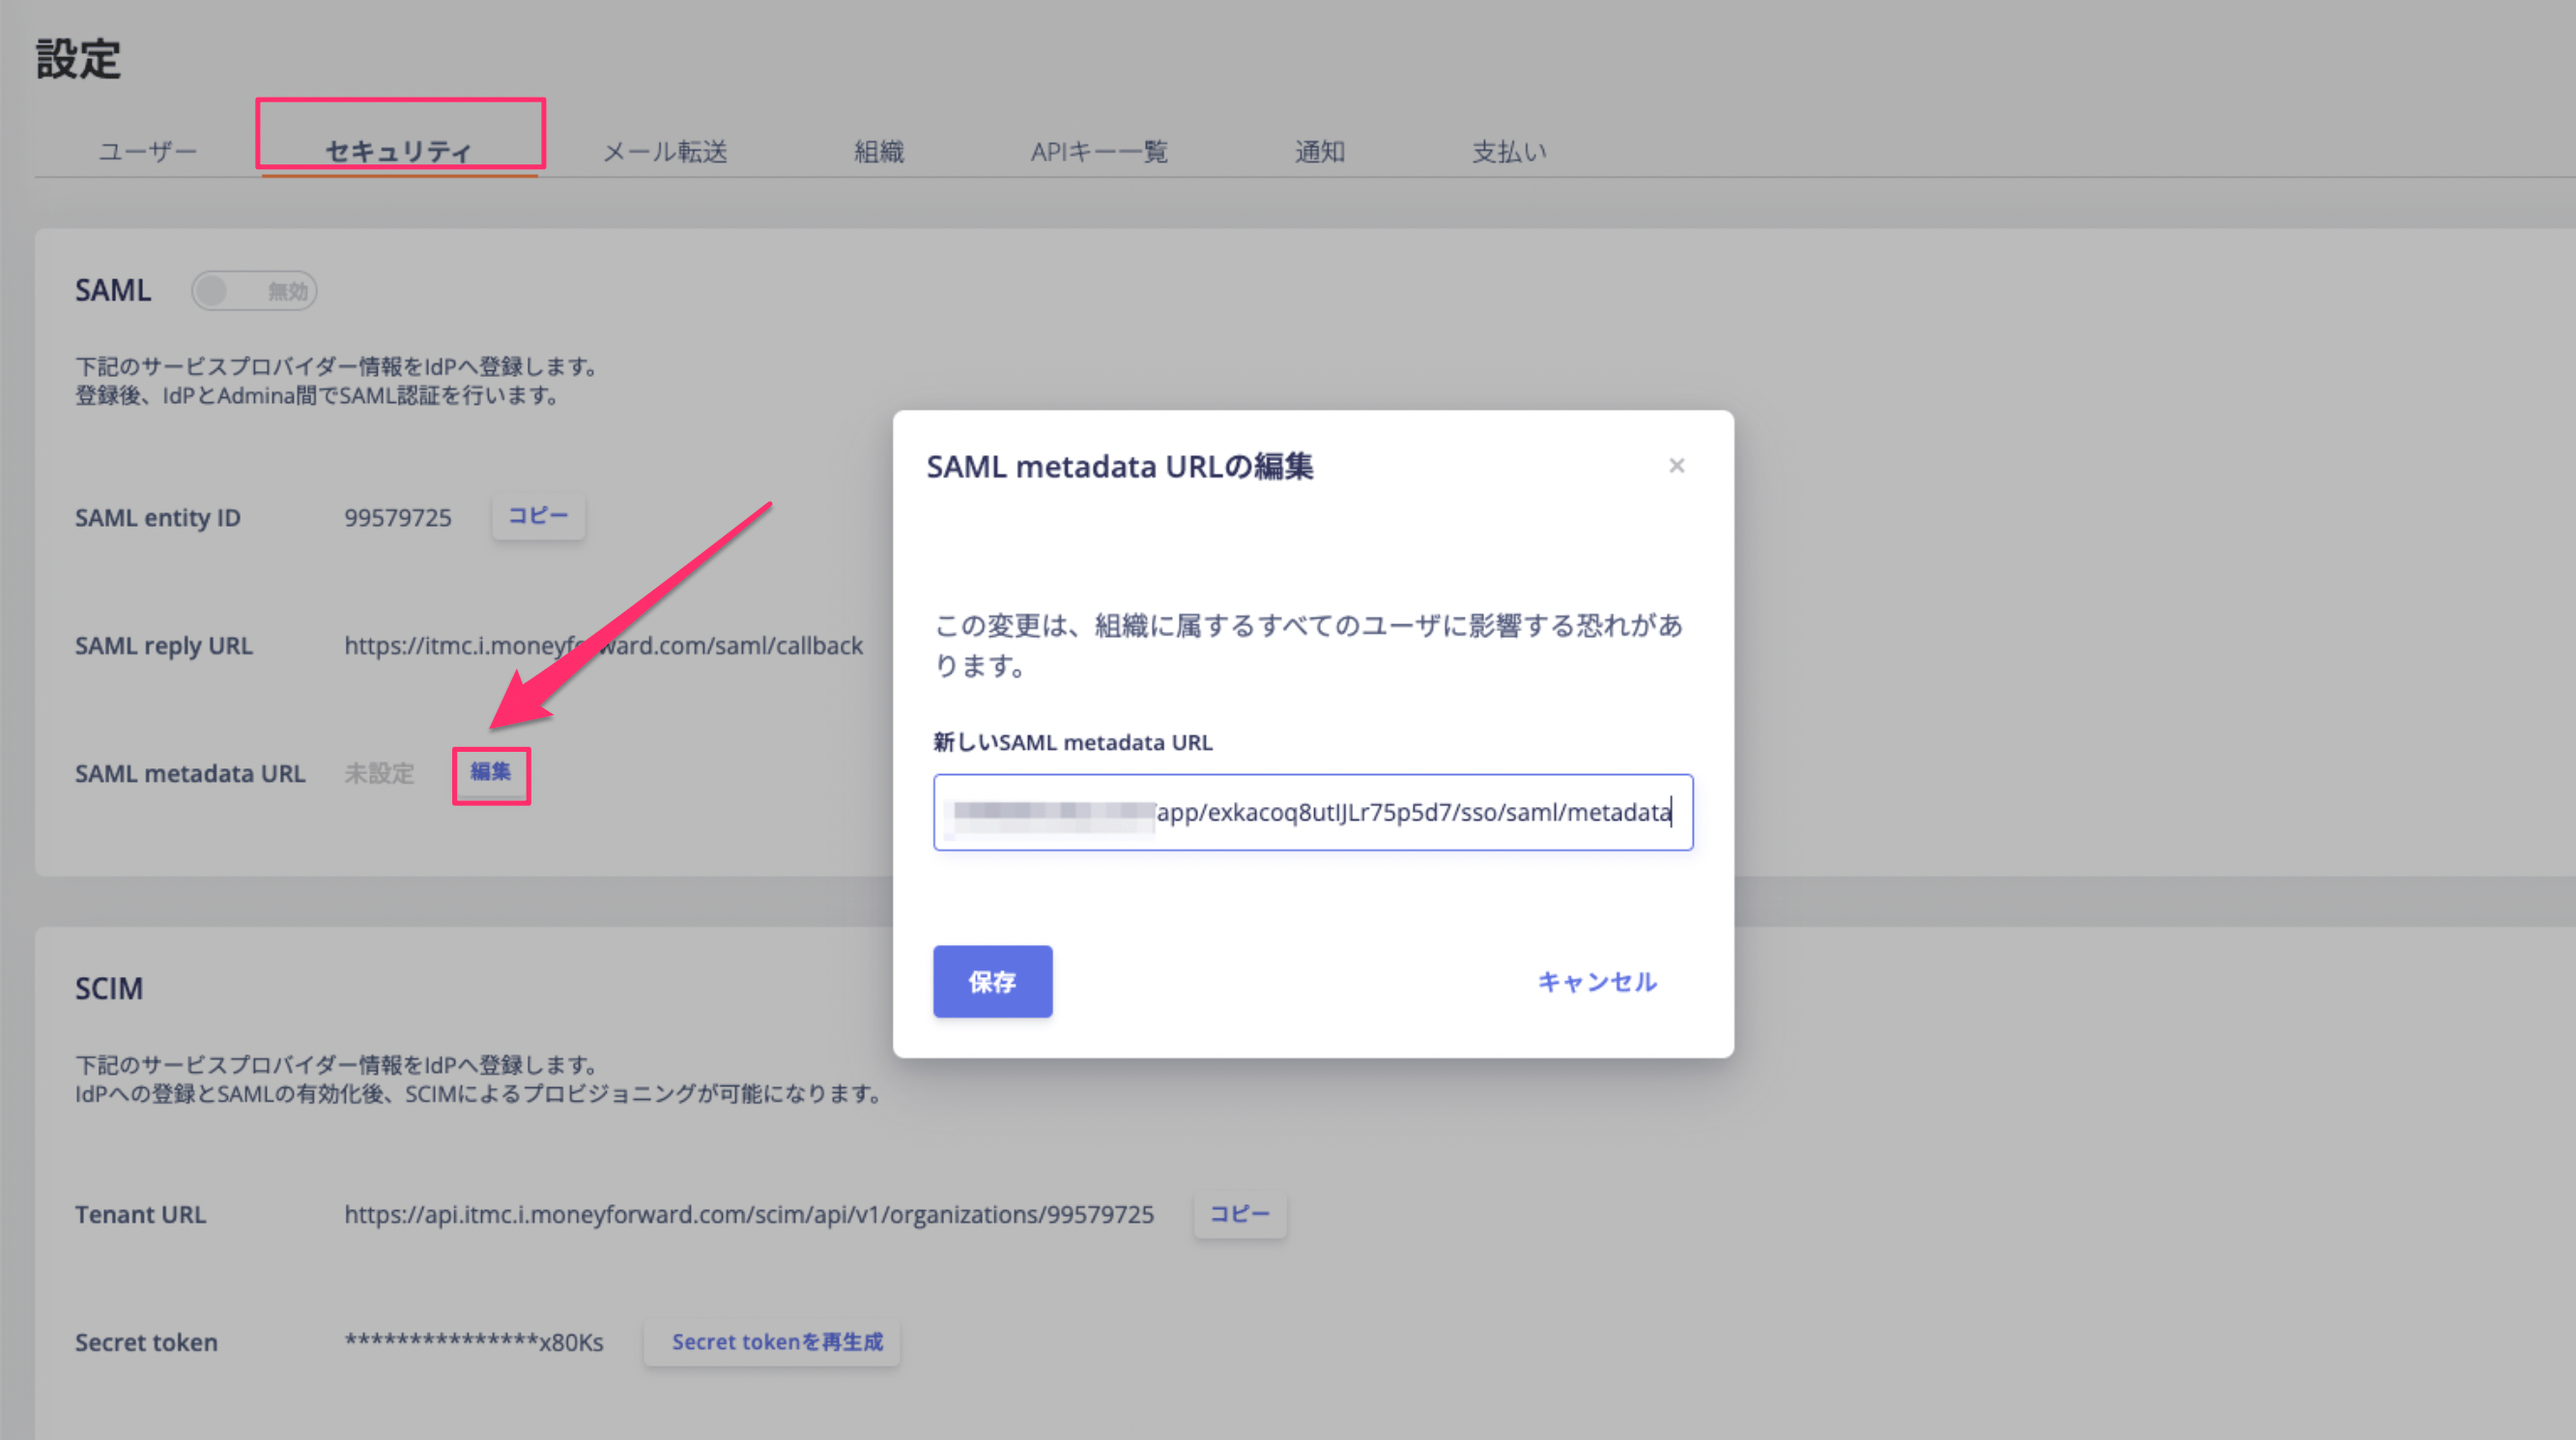
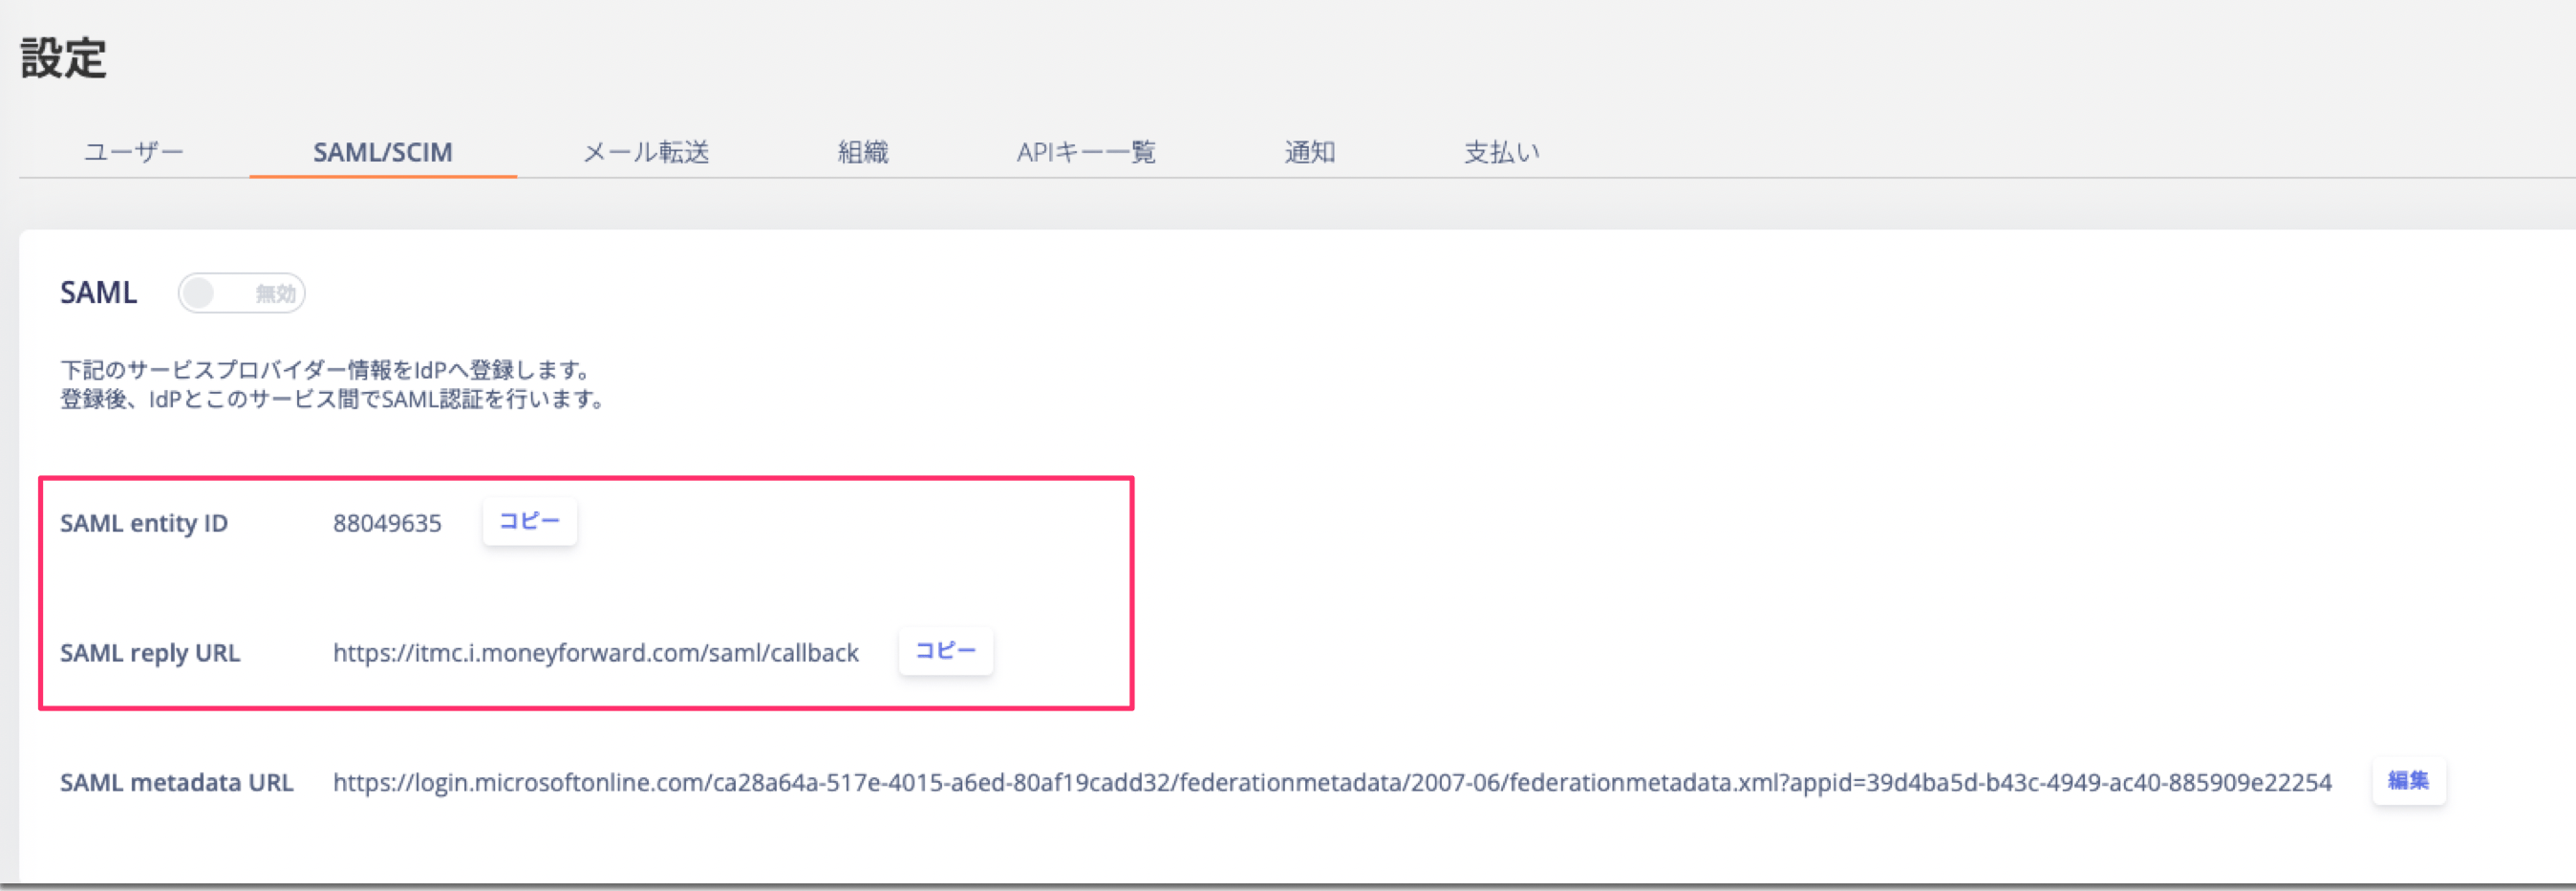 7. \[**Sign on**]タブのSAML2.0の項目から、Metadata URLをコピーし、当サービスの**設定 > セキュリティ**の`SAML metadata URL` にコピーして保存します。
 ## Okta Integration NetworkによるSCIMの設定
こちらの手順はOkta Integration Network(OIN)ご利用の場合のSCIMの設定手順です。
その他のサービスでSCIMを設定する場合は、[SCIM設定方法](/it-management/settings/msu9u84kyh-scim) をご覧ください。
### サポートする機能
* ユーザーの新規作成:Okta内にユーザーが作成されると、当サービスにもユーザーが作成されます。
* ユーザープロファイルの更新:Oktaで更新されたユーザー情報が、当サービス側に反映されます。
* ユーザーの無効化(再有効化)、削除:Okta側で無効化・再有効化および削除されると、当サービスにもその結果が反映されます。
### 前提条件
* OINを利用するSCIMのプロビジョニングには、予め[**OIN**](https://www.okta.com/integrations/admina-by-money-forward/)**で当サービスを追加**してください。手動で追加したアプリケーションではご利用いただけないためご注意ください。
### 設定手順
#### Tenant URLとSecret Tokenの取得
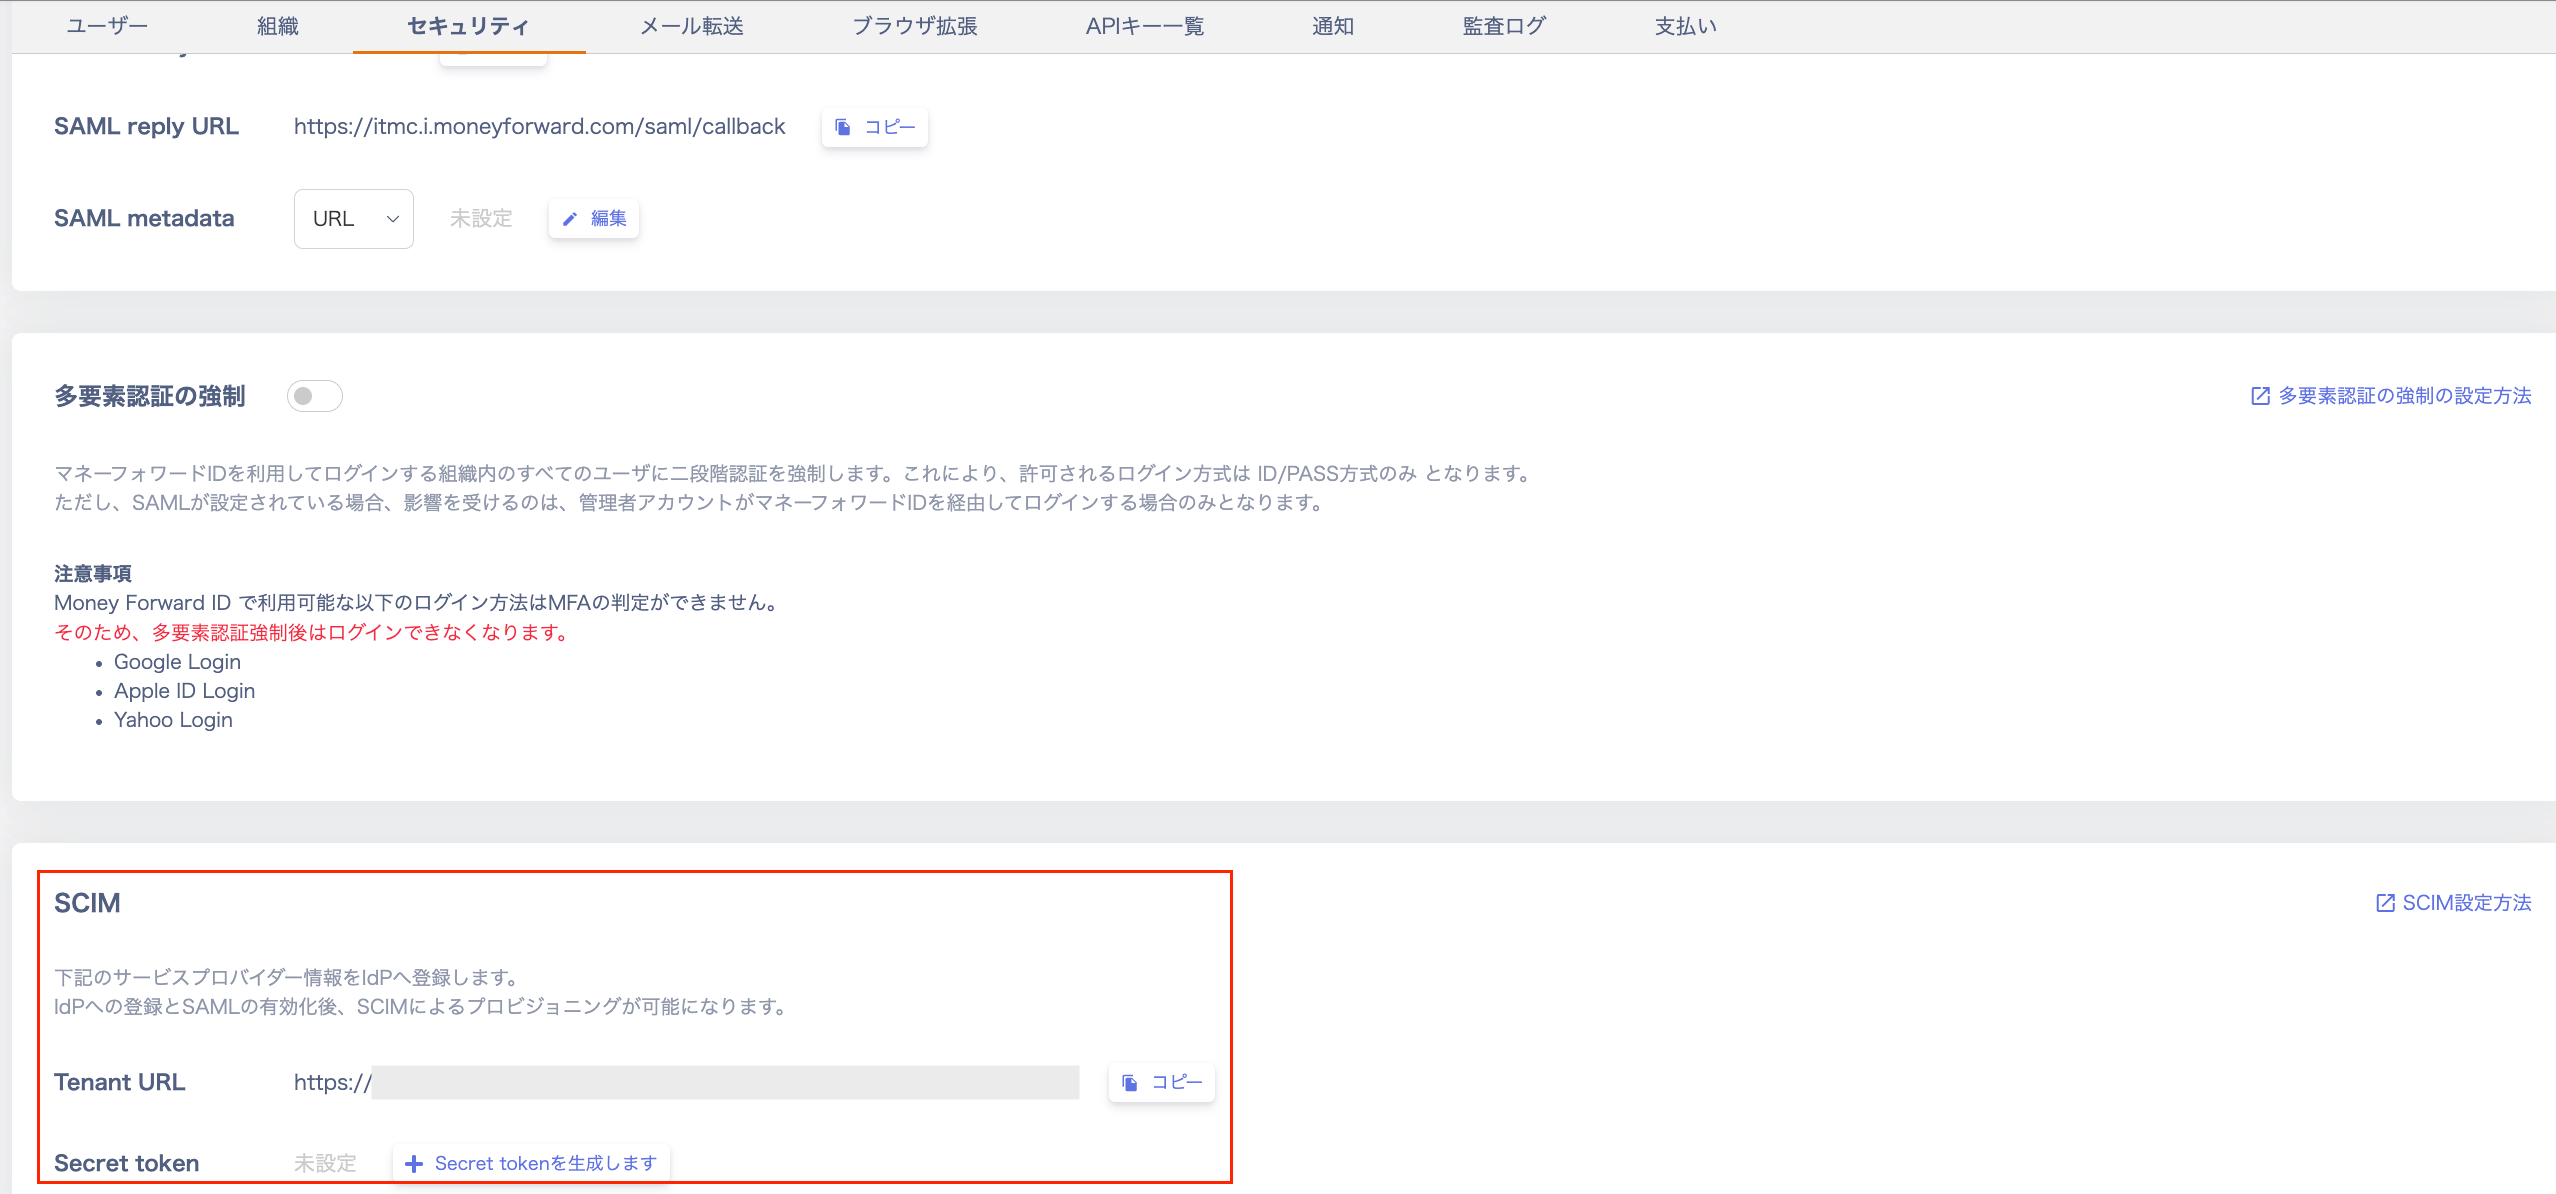
当サービスの`設定 > セキュリティ`でIdPの設定画面に必要とするtenant URLとsecret tokenを取得できます。Secret tokenがない場合は生成ボタンを押してください。
1つの組織に対して1つのSCIM secret tokenのみ取得可能です。新しいトークンを生成すると、前に生成されたTokenは失効します。
## Okta Integration NetworkによるSCIMの設定
こちらの手順はOkta Integration Network(OIN)ご利用の場合のSCIMの設定手順です。
その他のサービスでSCIMを設定する場合は、[SCIM設定方法](/it-management/settings/msu9u84kyh-scim) をご覧ください。
### サポートする機能
* ユーザーの新規作成:Okta内にユーザーが作成されると、当サービスにもユーザーが作成されます。
* ユーザープロファイルの更新:Oktaで更新されたユーザー情報が、当サービス側に反映されます。
* ユーザーの無効化(再有効化)、削除:Okta側で無効化・再有効化および削除されると、当サービスにもその結果が反映されます。
### 前提条件
* OINを利用するSCIMのプロビジョニングには、予め[**OIN**](https://www.okta.com/integrations/admina-by-money-forward/)**で当サービスを追加**してください。手動で追加したアプリケーションではご利用いただけないためご注意ください。
### 設定手順
#### Tenant URLとSecret Tokenの取得
当サービスの`設定 > セキュリティ`でIdPの設定画面に必要とするtenant URLとsecret tokenを取得できます。Secret tokenがない場合は生成ボタンを押してください。
1つの組織に対して1つのSCIM secret tokenのみ取得可能です。新しいトークンを生成すると、前に生成されたTokenは失効します。
 #### Okta側での設定
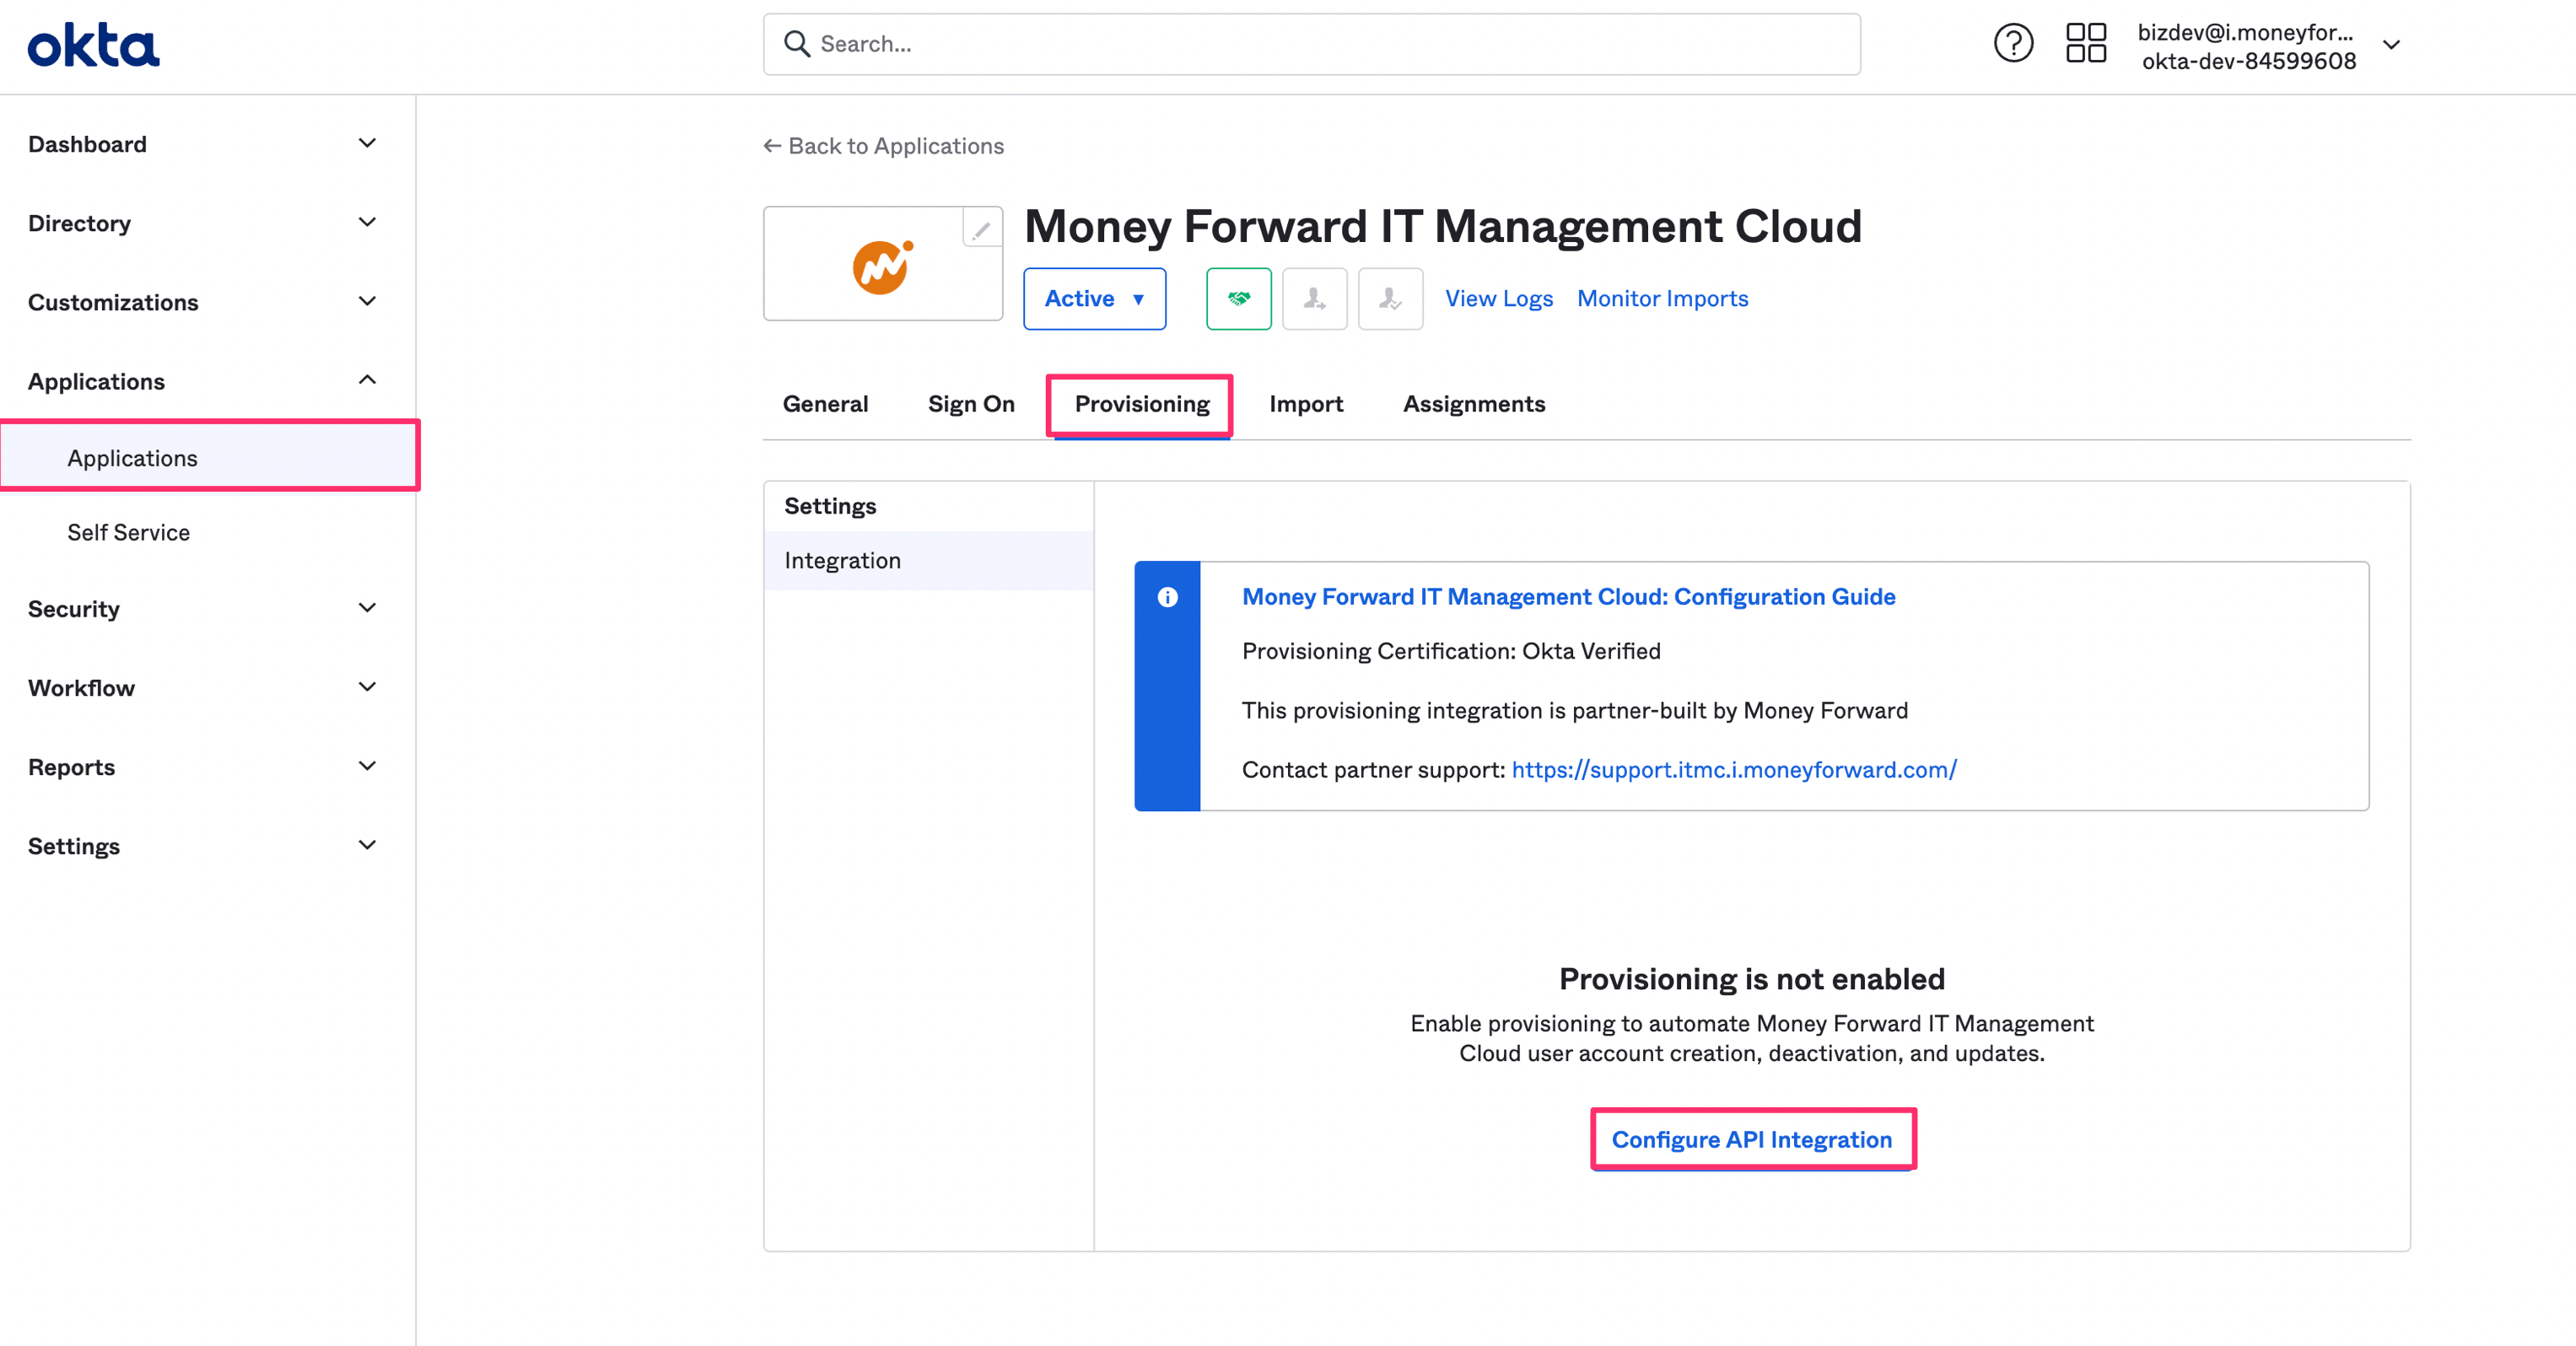
1. Apprications からOINで追加したをアプリケーションを選択し、`Provisoninng`タブをクリックします。
Configure API Integration をクリックします。
#### Okta側での設定
1. Apprications からOINで追加したをアプリケーションを選択し、`Provisoninng`タブをクリックします。
Configure API Integration をクリックします。
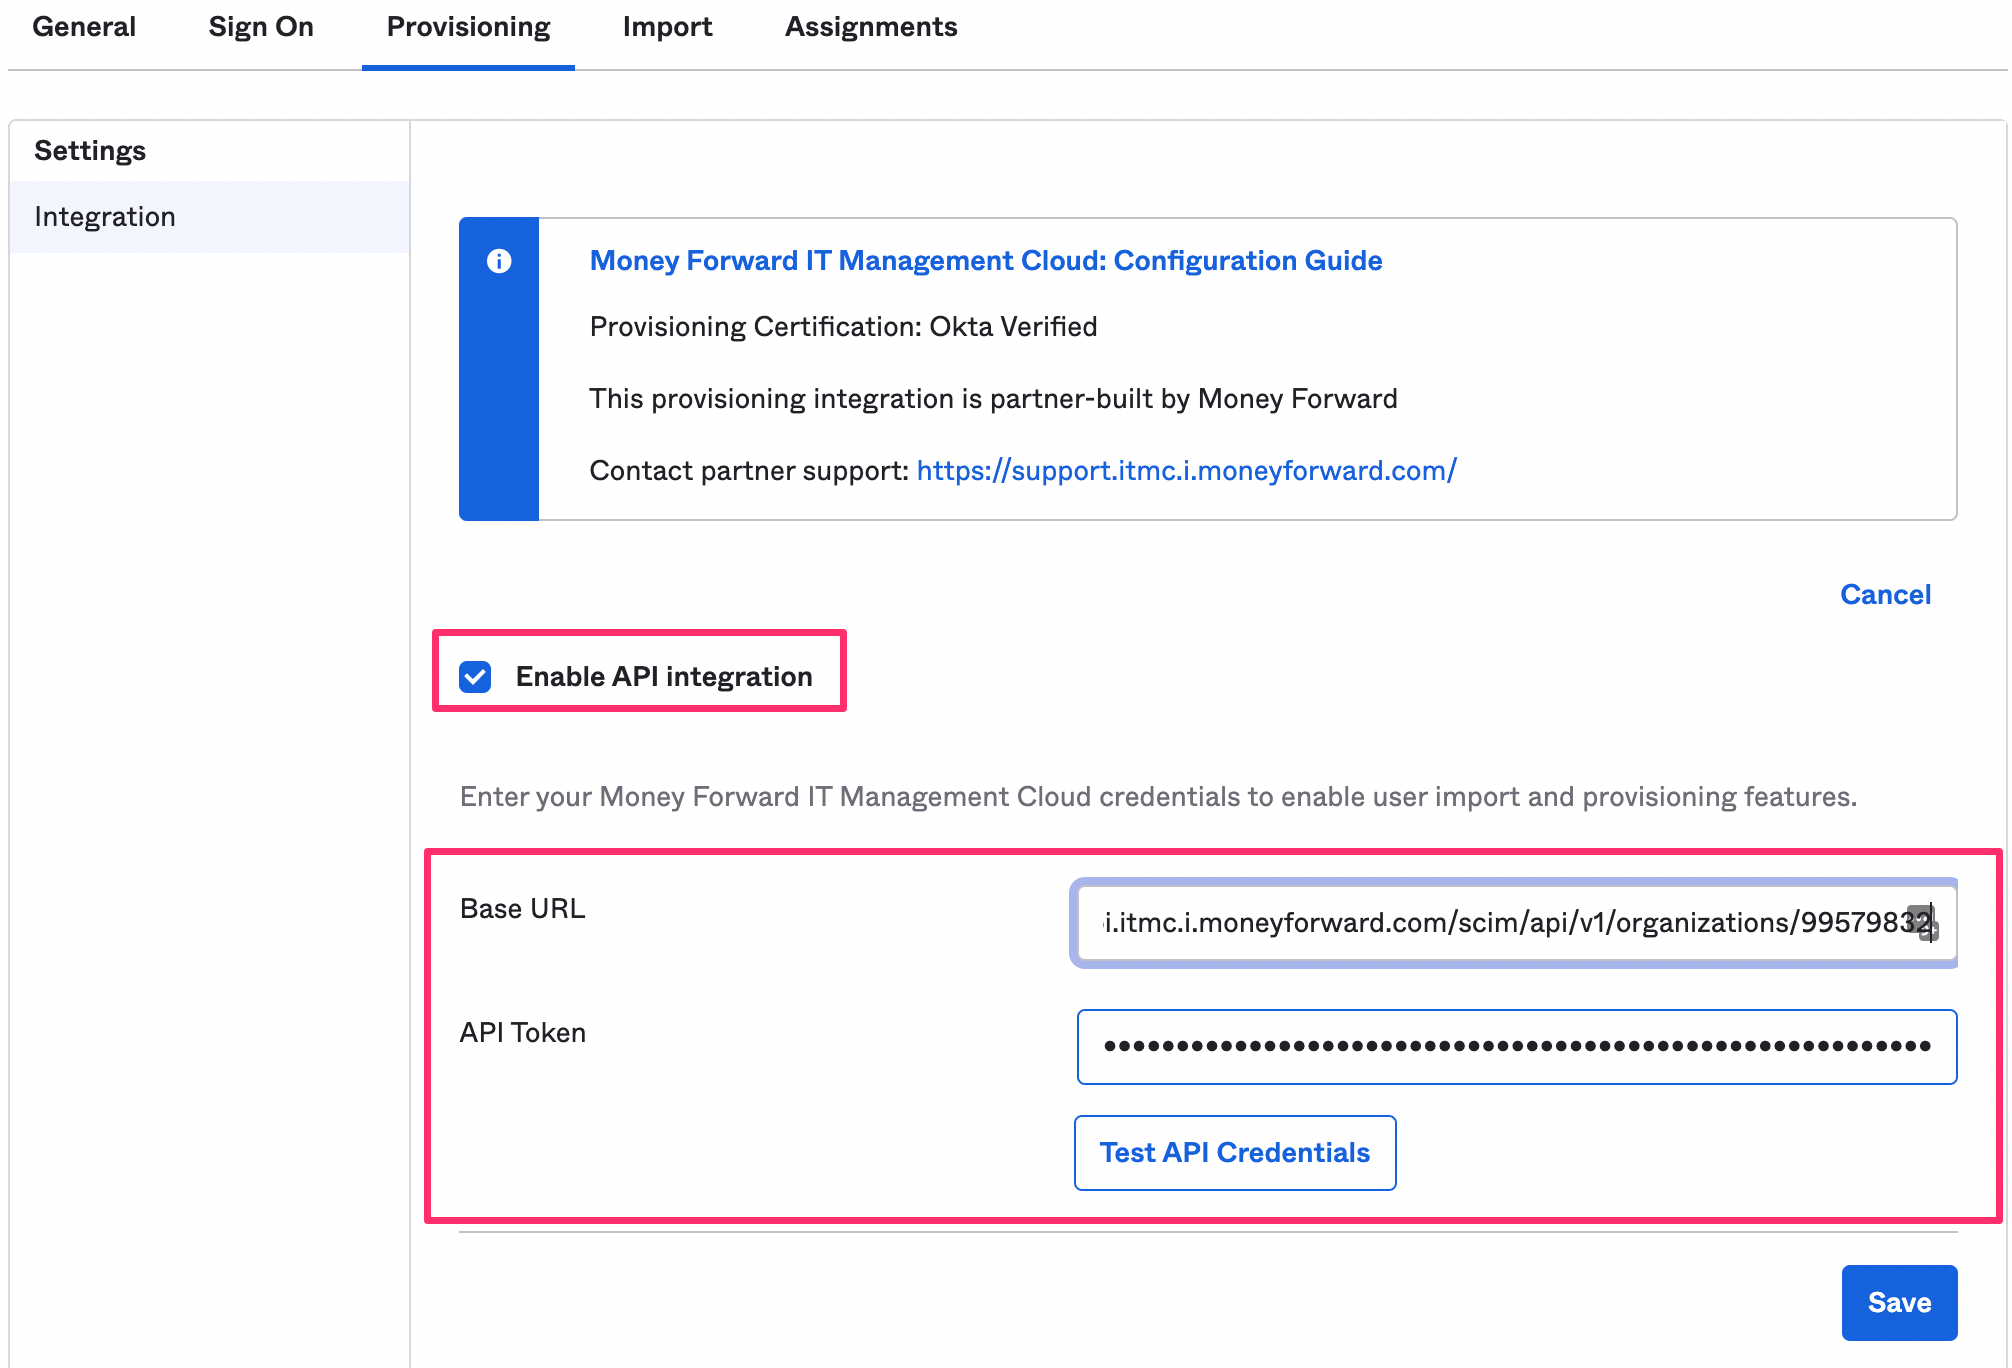
 2. Enable API integration にチェックをいれ、Base URLとAPI Tokenを入力します。
`Base URL` :取得した**Tenant URL**を入力
`API Token` : 取得した **Secret Token** を入力
2. Enable API integration にチェックをいれ、Base URLとAPI Tokenを入力します。
`Base URL` :取得した**Tenant URL**を入力
`API Token` : 取得した **Secret Token** を入力
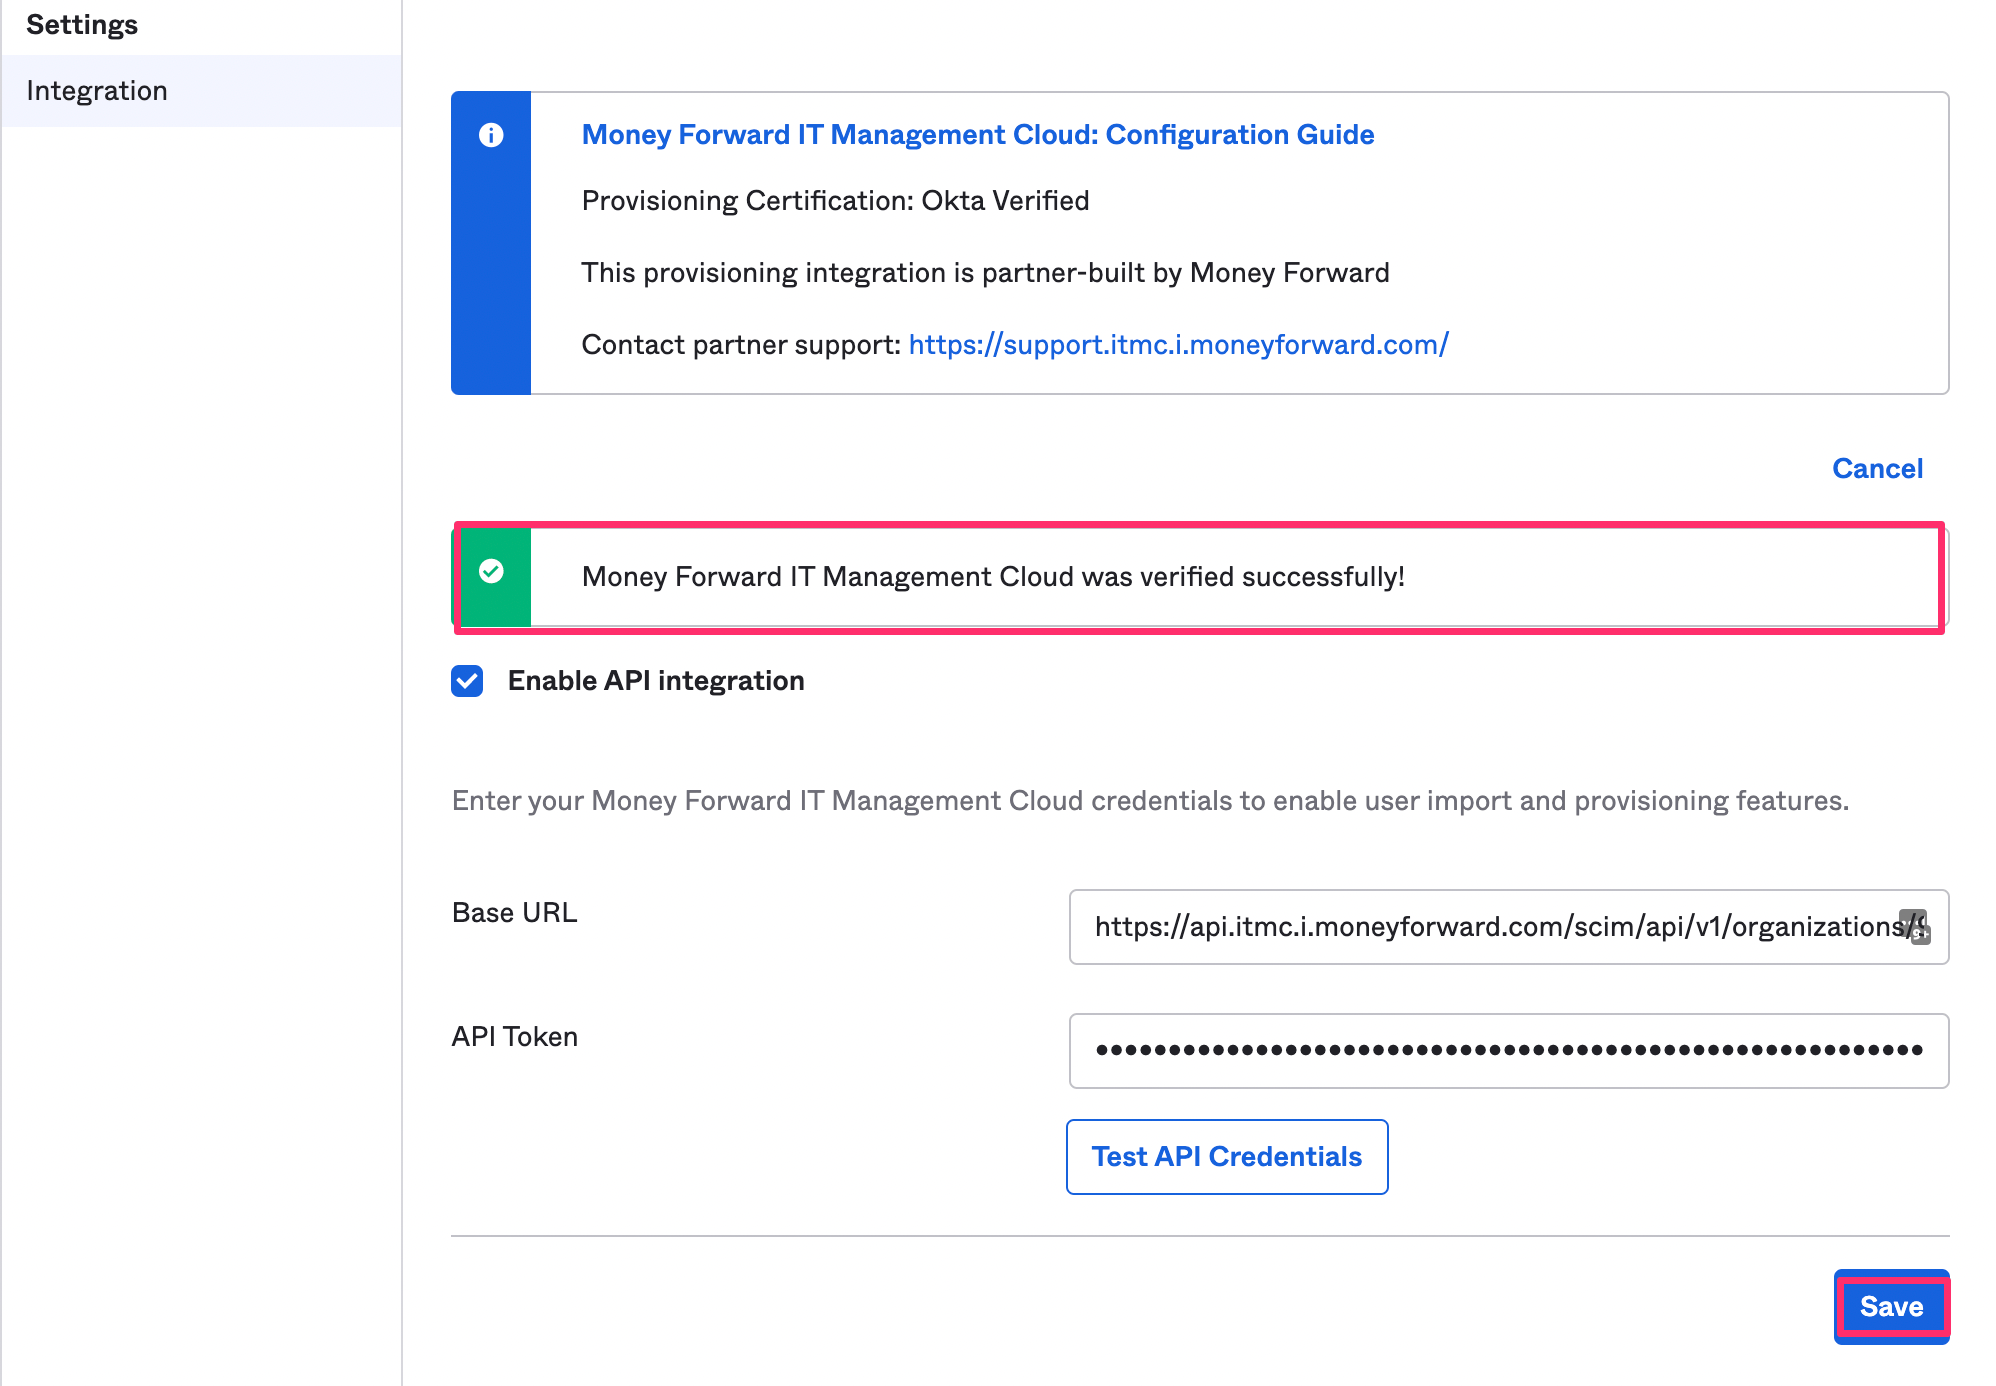
 3. **Test API Configuration** をクリックし、当サービス was verified successfully! と表示されることを確認します。SAVEをクリックします。
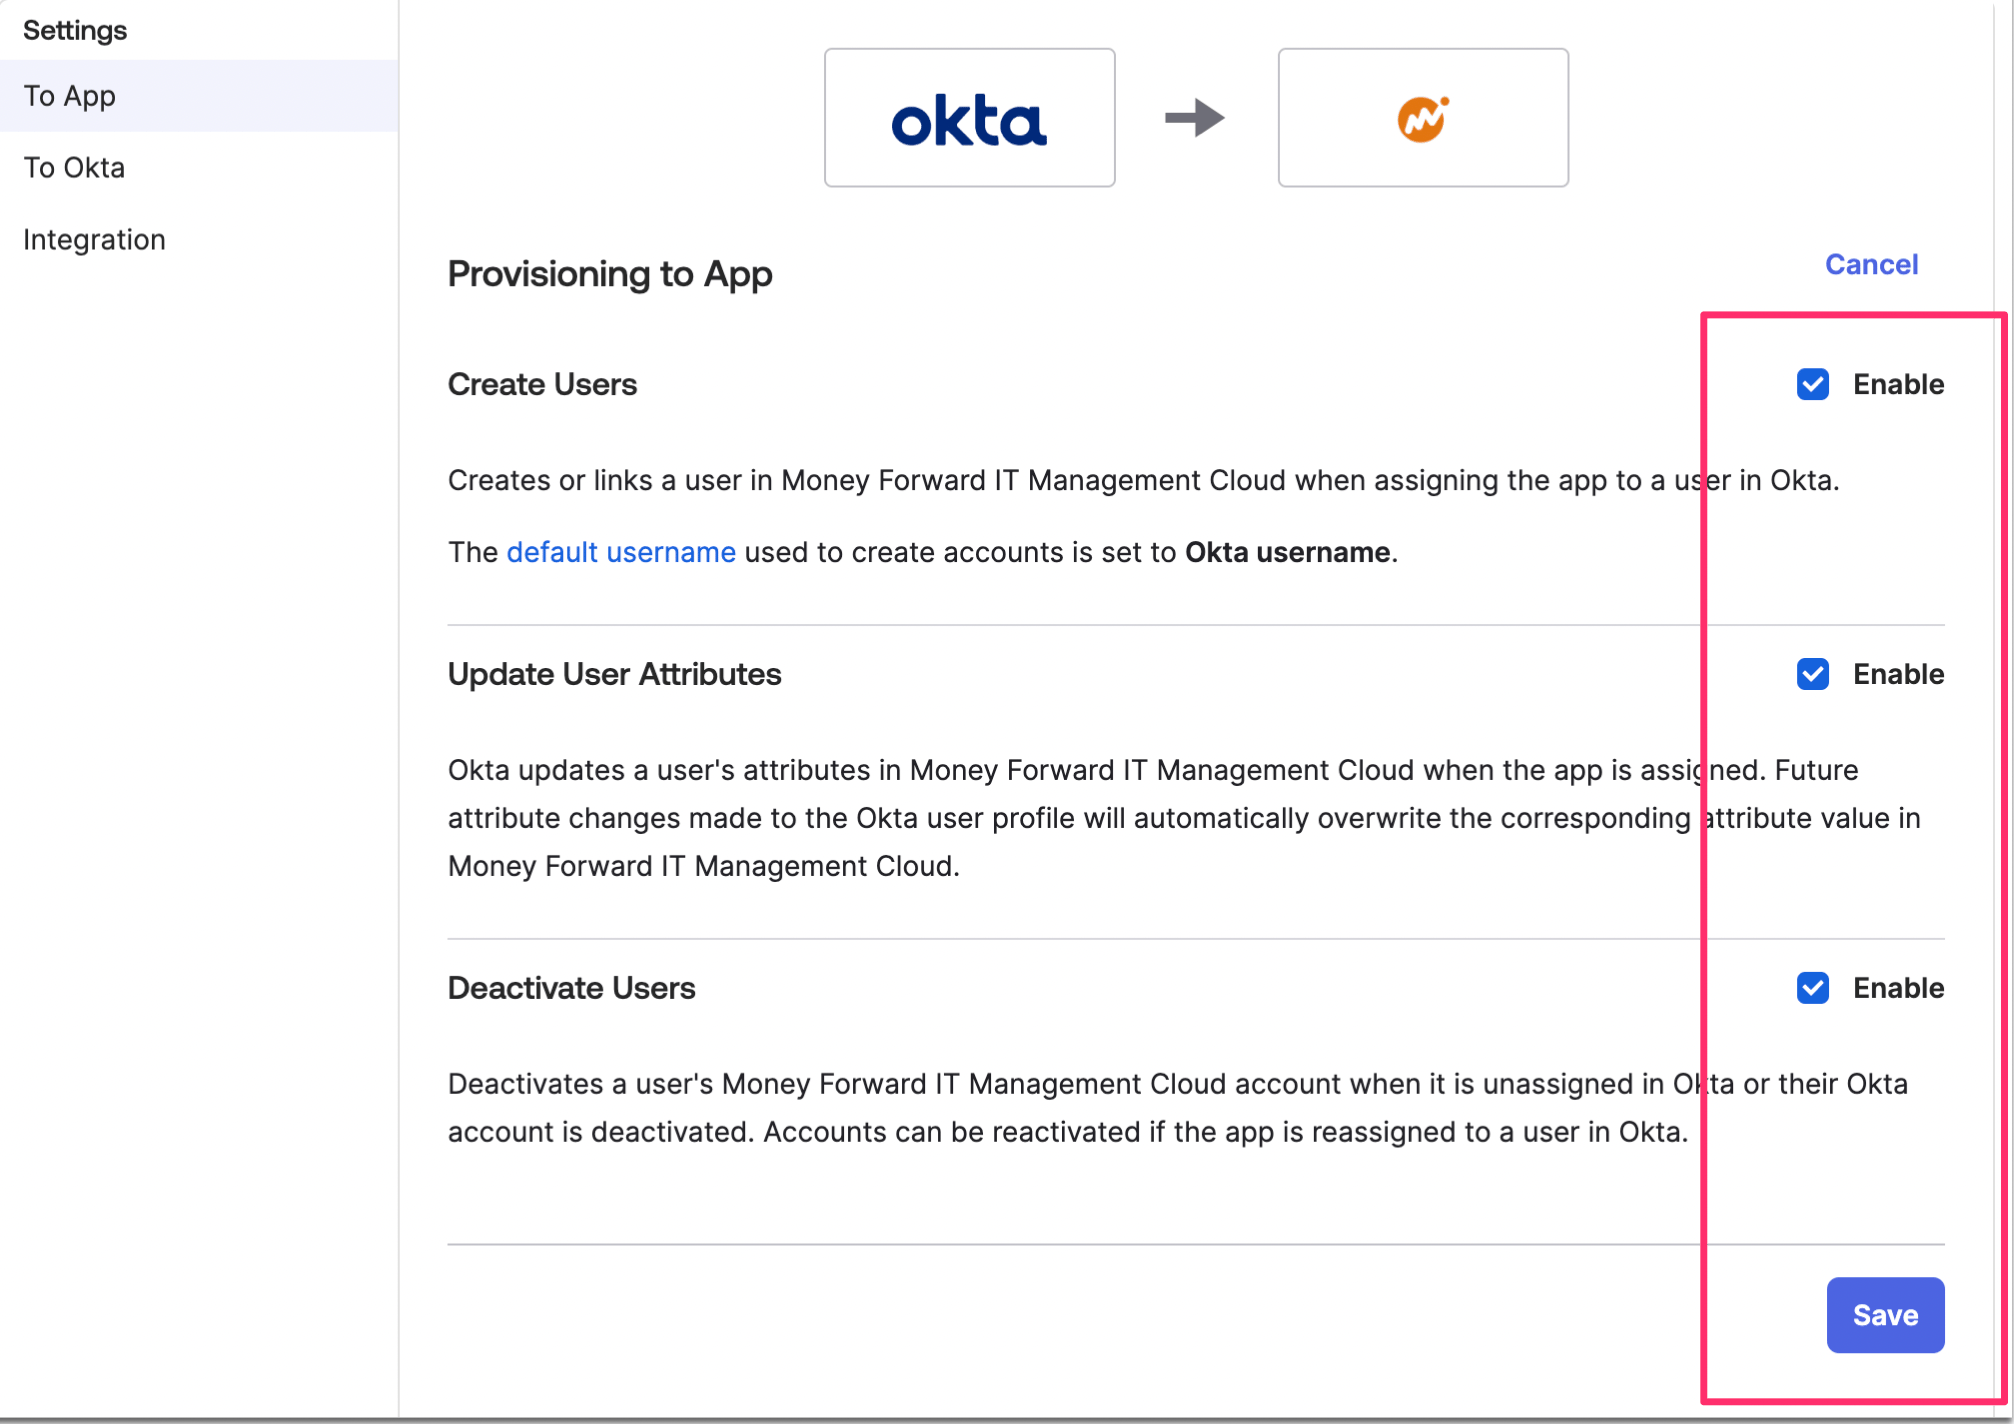
 4. アプリケーションが追加されることを確認します。To Appタブメニューから、Editをクリックし、`Create User`, `Update User Attributes,` `Deactivate Users`の各**Enable**にチェックをし、Saveをクリックします。
 5. 以上で完了です。アプリケーションにユーザーをアサインすると当サービスに自動でプロビジョニングされます。
#### 既知の問題・トラブルシューティング
・当サービスはアプリからOktaへのプロビジョニングをまだサポートしていませんので、「To Okta」の設定をデフォルト(無効)のままにしておいてください。
・当サービスのユーザー権限(ロール)がAdminの場合、SP Initiatedでのアクセスはできません。(設定不備によるログイン不可を避けるため)
5. 以上で完了です。アプリケーションにユーザーをアサインすると当サービスに自動でプロビジョニングされます。
#### 既知の問題・トラブルシューティング
・当サービスはアプリからOktaへのプロビジョニングをまだサポートしていませんので、「To Okta」の設定をデフォルト(無効)のままにしておいてください。
・当サービスのユーザー権限(ロール)がAdminの場合、SP Initiatedでのアクセスはできません。(設定不備によるログイン不可を避けるため)