

Requirements
For base requirements (supported OS, permissions, network requirements, and more), see Admina Tracker (Windows). Deploying via Microsoft Intune differs in the following ways:
Before starting, prepare deployment files (
.intunewin package, detection script, ADMX templates). Also have your API key and Organization ID ready.
Download the deployment files
Deployment files are published per release. Replacestable/<version>/ with the release version shown under Settings > Admina Tracker > Downloads.
A
.sha256 checksum ships with the .intunewin. Verify integrity with Get-FileHash before uploading to Intune.Deployment overview
Admina Tracker deployment combines app deployment and configuration profile deployment. These roles complement each other:- Configuration profile (ADMX): Deploys settings like API key and Organization ID to registry policies.
- Win32 app: Installs agent binaries, startup tasks, and local database under the user profile.
- Import the ADMX template
- Deploy configuration values with a configuration profile
- Add the Win32 app and assign it to target groups
Installation steps
Step 1: Import the ADMX template
- Prepare
AdminaTracker.admxanden-US/AdminaTracker.admlfrom the deployment package. - Sign in to the Microsoft Intune admin center.
- Open Devices > Configuration > Import ADMX tab.
- Click Import and upload the
.admxand.admlfiles as a pair. - Wait until the status displays “Available” in the list.
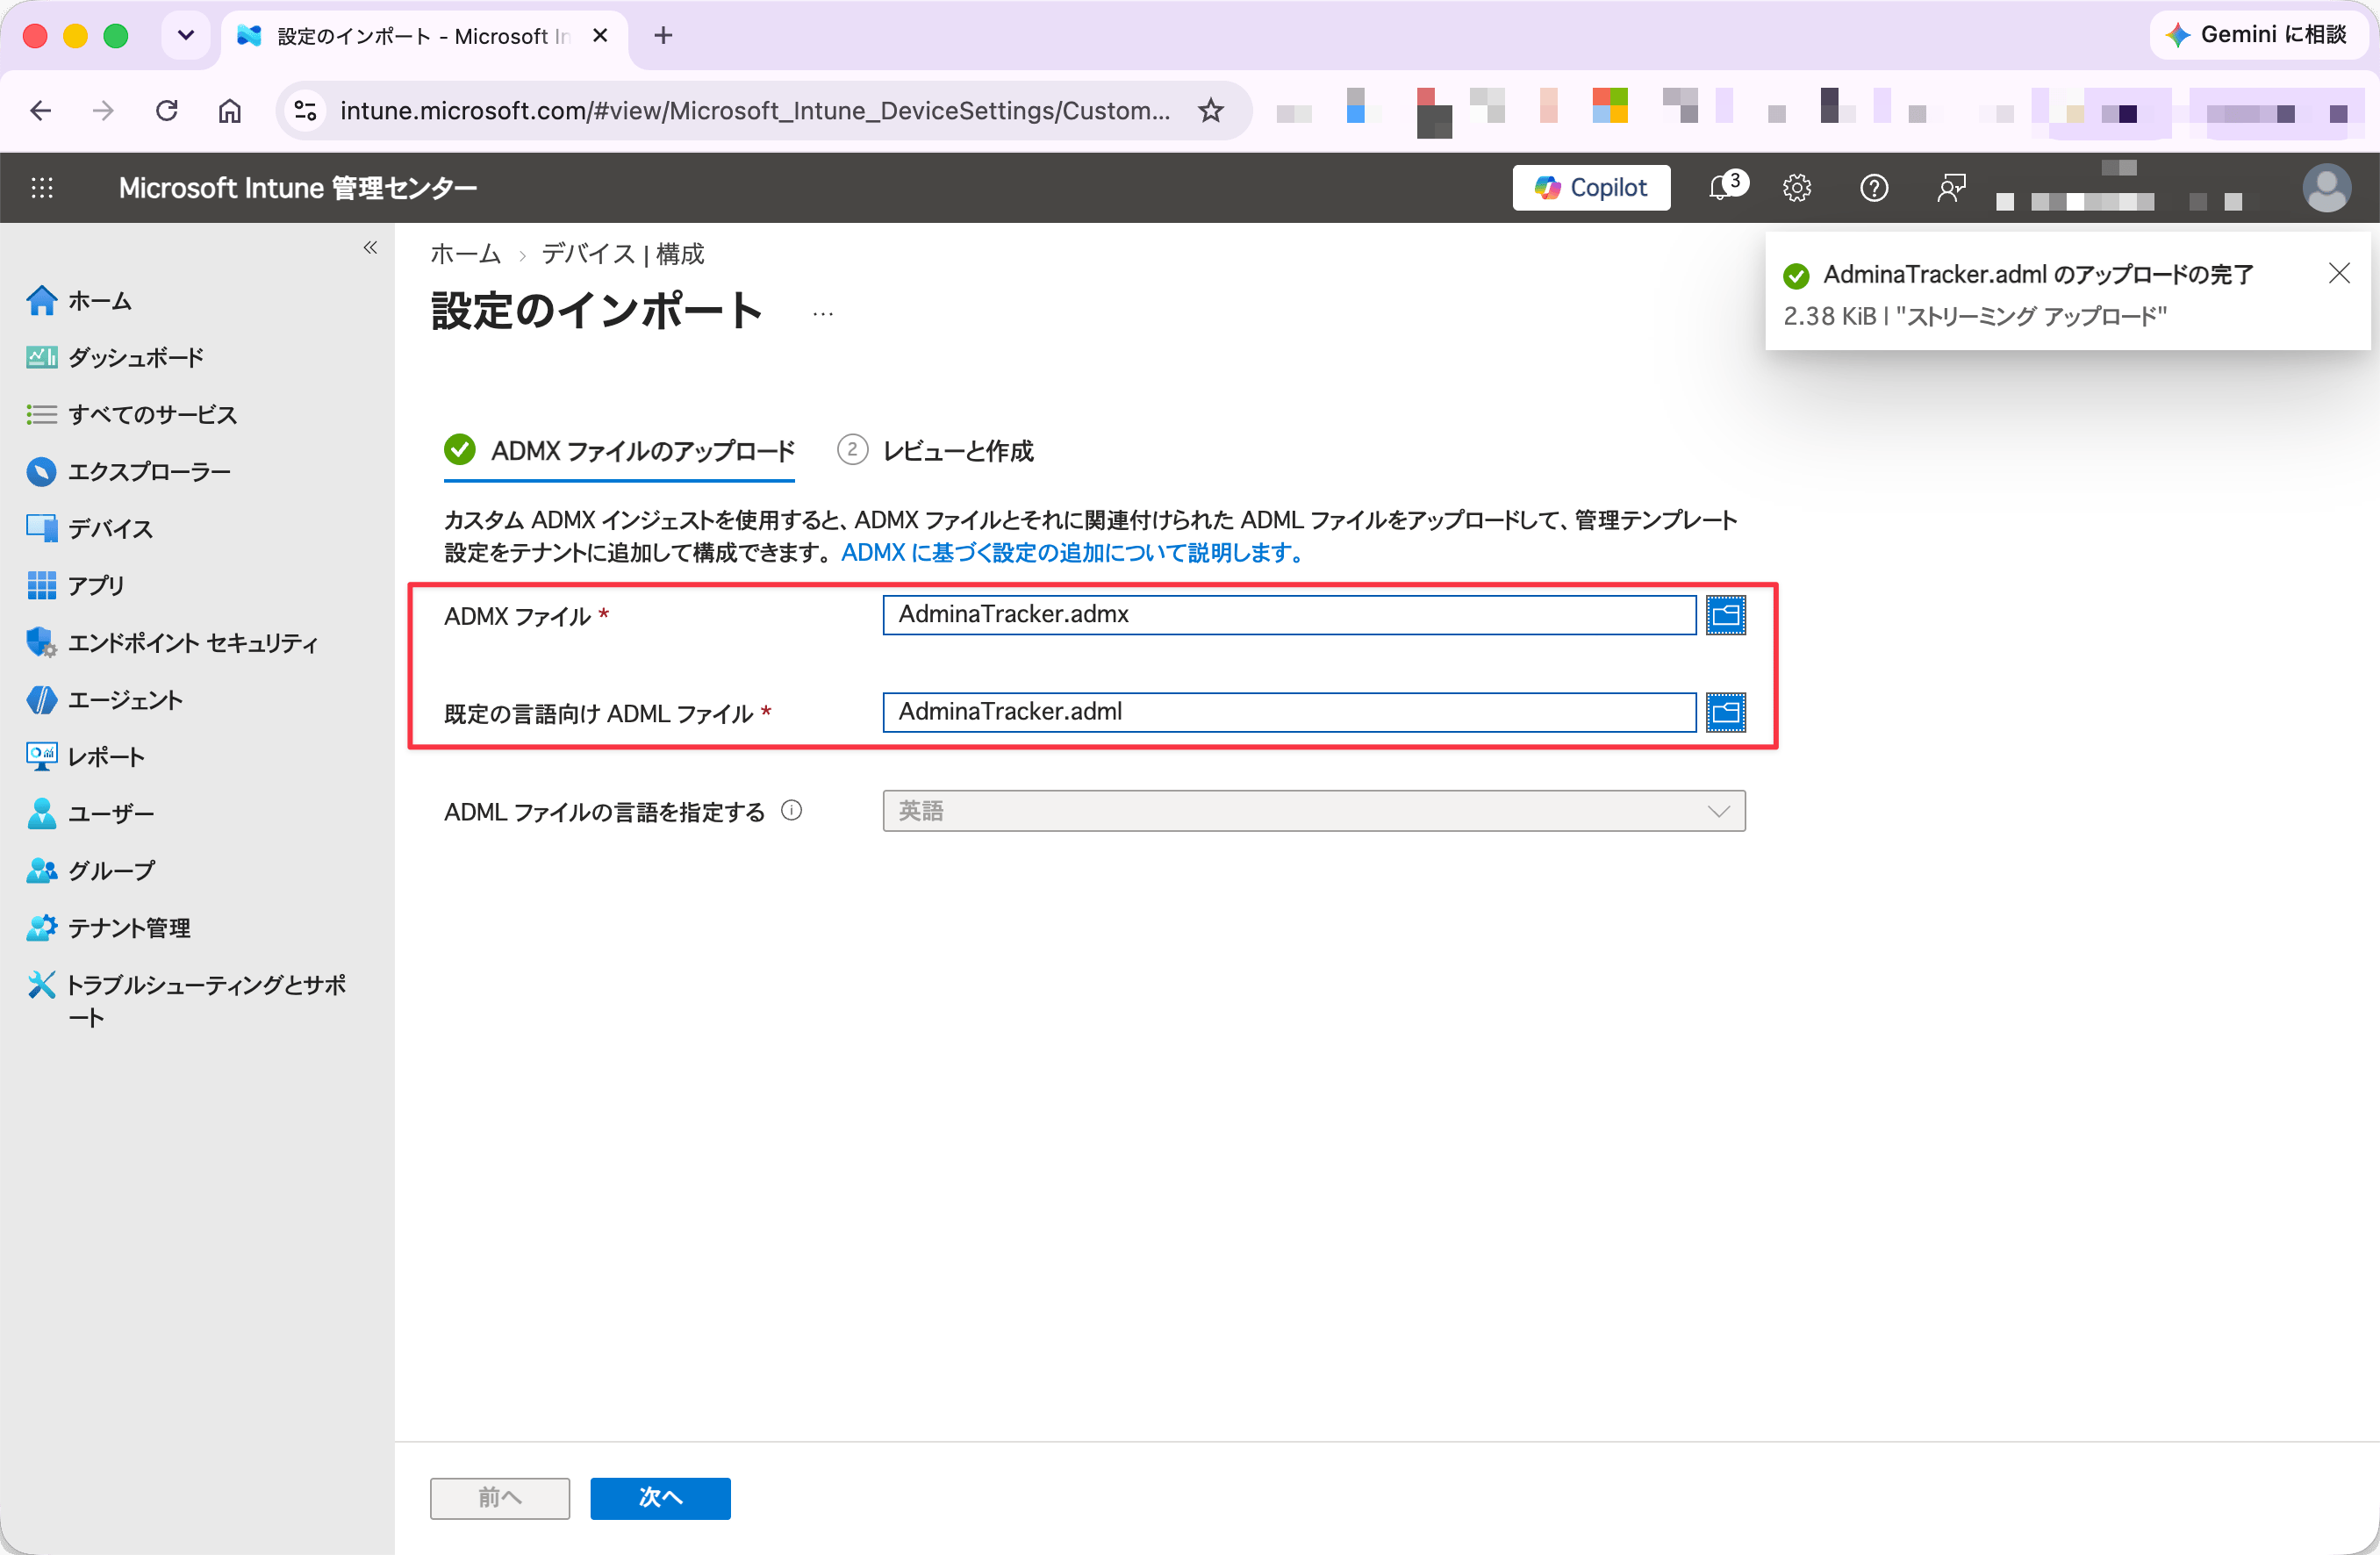
- Upload the .admx and .adml as a pair
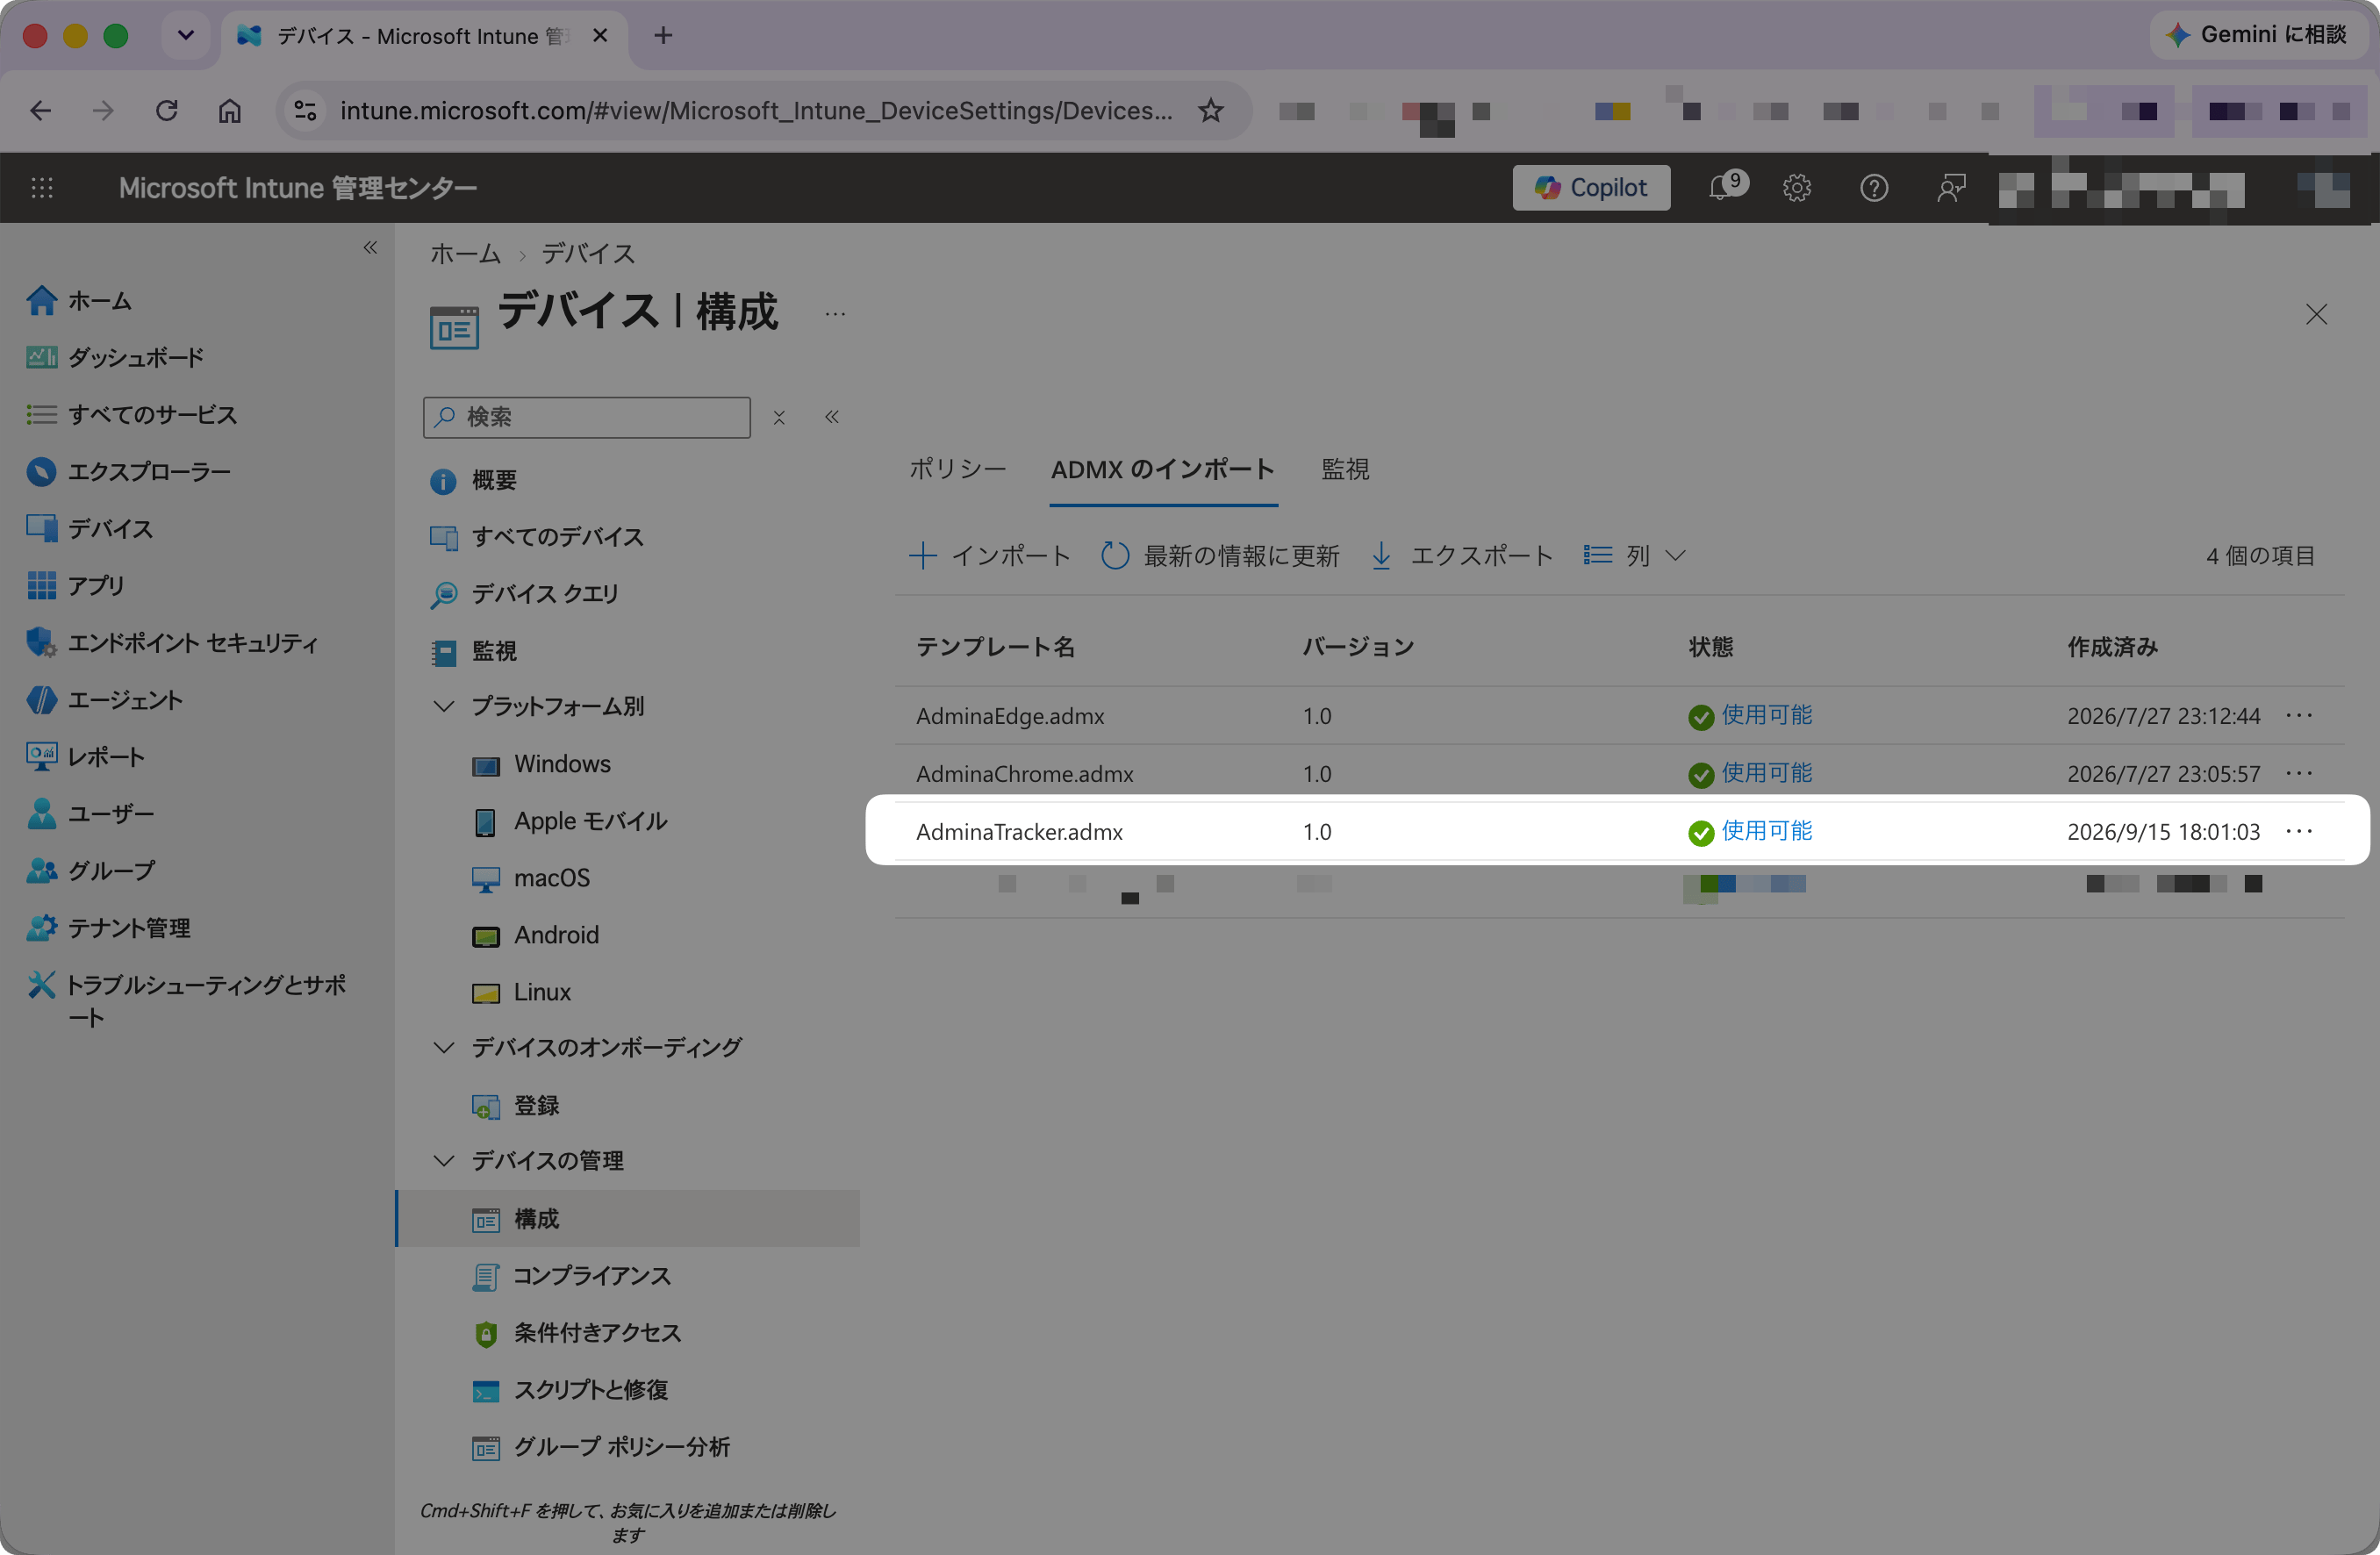
- The list shows the status as Available
Step 2: Deploy configuration values with a configuration profile
- In Intune admin center, go to Devices > Configuration > Policies tab and click + Create > New policy.
-
Select Windows 10 and later for Platform. Select Templates > Imported Administrative templates (Preview) for Profile type, and click Create.
Make sure to select “Imported Administrative templates (Preview)” rather than the built-in “Administrative templates”.
-
Enter a name and description, then click Next.
-
Name:
AdminaTrackerManagedPolicy -
Description: Paste the following text
-
Name:
-
In Configuration settings, open the Admina Tracker category. Set Admina Tracker: agent settings (API key, organization ID, user email) to Enabled. Three input fields appear once it is enabled; enter a value in each:
- API key — The API key generated in the Admina management console
- Organization ID — Your Admina Organization ID
- User email — User email address. Defaults to
%USEREMAIL%. To distribute a different value per user, leave the default unchanged and see Distributing UserEmail below.
The three values are bundled into a single policy.ApiKey,OrganizationID, andUserEmaildo not appear as separate policies. Leaving a field blank is not an error: that value alone falls through to a lower source in the configuration resolution order. - In Assignments, select the target groups.
- Review the settings and create the profile.
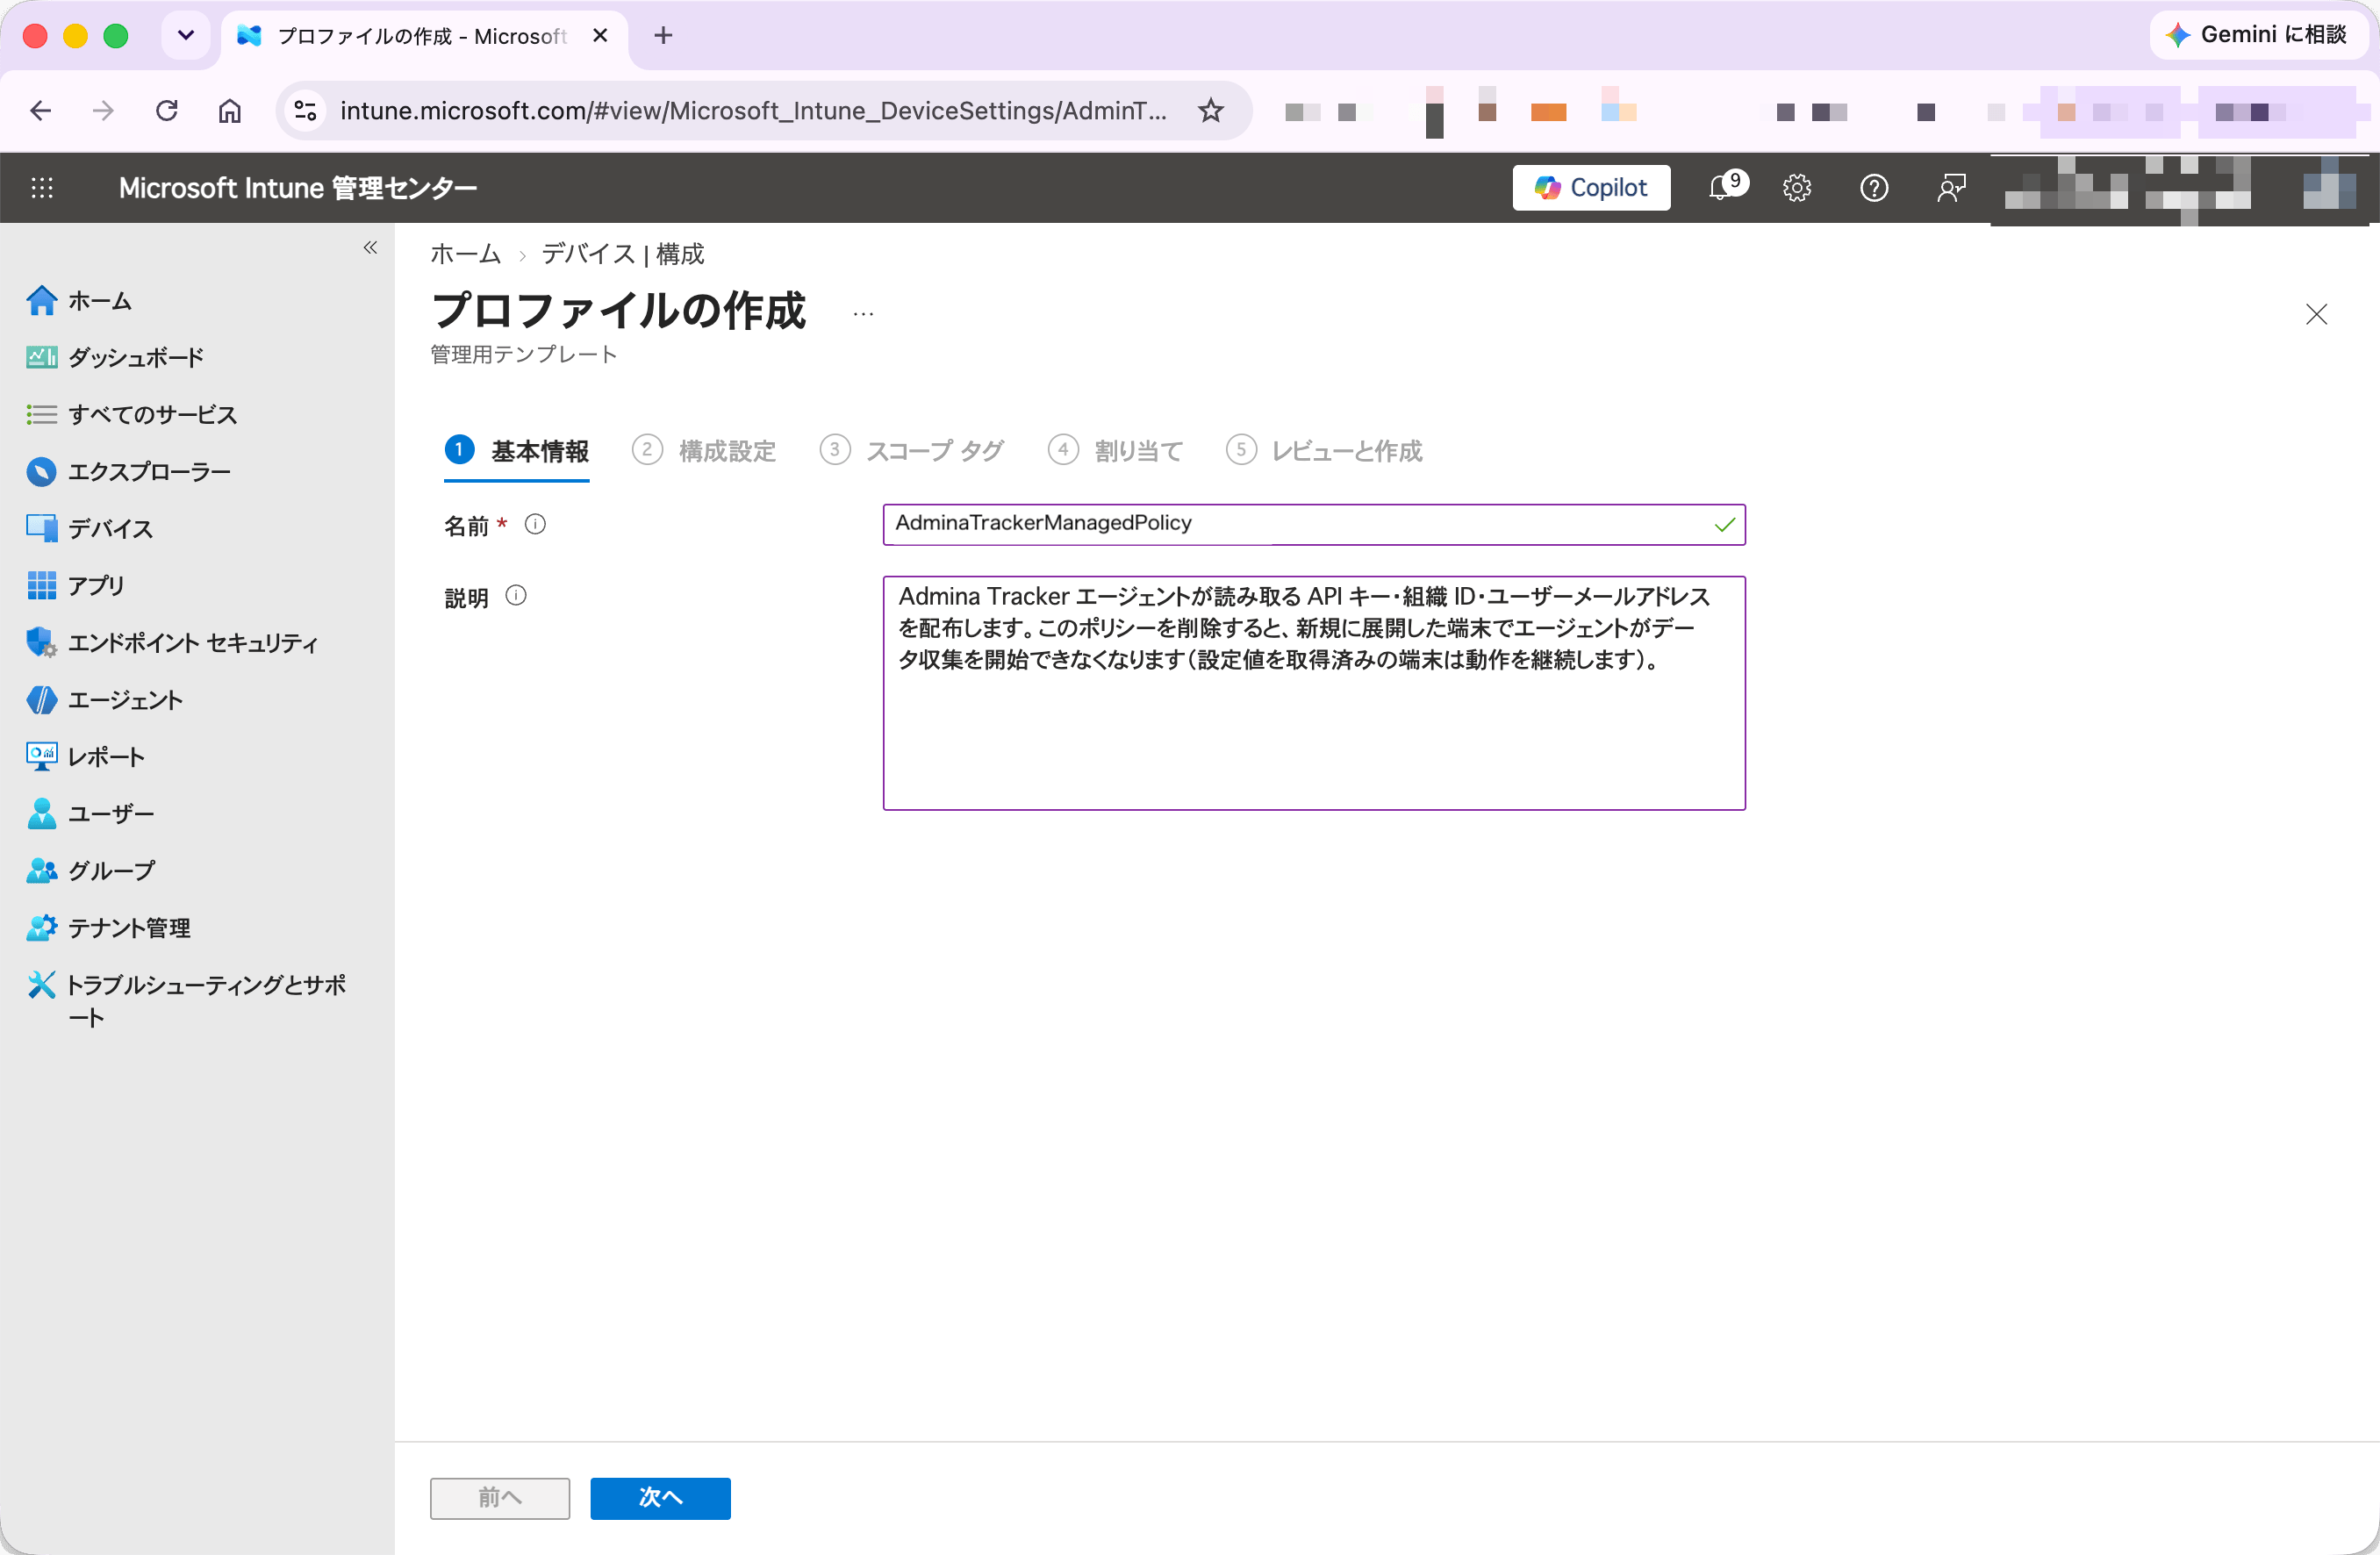
- Enter the name and description in Basics
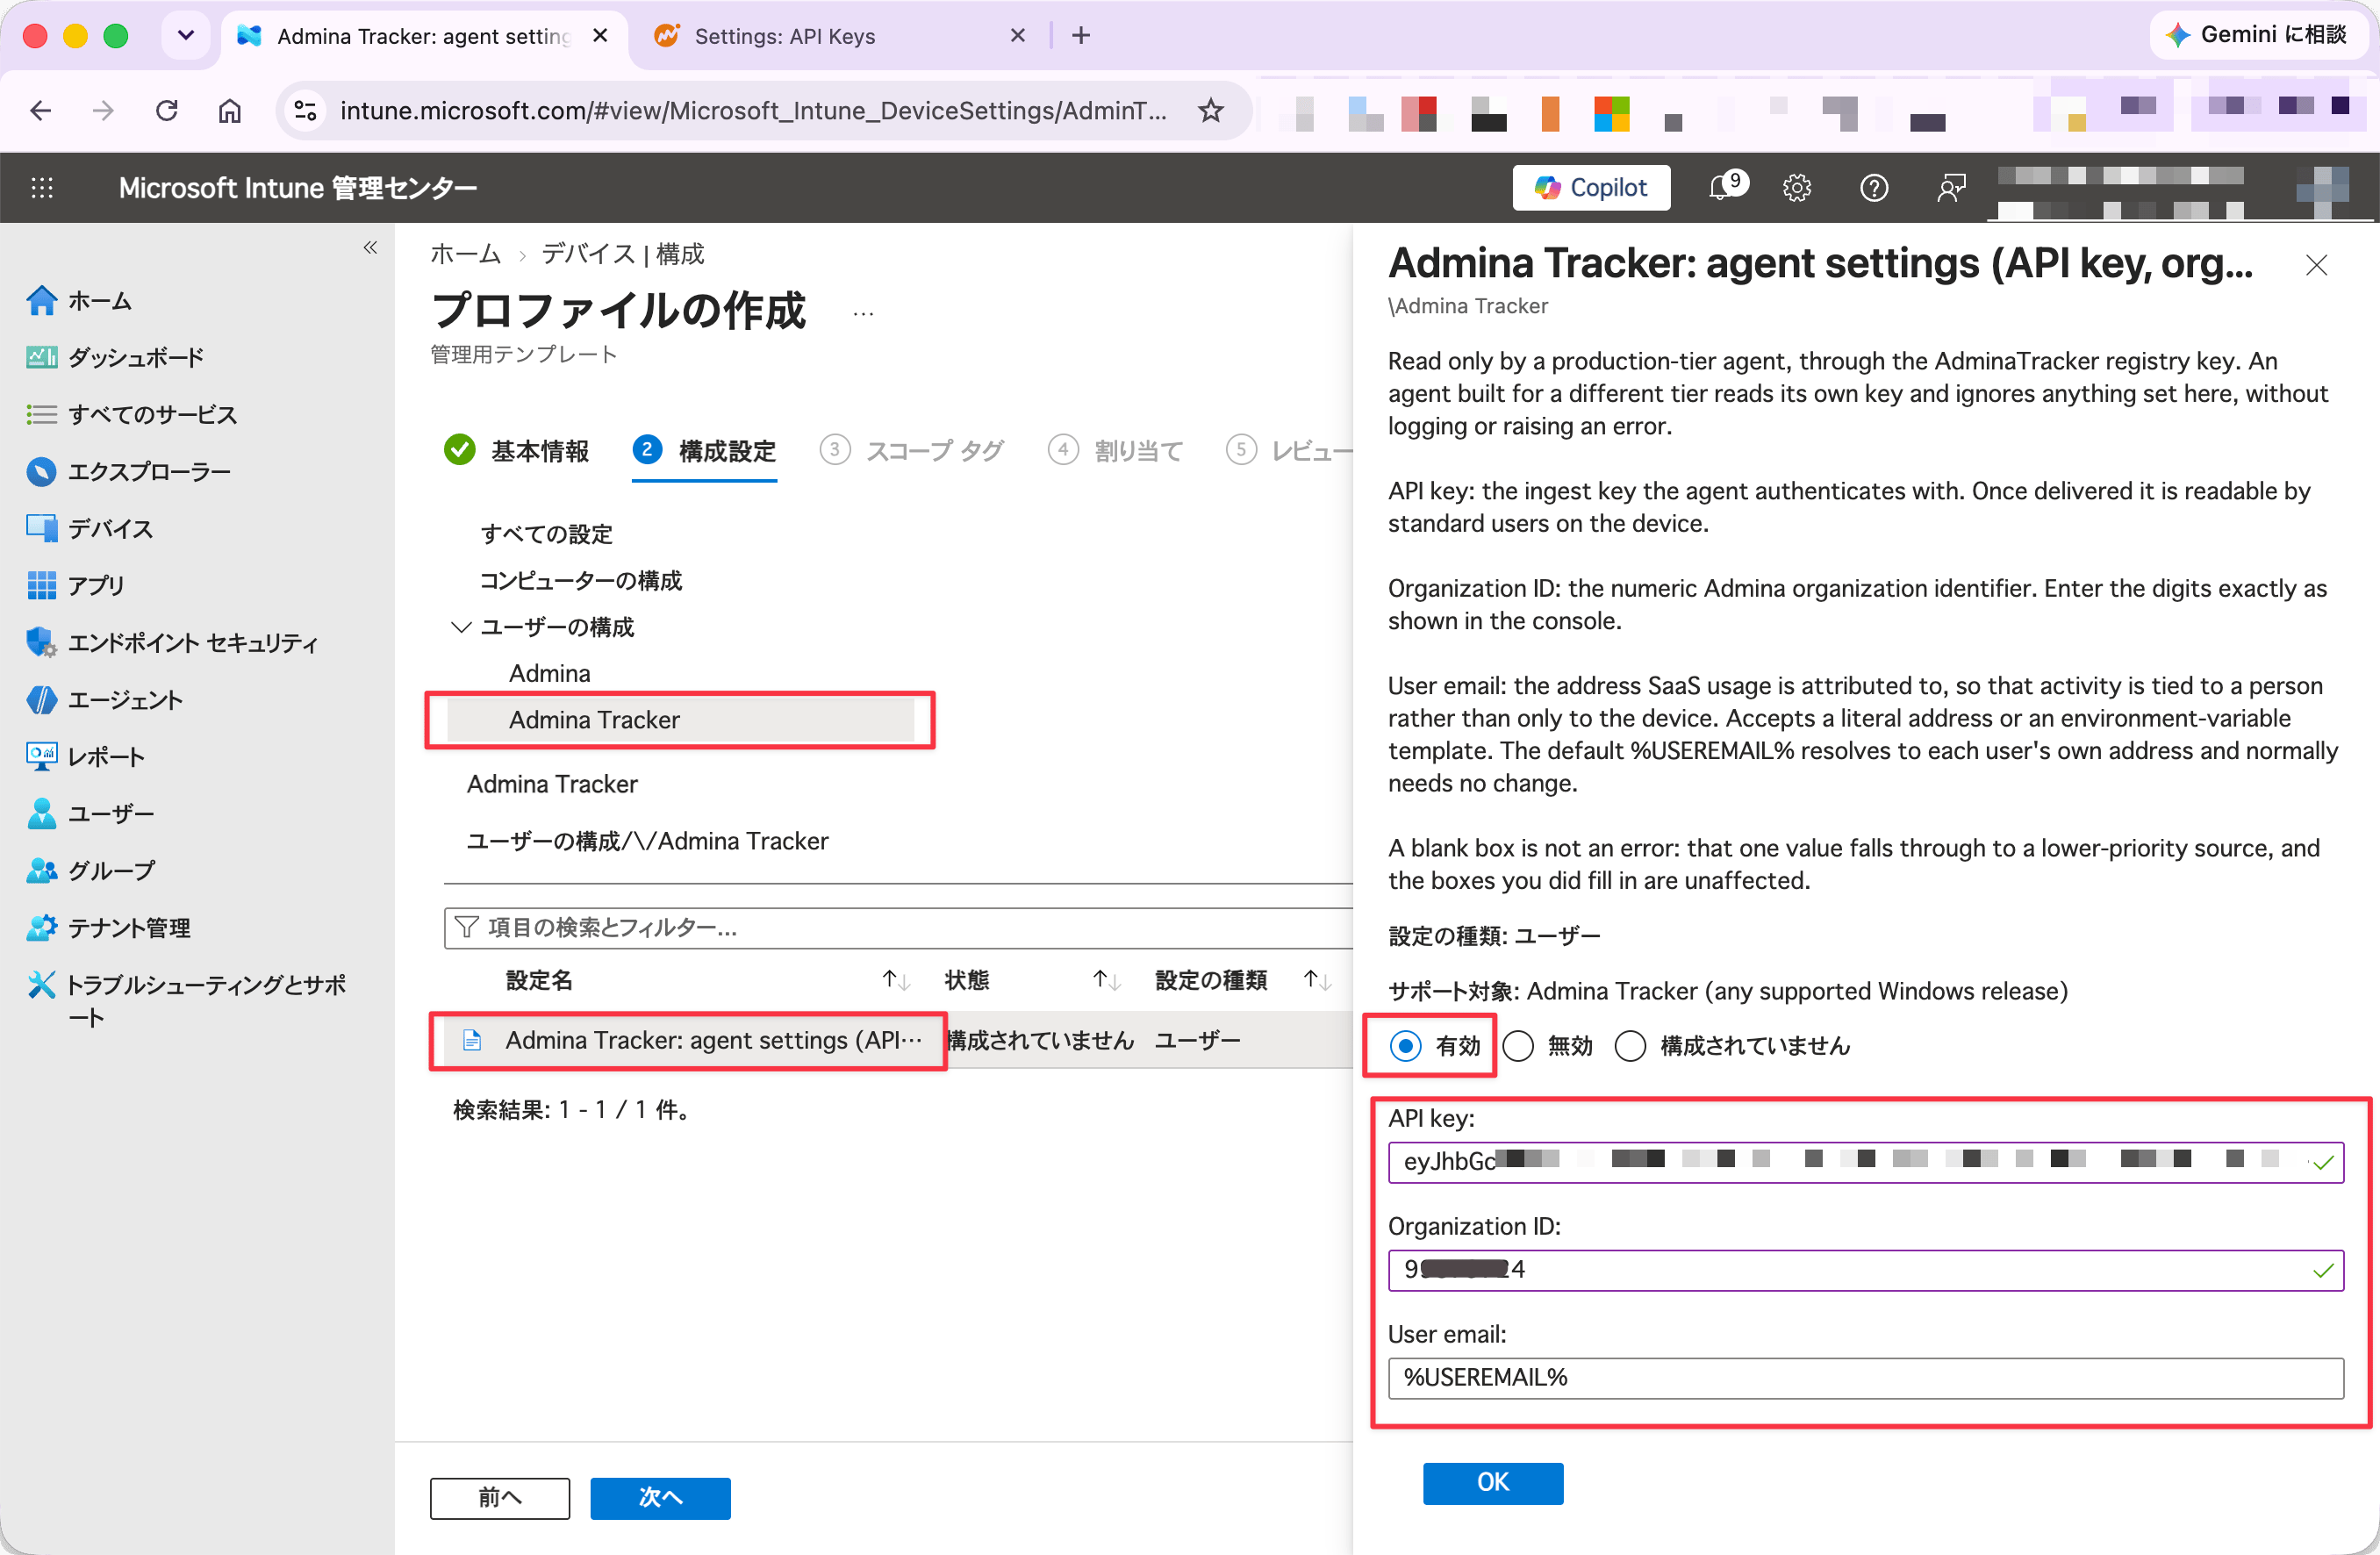
- Enable the policy and fill in the three values
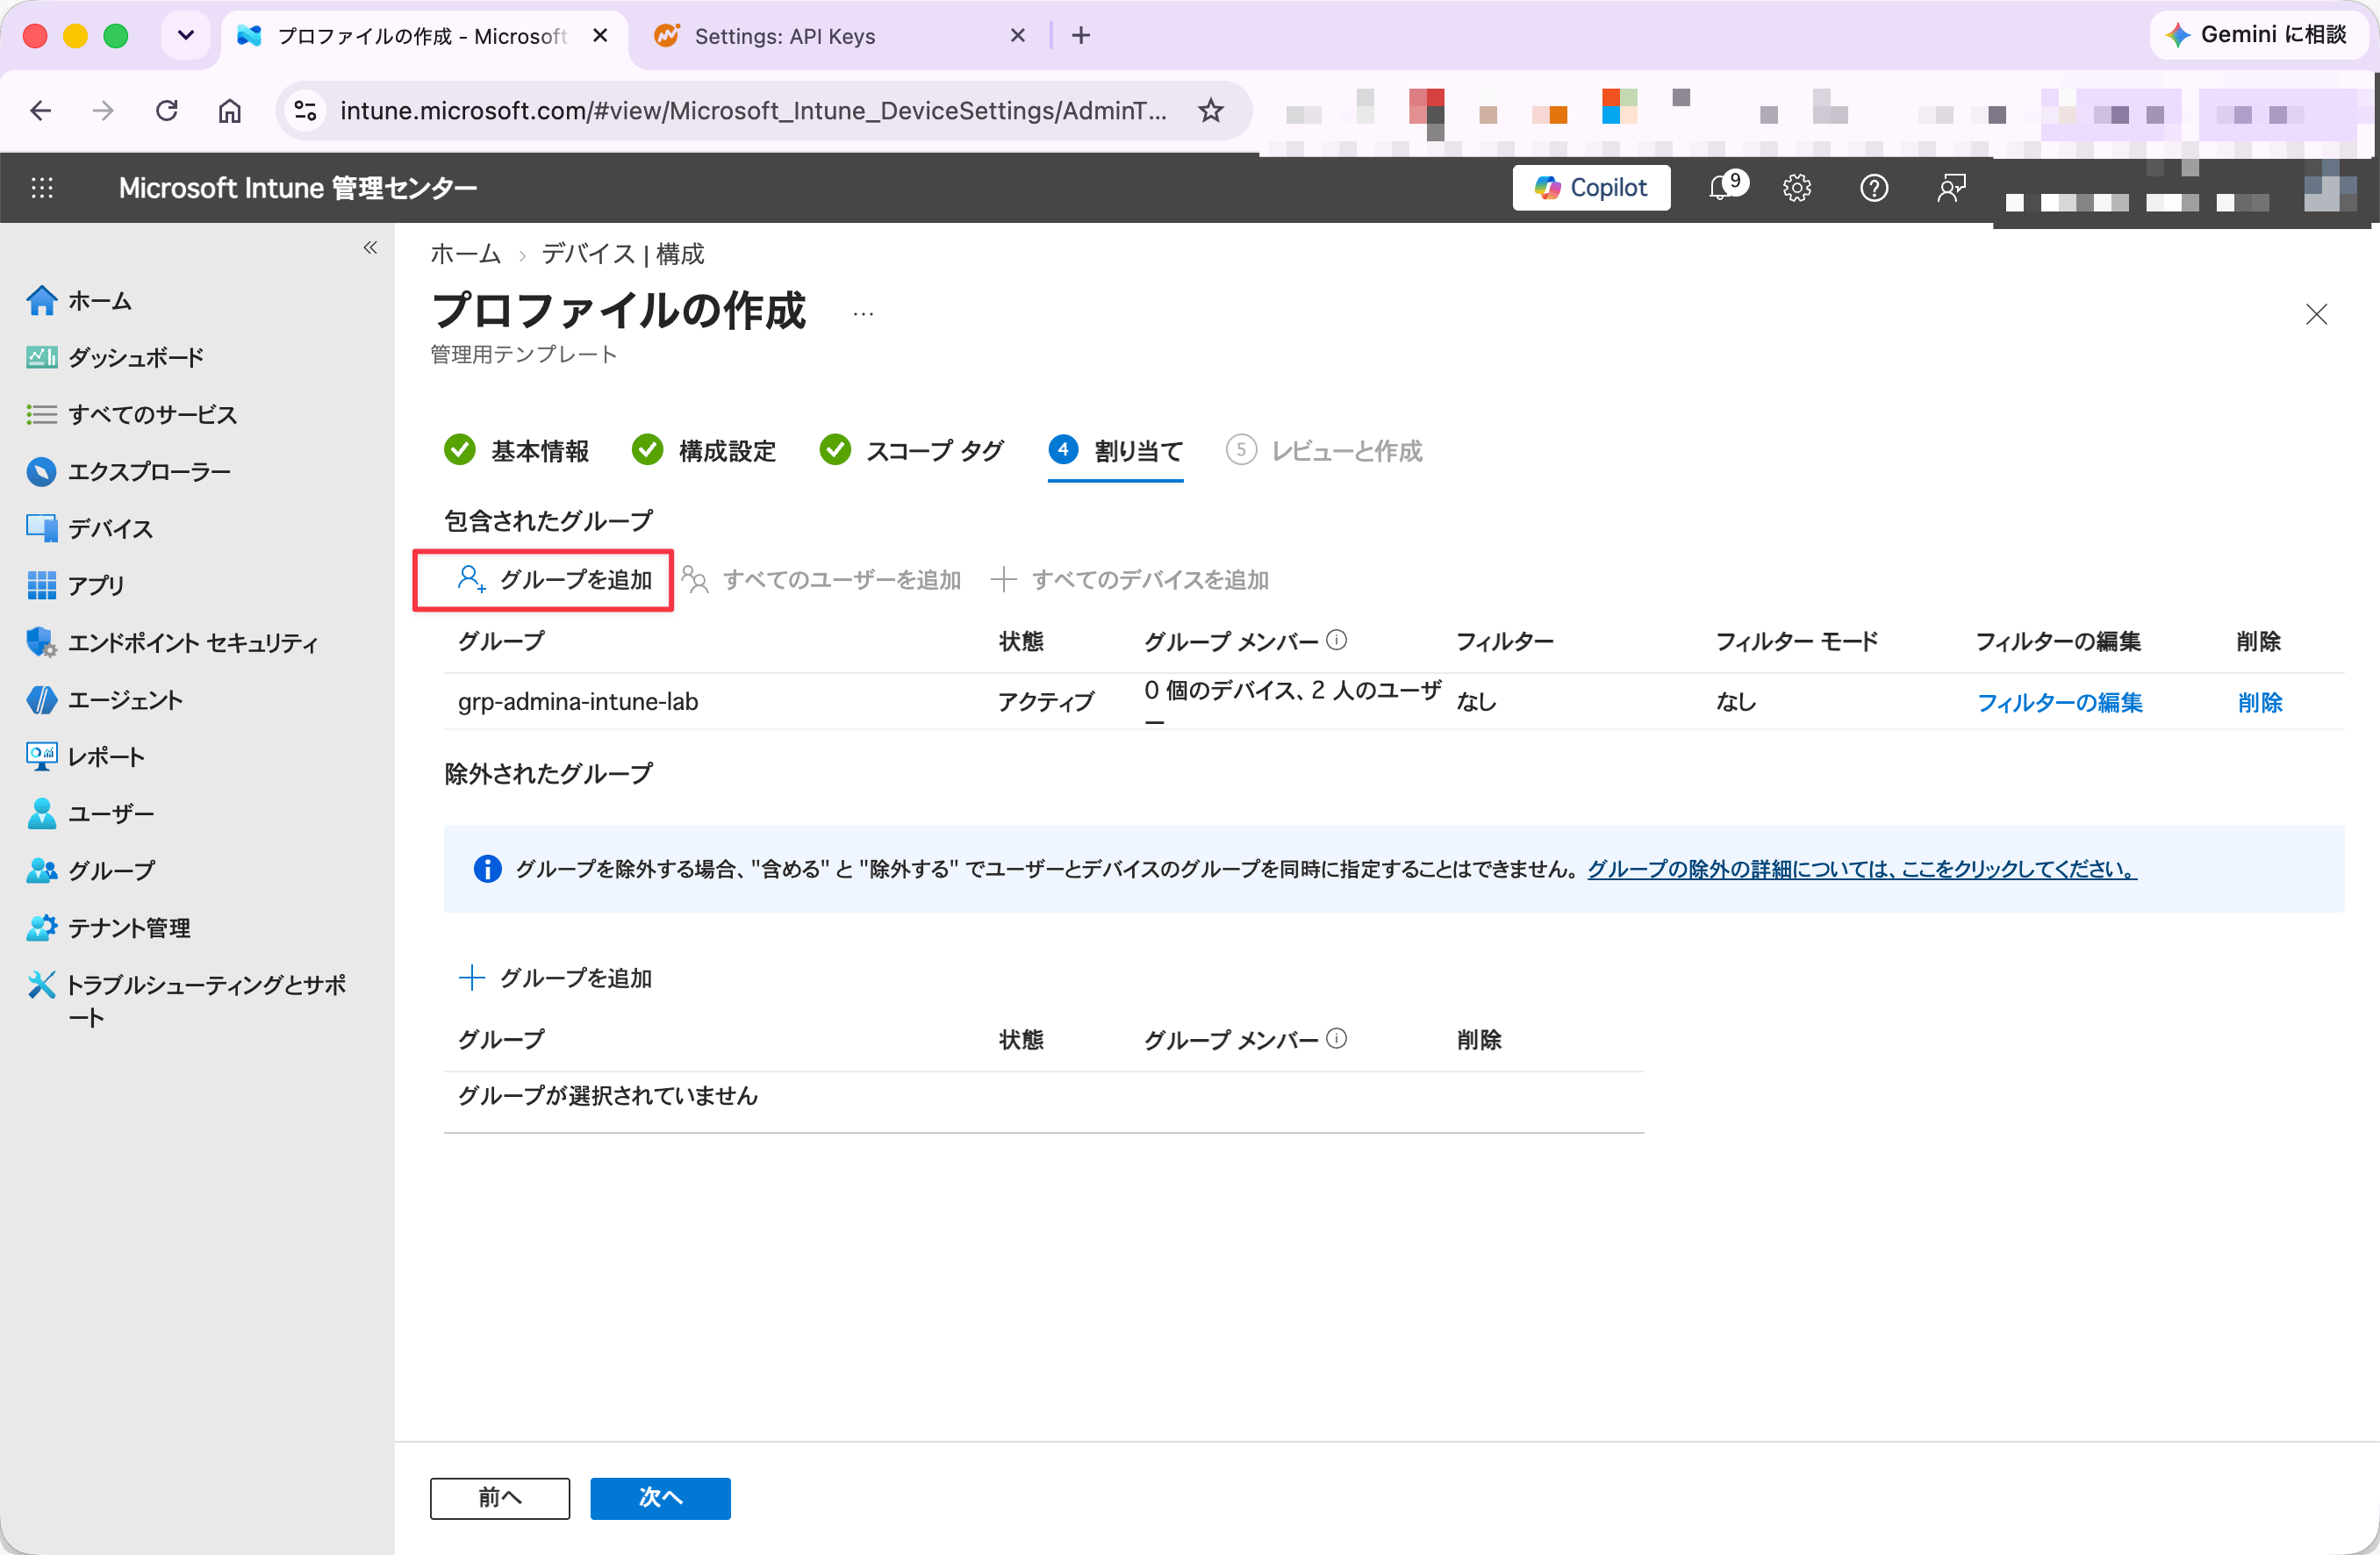
- Add the user group under Assignments
Distribute UserEmail
Leave the configuration policy’sUserEmail field at its default of %USEREMAIL%. Then deploy Set-UserEmailEnv.ps1 as an Intune platform script. The ADMX template ships this default, so there is nothing to type. The ADMX UserEmail field is treated as expandable="true" (REG_EXPAND_SZ). At agent startup, it expands using HKCU\Environment\USEREMAIL in the current session.
To learn where to obtain Set-UserEmailEnv.ps1 and how to deploy it in Intune, see Admina Extension Intune deployment. Refer to the section “Step 3: Deploy the email address script”. If you have already deployed Admina Extension via Intune, Set-UserEmailEnv.ps1 is already on client devices. Tracker requires no additional deployment. One deployment covers both Extension and Tracker.
After deployment, run the following command in the target user’s session to verify the environment variable is set:
%USEREMAIL% expansion fails, the Tracker agent rejects the template string as a value. It then falls back to a lower-priority configuration source. The literal %USEREMAIL% is not sent as the email address.
Step 3: Add and assign the app
- In Intune admin center, go to Apps > Windows > Add.
- Select Windows app (Win32) as the App type.
-
In Select app package file, upload the deployment package file (
.intunewin). -
In App information, configure the following:
-
Name:
Admina Tracker -
Publisher:
Money Forward i, Inc -
Description: Paste the following text
-
Logo: Right-click the image below, save it, and upload it (PNG, 512 × 512)

The description is also shown to end users in the Company Portal app. Write it for the people who will read it there, not as an internal identifier. Adjust the wording about what is collected to match what your organization has communicated internally. Category, Show this as a featured app in the Company Portal, and Logo also affect how the app appears in the Company Portal. -
Name:
-
In Program, configure the following:
-
Install command:
-
Uninstall command:
- Install behavior: User
- Device restart behavior: No specific action
-
Return codes:
0(Success) /1(Failed)
Always set Install behavior to User. The agent installs into each user’s profile directory and does not require administrator privileges (System context). -
Install command:
-
In Requirements, configure the following:
- Operating system architecture: x64
- Minimum operating system: Windows 10 1809
-
In Detection rules, configure the following:
- Rules format: Use a custom detection script
- Script file: Upload
Detect-AdminaTracker.ps1included in the deployment files - Run script as 32-bit process on 64-bit clients: No
- Enforce script signature check and run script silently: No
Detection scripts cannot take arguments, so the deployment files include a pre-generated script with the environment already baked in. Use the one included in the deployment files as-is. Uploading a script built for a different environment makes detection report “not installed” every time, so Intune reinstalls the agent repeatedly. - Dependencies and Supersedence need no configuration. Click Next to continue.
-
In Assignments, add the target user groups to the Required section.
Because the install behavior runs in user context, assign the app to user groups rather than device groups.
- In Review + create, review the settings and click Create.
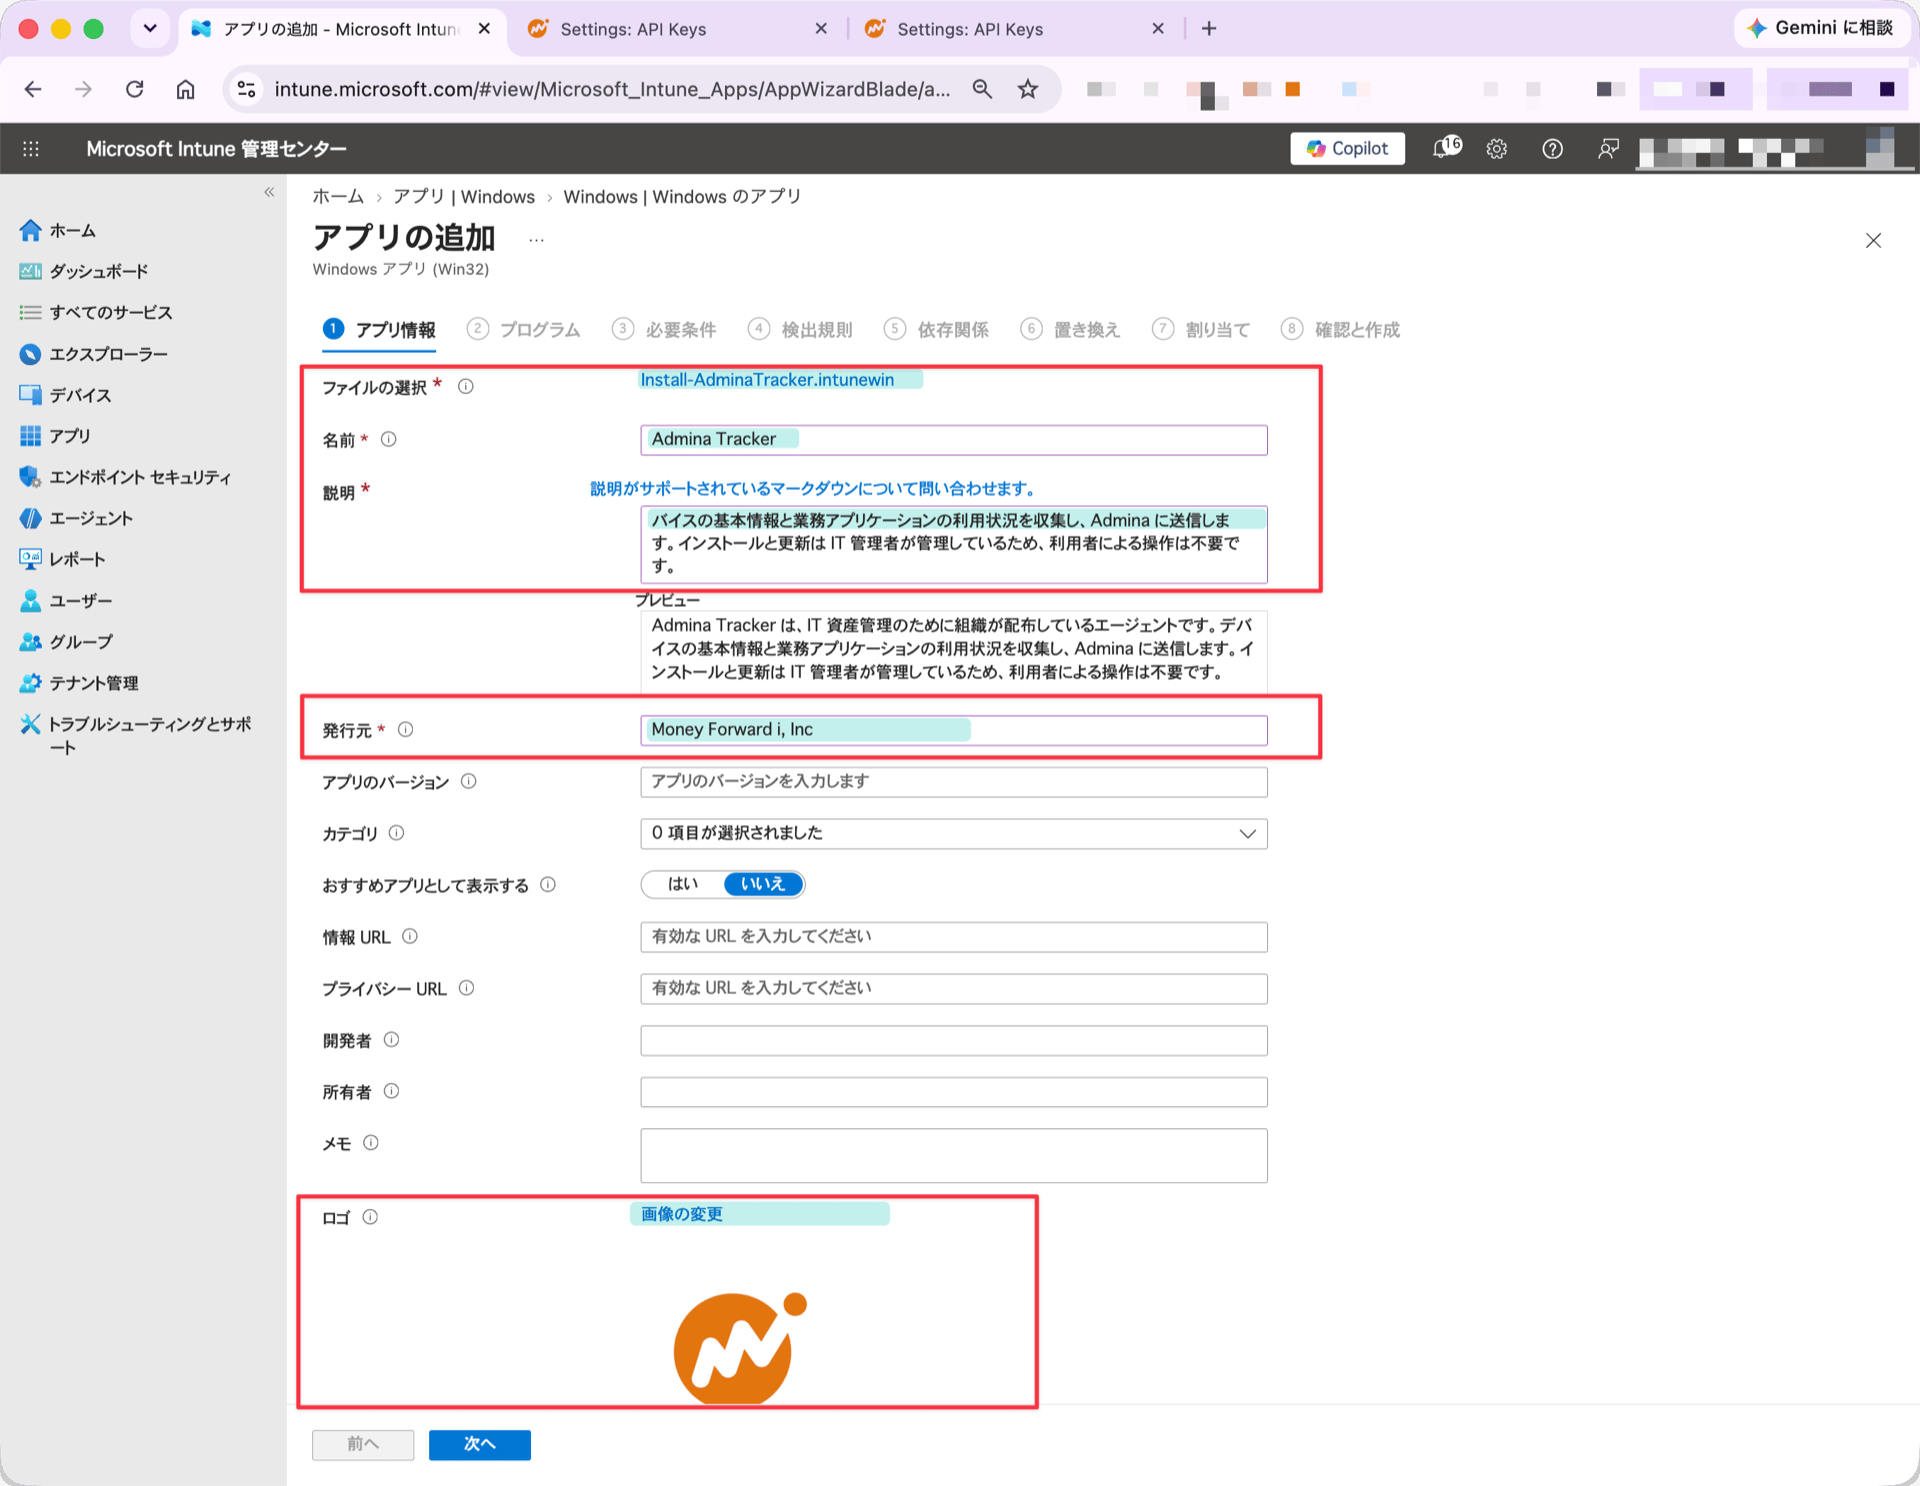
- Set the package, name, description, publisher, and logo in App information
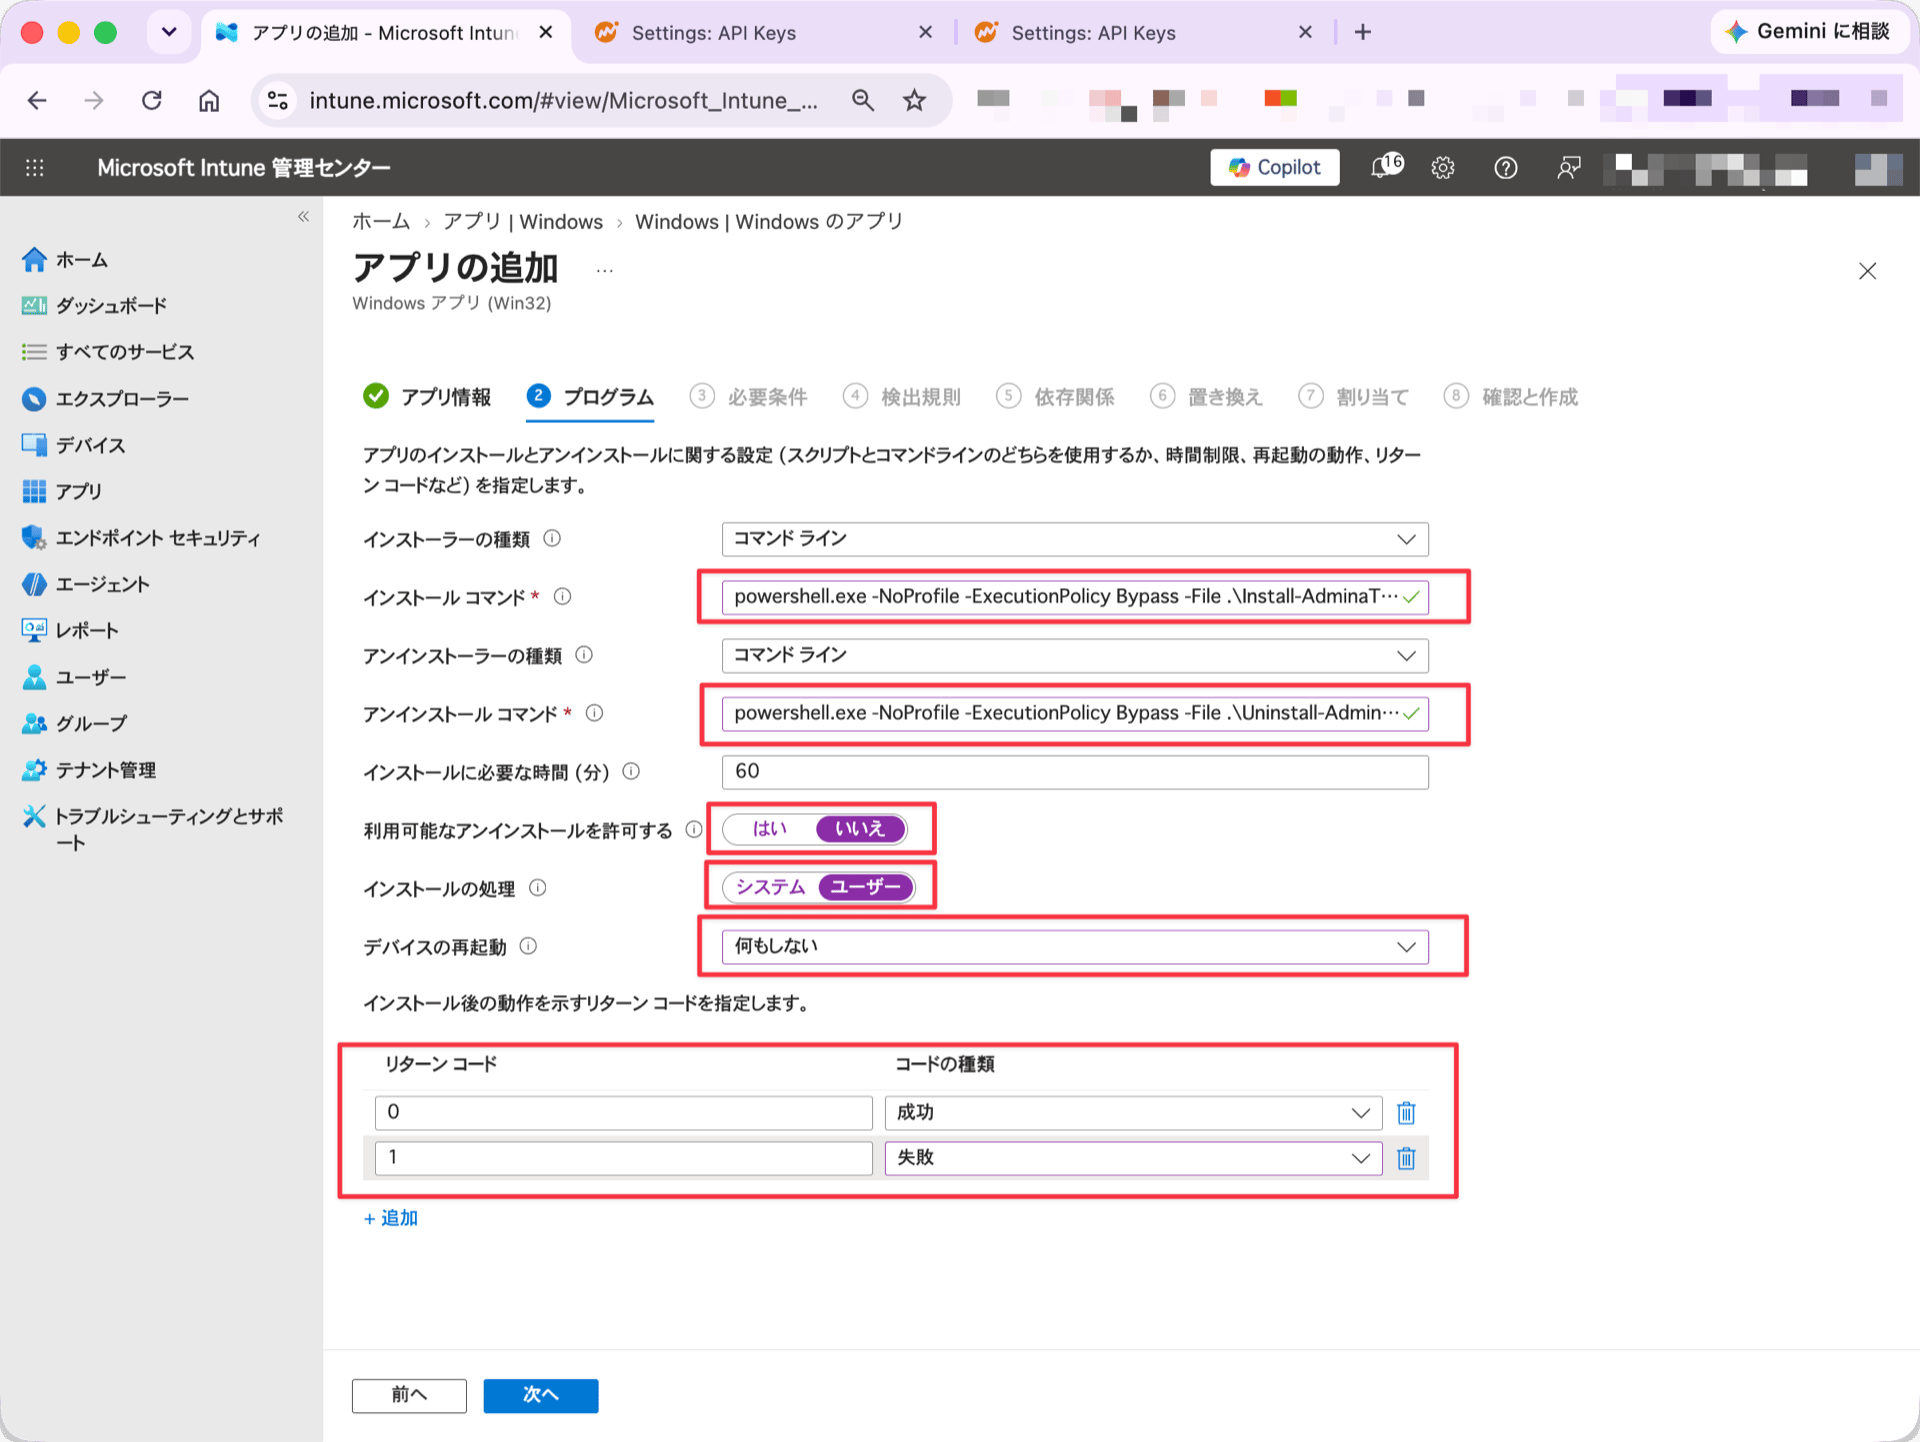
- Set the commands and install behavior in Program
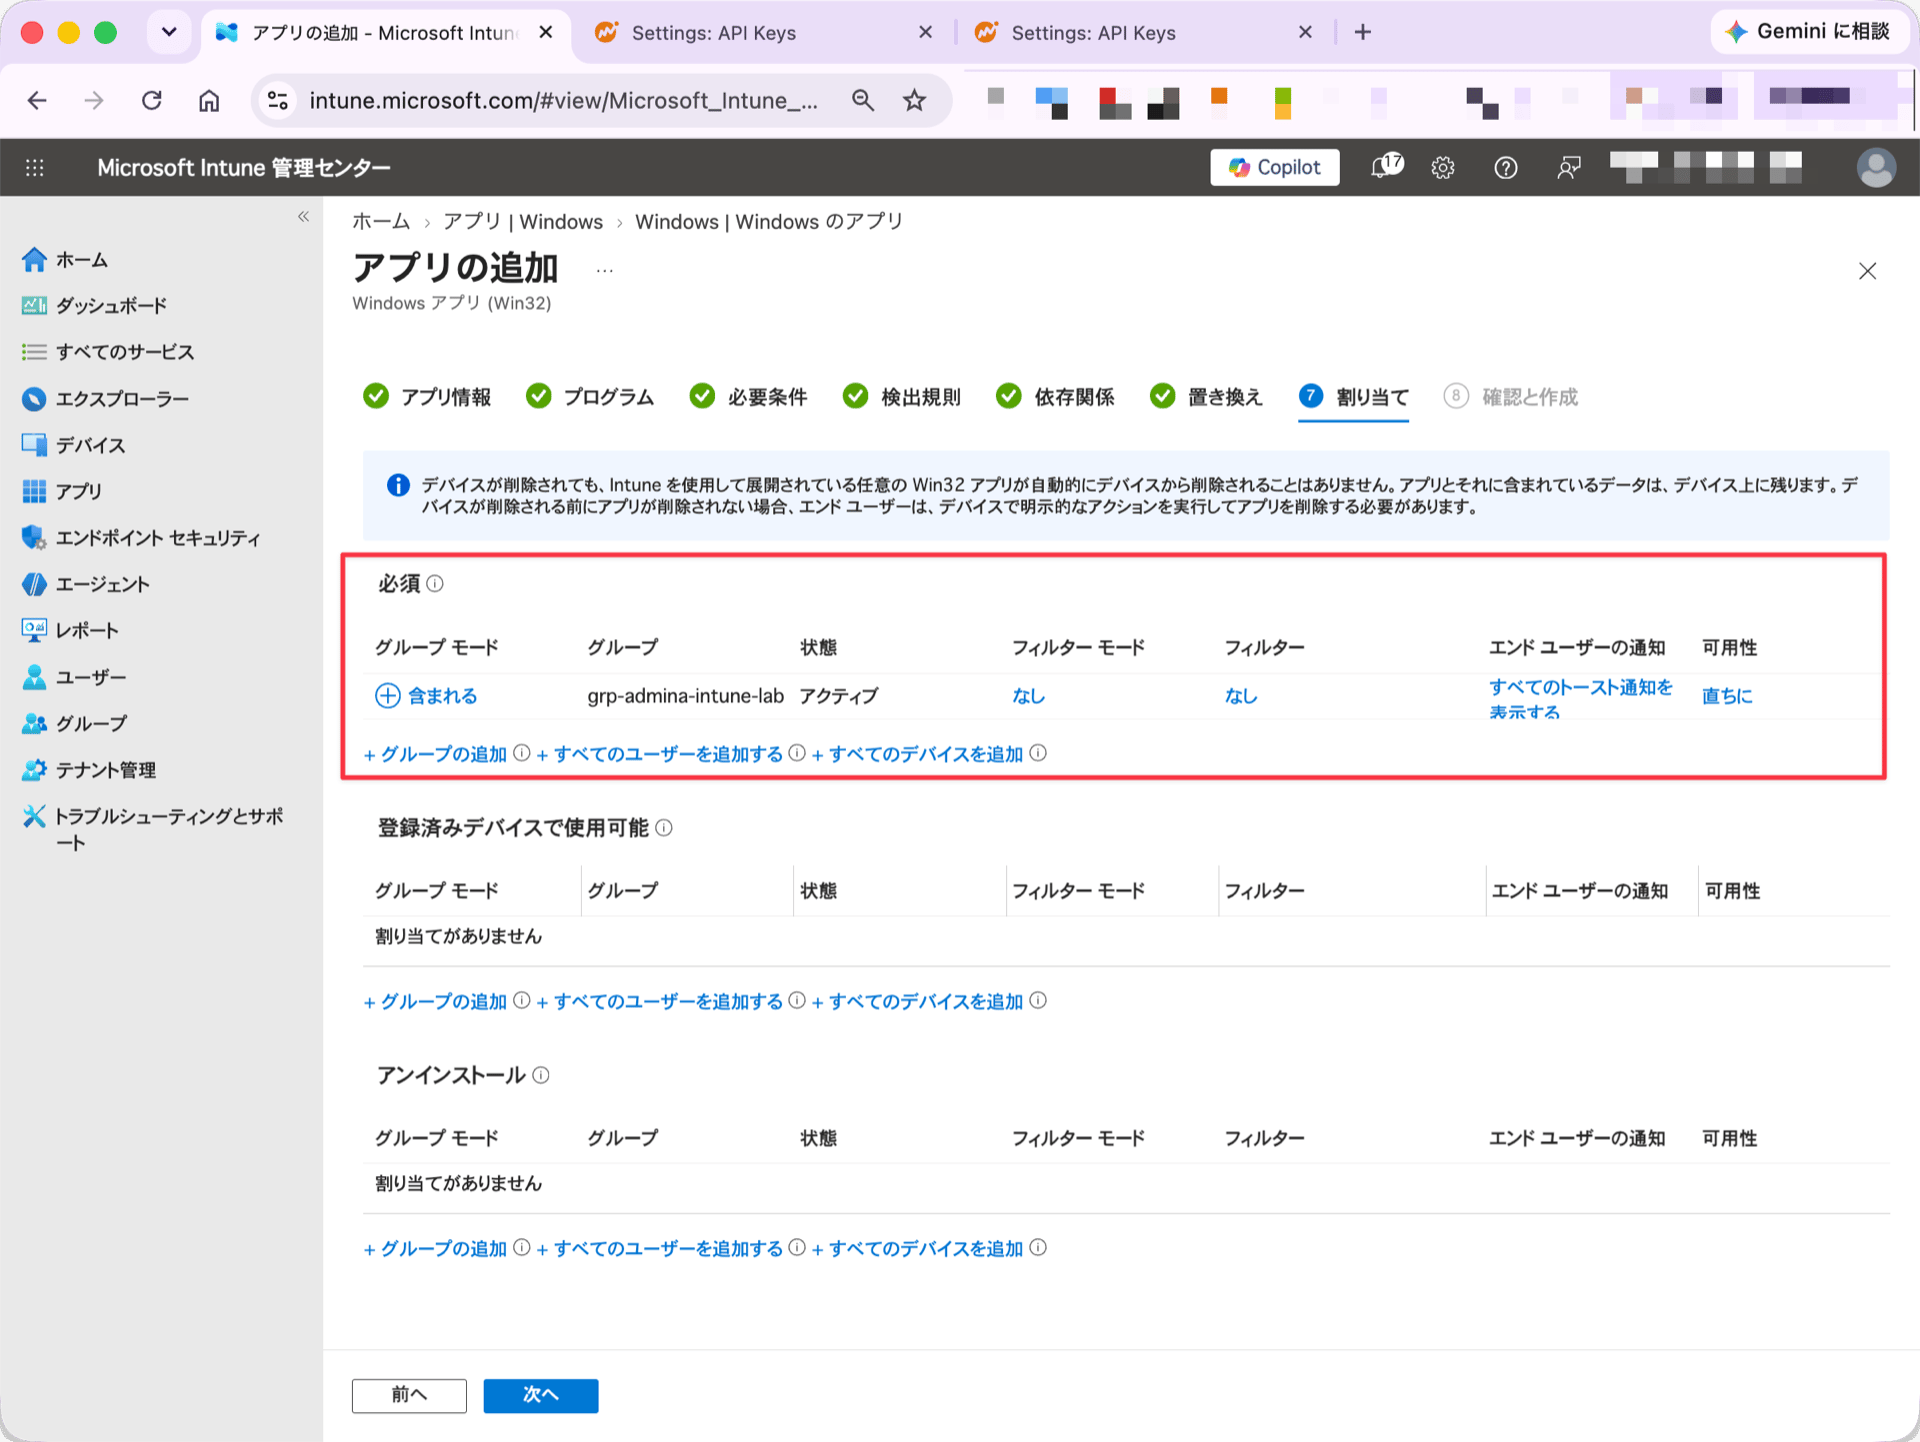
- Add a user group to Required in Assignments
Verify operation
Verify in Intune admin center
Check the deployment status in Microsoft Intune admin center:- In Intune admin center, go to Apps > Windows > Admina Tracker.
- Check Device install status or User install status.
- Confirm that the target device or user status shows “Installed”.
Verify agent operation on the client device
On devices deployed via Intune, the agent is installed in%LOCALAPPDATA%\AdminaTracker\. Open Command Prompt or PowerShell. Run status or diag with the full path to check status and connectivity.
PowerShell example:
Deployed configuration values
The configuration profile writes settings to the following registry keys on client devices:- Settings are written to
HKLMfor computer configurations, orHKCUPolicies hive for user configurations.
Uninstall
When uninstalling Admina Tracker, note that the app and configuration profile manage separate areas.Important: Removing the configuration profile (ADMX) assignment alone will not stop the agent from collecting and sending data. The local database retains cached configuration values from the previous successful run (such as the API key). If the policy settings disappear, the agent automatically falls back to these cached values and continues sending telemetry. To completely stop data collection and transmission, you must uninstall the app itself (which removes the database).
Uninstall the app
- In Intune admin center, open Apps > Windows > Admina Tracker.
- Open Properties > Assignments > Edit.
- Remove the target group from “Required”, and add the target user group to the “Uninstall” section.
- Confirm that the Group mode on the row you added reads Included.
- After saving, the uninstaller runs during the next client sync, removing the app binaries and scheduled tasks.
- Confirm that Device install status displays “Uninstalled”.
Do not delete the app registration itself from your Intune tenant before sending the uninstall instruction to devices. Deleting the app definition prevents Intune from issuing uninstall commands, leaving the agent installed on client devices.
Remove configuration profile assignment
- In Intune admin center, open Devices > Configuration.
- Open the Admina Tracker configuration profile and edit Properties > Assignments.
- Remove the target group from the assignment and save.
- Upon client sync, policy values in the registry (
Policieshierarchy) are automatically removed.
Resources removed during uninstallation
The resources removed by app uninstallation versus profile unassignment are as follows:Troubleshooting
Installation status shows “Failed”
- Check target group assignment: Verify that the assignment is set to a user group, not a device group.
- Check Intune logs: Check logs in
C:\ProgramData\Microsoft\IntuneManagementExtension\Logs\for error details.
Configuration settings are not applied
- Check ADMX template status: In Import ADMX, confirm that the template status shows “Available”.
- Check profile type: Verify the profile uses “Imported Administrative templates (Preview)”, not built-in templates.
Uninstall never runs
If nothing happens after you assign the uninstall, check the following in order. 1. Check the group mode In Intune admin center, open Apps > Admina Tracker > Properties > Assignments. Confirm that the Group mode on the “Uninstall” row reads Included. An assignment set to “Excluded” targets nobody, so the uninstall never runs. 2. Check whether the device received the uninstall instruction Open PowerShell in the target user’s session and run:Count of 0 means the device does not consider itself targeted by this app. Review the assignment (step 1) and the group membership.
3. Force re-evaluation
Win32 apps are re-evaluated roughly every 8 hours by default. To run it immediately, open PowerShell as an administrator and run:
lpExitCode 0 together with an EnforcementState of Success means the uninstall completed normally.
Agent remains after uninstallation
- Only configuration profile was removed: Removing the profile leaves agent binaries. Set app assignment to “Uninstall”.
- User not signed in: Uninstallation completes only after the user signs in and triggers a sync.
- File lock: If files are locked by antivirus scans or updater processes, sign out, sign in again, and retry the sync.