

Setup at a glance (shortest path)
On the target PC, the user performs the following three steps. No scripts or registry edits are needed. For details, see Setup steps.
Checks after saving (shortest)
- Confirm that no warning appears on the settings screen
- Click the reload button at the bottom right of the settings screen
- Confirm that data appears in Integrations > Event Log in the admin console
Overview
This page describes how to install the extension from the store. You then set it up by entering values on the extension settings screen. You configure one PC at a time. This method suits testing on your own PC and installation on a small number of PCs. With this method, the extension isn’t force-installed. Users can disable or remove the extension. Removing it also deletes the values entered on the settings screen. If you want to prevent users from removing the extension, choose one of the following methods.- To force-install on a single PC through the registry: Install the browser extension (Windows registry)
- To distribute in bulk with GPO: Install the browser extension (Windows GPO)
- To distribute in bulk with Intune: Install the browser extension (Windows Intune)
Prerequisites
- The common Windows prerequisites are met (see Browser extension deployment on Windows)
- Extensions can be installed from the store. If your organization’s policy restricts extension installation, check with your browser administrator
- Windows administrator rights aren’t required
Setup steps
Step 1: Get the values from the admin console
In the admin console, open Settings > Browser Extension > Extension policy. Note the values ofApiKey and OrganizationID.
Step 2: Install the extension from the store
Open the store page for your browser and add the extension.
If you use both Chrome and Edge, install the extension and complete Step 3 in each browser. Values entered on the settings screen are saved per browser.
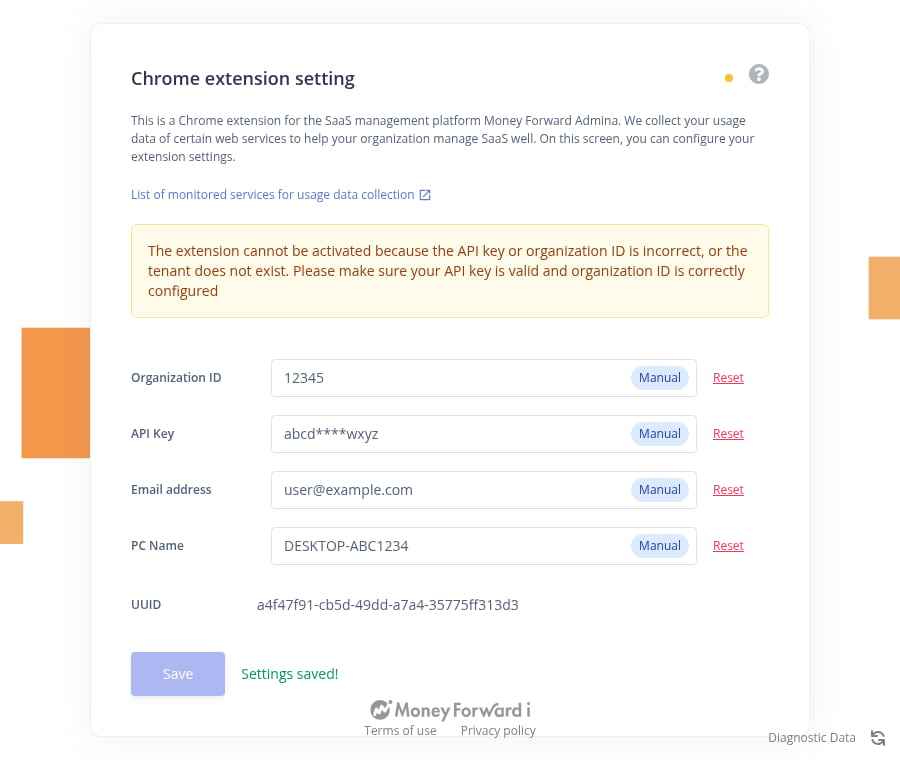
Step 3: Enter the values on the settings screen
- Click the extension icon on the browser toolbar, then open the settings screen from the settings (⚙️) icon.
-
Enter the following values.
- Click Save. Setup is complete when “Settings saved!” appears.
Verification
Check 1: Settings screen
Confirm that no warning appears on the settings screen. A warning may say that the API key or organization ID is incorrect. In that case, compare Organization ID and API Key with the values from Step 1.Check 2: Reload button
Click the reload button at the bottom right of the settings screen. The reload button reloads the configuration values and sends unsent data in one action. IfReloaded! Sent N records. appears, data has been sent. If only Reloaded! appears, there is no data to send yet. Open some SaaS applications, then click it again.
Check 3: Event logs
Confirm that Chrome or Edge data appears in Integrations > Event Log in the admin console. For details, see Check data after rollout. If no data appears, review your configuration with Get Diag data for the browser extension.FAQ
For common Windows questions, see Browser extension technical notes and FAQ for Windows.Q. How do I uninstall the extension?
Openchrome://extensions (edge://extensions for Edge) and click Remove for the extension. The values entered on the settings screen are also deleted.