How to integrate Autosana with Admina using an API key. Admina retrieves data such as user names, email addresses, and roles and supports account creation and deletion.
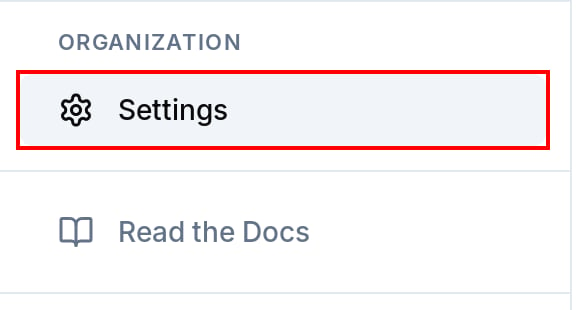
After logging in to Autosana, select Settings under ORGANIZATION in the left-side menu.
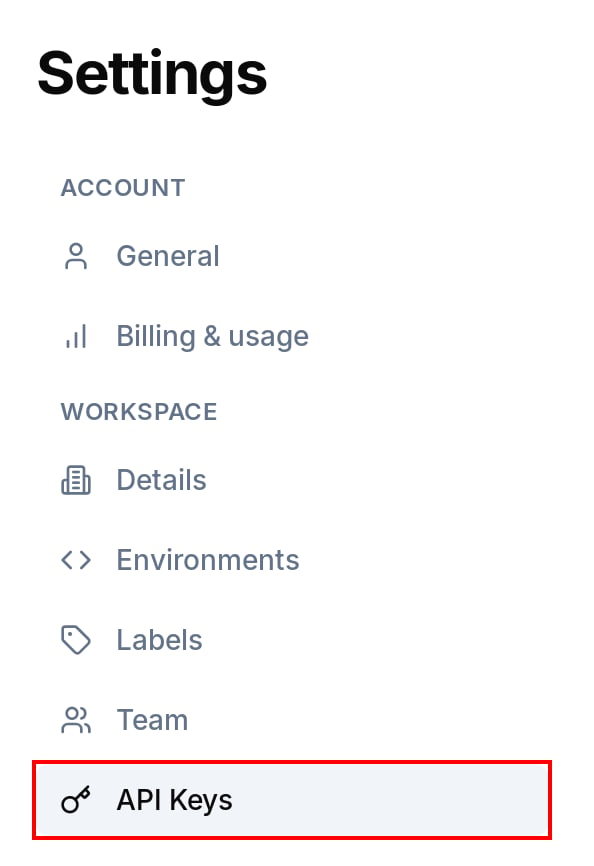
In the settings menu, select API Keys under WORKSPACE.
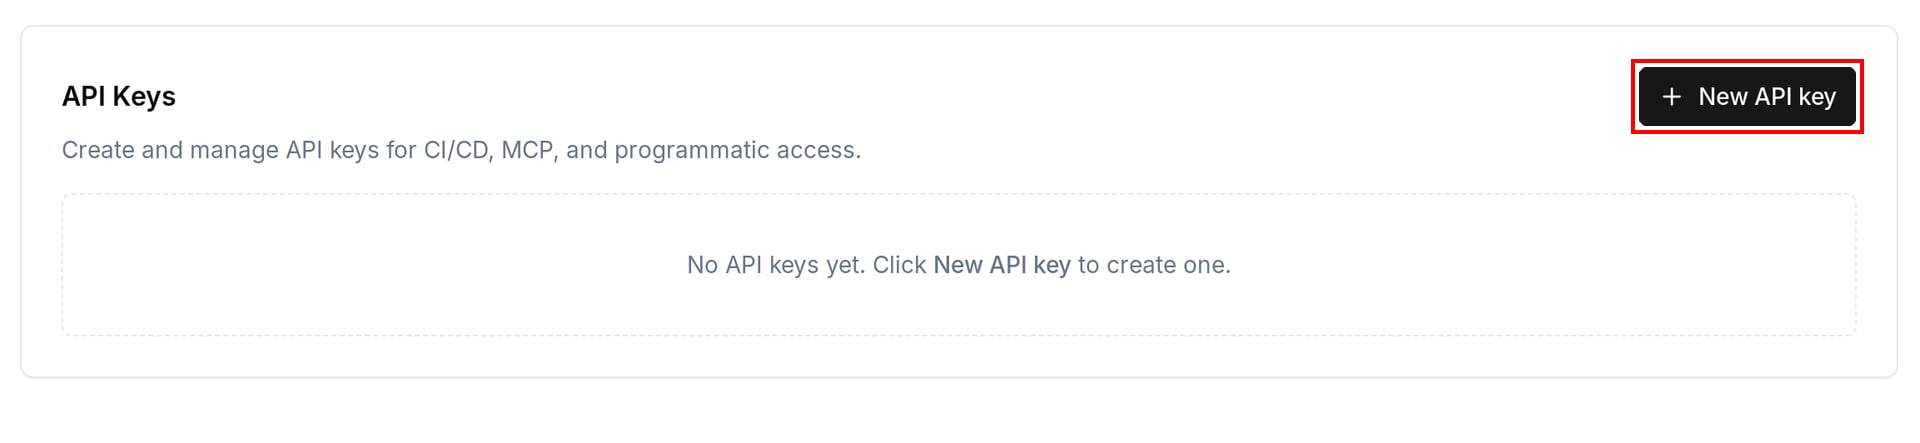
Click New API key in the upper-right corner.
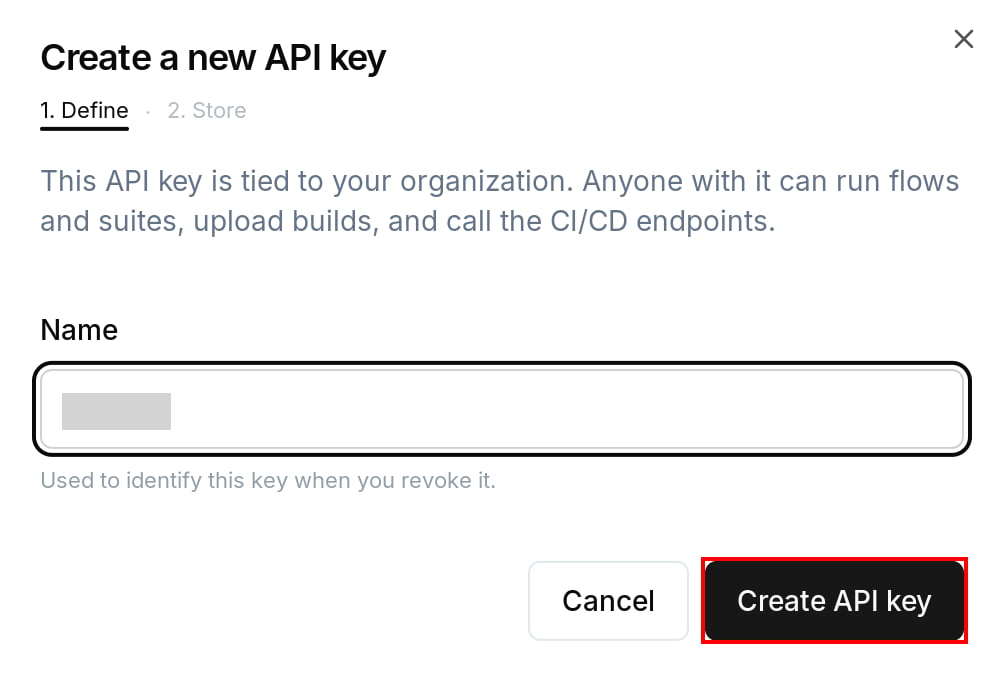
Enter a name that shows the key is used for Admina in Name, and click Create API key.
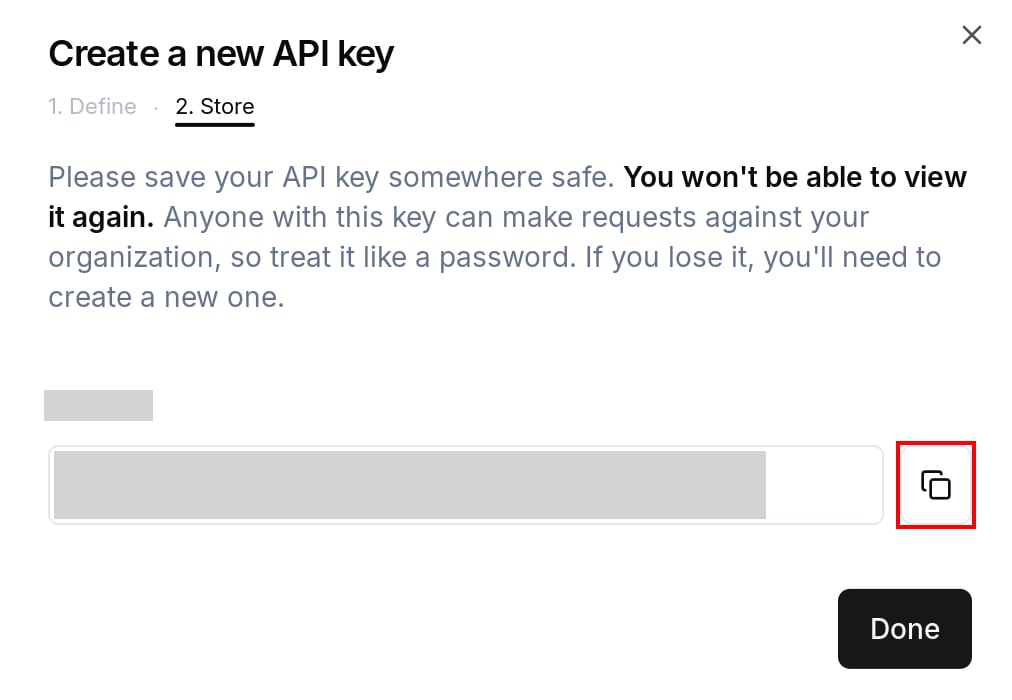
Click the copy icon to the right of the issued key to copy it, then save it. The key is shown only on this screen, so make sure to save it now.
This API key acts as an administrator, so Admina can invite members. Create it as an Autosana Owner or Admin user.
The roles you can select when inviting from Admina are Member and Admin. Admina can remove only members whose role is Member. Remove Owner and Admin members from Settings > Team in Autosana.
Autosana has three roles: Owner, Admin, and Member. For details, see Autosana’s Team (external site).
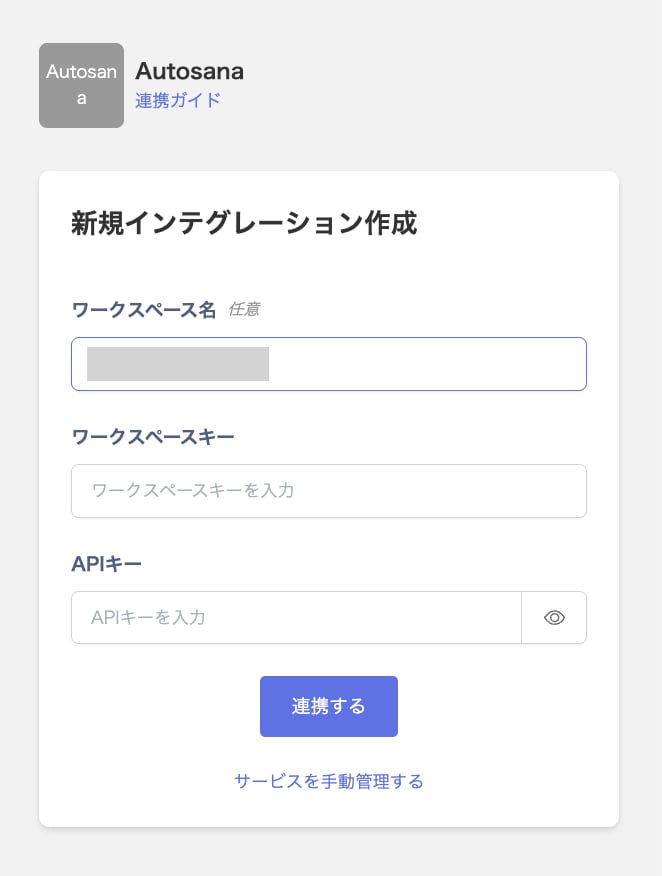
Enter any string into Workspace key. Enter the API key you copied in the previous step into API key, and click Connect. Workspace name is optional.
Once the integration with Autosana succeeds, registered user information appears in the account list. If it doesn’t complete successfully, first try the steps in Troubleshoot SaaS integration errors. If that doesn’t resolve it, check Information to provide and contact support.
Last modified on November 5, 2026
Was this page helpful?
{"docsConfig":{"theme":"mint","$schema":"https://mintlify.com/docs.json","name":"Admina Help Center","colors":{"primary":"#4361ee","light":"#bcd1ff","dark":"#4361ee"},"logo":{"light":"https://mintcdn.com/moneyforwardi/r7Kl_XskKl0zZU6O/images/logo-light.png?fit=max\u0026auto=format\u0026n=r7Kl_XskKl0zZU6O\u0026q=85\u0026s=34f61220e23b4287c2562d1517958299","dark":"https://mintcdn.com/moneyforwardi/r7Kl_XskKl0zZU6O/images/logo-dark.png?fit=max\u0026auto=format\u0026n=r7Kl_XskKl0zZU6O\u0026q=85\u0026s=5b6db21942c268fab71887726d3cf3f7","href":"/"},"favicon":"https://mintcdn.com/moneyforwardi/sBonQ3jiLBZfmNUI/images/favicon.jpg?fit=max\u0026auto=format\u0026n=sBonQ3jiLBZfmNUI\u0026q=85\u0026s=357aac4e2a753f60c369805a0e93e061","appearance":{"default":"system"},"background":{"color":{"light":"#faf9f7","dark":"#050919"}},"navbar":{"links":[{"href":"https://admina.moneyforward.com/jp","label":"サービス紹介"}],"primary":{"type":"button","label":"ログイン","href":"/goto/service-login"}},"footer":{"socials":{"x":"https://x.com/A_D_M_I_N_A_MFi","github":"https://github.com/moneyforward-i","facebook":"https://www.facebook.com/moneyforwardi"},"links":[{"header":"サービス","items":[{"label":"サービス紹介","href":"https://admina.moneyforward.com/jp"},{"label":"ログイン","href":"/goto/service-login"},{"label":"サービス稼働状況","href":"https://status.i.moneyforward.com/"}]},{"header":"規約","items":[{"label":"利用規約","href":"https://admina.moneyforward.com/jp/terms-of-service"},{"label":"プライバシーポリシー","href":"https://admina.moneyforward.com/jp/privacy"},{"label":"AIサービス特約","href":"https://admina.moneyforward.com/jp/terms-of-service"},{"label":"外部送信ツールに関する公表事項","href":"https://admina.moneyforward.com/jp/external-tools"}]},{"header":"会社情報","items":[{"label":"会社概要","href":"https://admina.moneyforward.com/jp/company"},{"label":"お問い合わせ","href":"https://admina.moneyforward.com/jp/contact"}]}]},"seo":{"metatags":{"google-site-verification":"NQWwJQFaBXylW27NyMRORXsBvXNu-mUz6MDPqC7NzF8","og:site_name":"Admina ヘルプセンター","og:locale":"ja_JP","og:type":"website","twitter:card":"summary_large_image","twitter:site":"@A_D_M_I_N_A_MFi"},"paths":[{"path":"en","metatags":{"og:site_name":"Admina Help Center","og:locale":"en_US"}}],"indexing":"navigable"},"fonts":{"heading":{"family":"Sora","weight":600},"body":{"family":"Nunito Sans","weight":400}},"icons":{"library":"fontawesome"},"integrations":{"clarity":{"projectId":"x8ucua5277"},"gtm":{"tagId":"GTM-PGZJN7LM"},"intercom":{"appId":"wgvy651g"}},"errors":{"404":{"redirect":true}},"contextual":{"options":["copy","view","chatgpt","claude"],"display":"header"},"thumbnails":{"appearance":"light","background":"https://mintcdn.com/moneyforwardi/UrS7Sqkq91cqBl-T/images/thumbnail-bg.svg?fit=max\u0026auto=format\u0026n=UrS7Sqkq91cqBl-T\u0026q=85\u0026s=fd3dfe79cbd33b042fef3356c334195f","fonts":{"family":"Noto Sans JP"}},"metadata":{"timestamp":true},"styling":{"latex":false},"navigation":{"languages":[{"language":"ja","href":""},{"language":"en","href":"en"}]}},"deployment":{"deploymentMetadataValue":{"subdomain":"moneyforwardi","hasAudioNarration":false,"actualSubdomain":"moneyforwardi","customDomains":["support.i.moneyforward.com"],"gitSource":{"type":"github","owner":"moneyforward-i","repo":"admina-support-docs","deployBranch":"main","contentDirectory":"docs","isPrivate":true,"mountPath":"","label":""},"chroma":{"liveDeploymentHistoryId":"6aec1f67afba45a8ed3260a8","collectionId":"8229bf38-f3b5-4bde-86c8-22b593a1ae51","schemaVersion":"v3","latestBuiltDeploymentHistoryId":"6aec1f67afba45a8ed3260a8"},"feedback":{"agentFeedback":true,"thumbs":true},"entitlements":{"AI_CHAT":{"status":"DISABLED"}},"buildId":"6aec1f67afba45a8ed3260a8","clientVersion":"0.0.4067","searchFilterCounts":[{"language":"ja","tag":"インテグレーション","count":492},{"language":"en","tag":"Integration","count":492},{"language":"ja","tag":"連携ガイド","count":484},{"language":"en","tag":"Integration guides","count":484},{"language":"default","tag":"API・MCP","count":204},{"language":"default","tag":"リファレンス","count":204},{"language":"default","tag":"IT Management API","count":179},{"language":"ja","tag":"IT Management","count":163},{"language":"en","tag":"IT Management","count":163},{"language":"en","tag":"0-9 / A-E","count":132},{"language":"ja","tag":"0-9 / A-E","count":126},{"language":"ja","tag":"機能別ガイド","count":121},{"language":"en","tag":"Guides by feature","count":121},{"language":"en","tag":"K-O","count":108},{"language":"en","tag":"P-T","count":103},{"language":"ja","tag":"P-T","count":93},{"language":"en","tag":"F-J","count":93},{"language":"ja","tag":"K-O","count":89},{"language":"ja","tag":"F-J","count":86},{"language":"en","tag":"U-Z","count":48},{"language":"ja","tag":"U-Z","count":47},{"language":"ja","tag":"日本語","count":43},{"language":"en","tag":"Admin settings","count":41},{"language":"default","tag":"Devices","count":40},{"language":"default","tag":"AIヘルプデスク API","count":25},{"language":"default","tag":"Directory","count":20},{"language":"default","tag":"Services","count":16},{"language":"default","tag":"Workspaces","count":13},{"language":"default","tag":"Contracts","count":12},{"language":"default","tag":"Surveys","count":12}],"searchSettings":{"maxResults":10}},"assistantConfig":{"enableAskAiButton":false,"enableStarterQuestions":false,"enableContextualStarterQuestions":false,"enableAskAiSearchBar":true},"basePath":"","hasChatPermissions":false,"hasWebMcpPermissions":false,"toggles":[{"name":"kill-isr","enabled":true,"variant":{"name":"disabled","enabled":false,"feature_enabled":true},"impressionData":false},{"name":"agent-mintlify-slack","enabled":true,"variant":{"name":"disabled","enabled":false,"feature_enabled":true},"impressionData":false},{"name":"agent-integrations-settings","enabled":true,"variant":{"name":"disabled","enabled":false,"feature_enabled":true},"impressionData":false},{"name":"rbac-expansion","enabled":true,"variant":{"name":"disabled","enabled":false,"feature_enabled":true},"impressionData":false},{"name":"automations-pr-grouping","enabled":true,"variant":{"name":"disabled","enabled":false,"feature_enabled":true},"impressionData":false},{"name":"custom-prefix","enabled":true,"variant":{"name":"disabled","enabled":false,"feature_enabled":true},"impressionData":false},{"name":"analytics-v7","enabled":true,"variant":{"name":"disabled","enabled":false,"feature_enabled":true},"impressionData":false},{"name":"user-flows-analytics","enabled":true,"variant":{"name":"disabled","enabled":false,"feature_enabled":true},"impressionData":false},{"name":"no-publish-flow","enabled":true,"variant":{"name":"disabled","enabled":false,"feature_enabled":true},"impressionData":false},{"name":"workos-onboarding","enabled":true,"variant":{"name":"disabled","enabled":false,"feature_enabled":true},"impressionData":false},{"name":"llms-txt-v2","enabled":true,"variant":{"name":"disabled","enabled":false,"feature_enabled":true},"impressionData":false},{"name":"snapshot-serving-live","enabled":true,"variant":{"name":"disabled","enabled":false,"feature_enabled":true},"impressionData":false},{"name":"stripTemperatureMiddleware","enabled":true,"variant":{"name":"disabled","enabled":false,"feature_enabled":true},"impressionData":false},{"name":"support-platform-pylon-zendesk","enabled":true,"variant":{"name":"disabled","enabled":false,"feature_enabled":true},"impressionData":false},{"name":"snapshot-serving","enabled":true,"variant":{"name":"disabled","enabled":false,"feature_enabled":true},"impressionData":false},{"name":"instant-rollback","enabled":true,"variant":{"name":"disabled","enabled":false,"feature_enabled":true},"impressionData":false},{"name":"granular-notifications-server","enabled":true,"variant":{"name":"disabled","enabled":false,"feature_enabled":true},"impressionData":false},{"name":"granular-notifications","enabled":true,"variant":{"name":"disabled","enabled":false,"feature_enabled":true},"impressionData":false},{"name":"automations-fable","enabled":true,"variant":{"name":"disabled","enabled":false,"feature_enabled":true},"impressionData":false},{"name":"fixed-ai-action-pricing","enabled":true,"variant":{"name":"disabled","enabled":false,"feature_enabled":true},"impressionData":false},{"name":"automation-resolve-merge-conflict","enabled":true,"variant":{"name":"disabled","enabled":false,"feature_enabled":true},"impressionData":false},{"name":"scoped-publishing","enabled":true,"variant":{"name":"disabled","enabled":false,"feature_enabled":true},"impressionData":false},{"name":"mintql","enabled":true,"variant":{"name":"disabled","enabled":false,"feature_enabled":true},"impressionData":false},{"name":"page-level-analytics","enabled":true,"variant":{"name":"disabled","enabled":false,"feature_enabled":true},"impressionData":false},{"name":"editor-version-history-v2","enabled":true,"variant":{"name":"disabled","enabled":false,"feature_enabled":true},"impressionData":false},{"name":"billing-page-v2","enabled":true,"variant":{"name":"disabled","enabled":false,"feature_enabled":true},"impressionData":false},{"name":"full-page-search","enabled":true,"variant":{"name":"disabled","enabled":false,"feature_enabled":true},"impressionData":false},{"name":"workspace-projects","enabled":true,"variant":{"name":"disabled","enabled":false,"feature_enabled":true},"impressionData":false},{"name":"assistant-v5","enabled":true,"variant":{"name":"disabled","enabled":false,"feature_enabled":true},"impressionData":false},{"name":"fork-pr-previews","enabled":true,"variant":{"name":"disabled","enabled":false,"feature_enabled":true},"impressionData":false},{"name":"revalidation-jwt","enabled":true,"variant":{"name":"disabled","enabled":false,"feature_enabled":true},"impressionData":false},{"name":"vite-origin","enabled":true,"variant":{"name":"disabled","enabled":false,"feature_enabled":true},"impressionData":false},{"name":"workos-sso-scim","enabled":true,"variant":{"name":"disabled","enabled":false,"feature_enabled":true},"impressionData":false},{"name":"hobby-abuse-scan","enabled":true,"variant":{"name":"disabled","enabled":false,"feature_enabled":true},"impressionData":false},{"name":"dashboard-inbox","enabled":true,"variant":{"name":"disabled","enabled":false,"feature_enabled":true},"impressionData":false},{"name":"workos-signup","enabled":true,"variant":{"name":"disabled","enabled":false,"feature_enabled":true},"impressionData":false},{"name":"turbopuffer-dual-write","enabled":true,"variant":{"name":"disabled","enabled":false,"feature_enabled":true},"impressionData":false},{"name":"workos-enabled","enabled":true,"variant":{"name":"disabled","enabled":false,"feature_enabled":true},"impressionData":false},{"name":"approve-review-flow","enabled":true,"variant":{"name":"disabled","enabled":false,"feature_enabled":true},"impressionData":false},{"name":"sso-setup-deadline-banner","enabled":true,"variant":{"name":"disabled","enabled":false,"feature_enabled":true},"impressionData":false},{"name":"turbopuffer-serve","enabled":true,"variant":{"name":"disabled","enabled":false,"feature_enabled":true},"impressionData":false},{"name":"live-agents","enabled":true,"variant":{"name":"disabled","enabled":false,"feature_enabled":true},"impressionData":false}],"googleFontsInlined":true},"customCss":[{"filePath":"style.css","content":":is(#sidebar,#mobile-nav) button[aria-expanded] span{font-weight:600}:is(#sidebar,#mobile-nav) .sidebar-group-header{font-size:0.75rem;color:rgb(107 114 128)}html.dark :is(#sidebar,#mobile-nav) .sidebar-group-header{color:rgb(156 163 175)}:is(#sidebar,#mobile-nav) button[aria-expanded]+ul{margin-left:1rem;padding-left:0.375rem;border-left:1px solid rgb(229 231 235)}html.dark :is(#sidebar,#mobile-nav) button[aria-expanded]+ul{border-left-color:rgb(255 255 255 / 0.1)}:is(#sidebar,#mobile-nav) button[aria-expanded]+ul>li>a{padding-left:0.625rem!important}footer div:has(>[data-testid^=\"mode-switch-\"]){display:none}#footer p~a,#footer a[href*=\"mintlify.com\"]{color:#4a5565}#footer p~a:hover,#footer a[href*=\"mintlify.com\"]:hover{color:#030712}html.dark #footer p~a{color:#82858c}html.dark #footer p~a:hover{color:#b4b5ba}html.dark #footer a[href*=\"mintlify.com\"]{color:#99a1af}html.dark #footer a[href*=\"mintlify.com\"]:hover{color:#e5e7eb}html.dark{--admina-dark-surface: rgb(21 24 38);--admina-dark-border: rgb(255 255 255 / 0.12)}html.dark .card{background:var(--admina-dark-surface);border-color:var(--admina-dark-border)}html.dark .home-search{border-color:var(--admina-dark-border)}.blog-author-card{display:flex;gap:1rem;align-items:flex-start;margin-top:2rem;padding:1.25rem;border:1px solid rgb(229 231 235);border-radius:0.75rem;background:rgb(249 250 251)}html.dark .blog-author-card{border-color:rgb(55 65 81);background:rgb(31 41 55)}.blog-author-avatar{flex-shrink:0;width:3.5rem;height:3.5rem;border-radius:50%;display:flex;align-items:center;justify-content:center;background:#4361ee;color:white;font-weight:600;font-size:1.125rem;overflow:hidden}.blog-author-avatar img{width:100%;height:100%;object-fit:cover}.blog-author-body{min-width:0}.blog-author-name{font-weight:600;color:rgb(17 24 39)}html.dark .blog-author-name{color:rgb(243 244 246)}.blog-author-title{font-size:0.875rem;color:rgb(107 114 128);margin-top:0.125rem}html.dark .blog-author-title{color:rgb(156 163 175)}.blog-author-bio{font-size:0.875rem;line-height:1.6;color:rgb(75 85 99);margin-top:0.5rem}html.dark .blog-author-bio{color:rgb(209 213 219)}.blog-author-links{display:flex;gap:0.75rem;margin-top:0.75rem}.blog-author-links a{display:inline-flex;color:rgb(107 114 128);text-decoration:none;border-bottom:none}.blog-author-links a:hover{color:#4361ee}.blog-author-brand-icon{display:inline-block;width:18px;height:18px;vertical-align:middle;background-color:currentColor;-webkit-mask-repeat:no-repeat;mask-repeat:no-repeat;-webkit-mask-position:center;mask-position:center;-webkit-mask-size:contain;mask-size:contain}html.dark .blog-author-links a{color:rgb(156 163 175)}html.dark .blog-author-links a:hover{color:#6d83f2}html[data-page-mode=\"center\"]:has(.home) div:has(>#content-container){max-width:none;padding-left:0;padding-right:0}html[data-page-mode=\"center\"]:has(.home) div:has(>#content-area){padding-top:calc(4rem + var(--banner-height, 2.5rem))}@media (min-width: 1024px){html[data-page-mode=\"center\"]:has(.home) div:has(>#content-area){padding-top:0}}html[data-page-mode=\"center\"]:has(.home) #header{display:none}html[data-page-mode=\"center\"]:has(.home) #content-area>.feedback-toolbar{display:none}html[data-page-mode=\"center\"]:has(.home) #content{margin-top:0;margin-bottom:0}html[data-page-mode=\"center\"] .home-section-head h2{line-height:1.7}html[data-page-mode=\"center\"] .home :is(h1,h2,h3,h4)>.absolute{display:none}html[data-page-mode=\"center\"] .home :is(h1,h2,h3,h4)>.cursor-pointer{cursor:auto}html[data-page-mode=\"center\"] .home a{border-bottom:none}.home{--home-heading: rgb(17 24 39);--home-border: rgb(229 231 235);--home-muted: rgb(75 85 99);--home-faint: rgb(107 114 128);--home-surface: #ffffff;--home-primary: #4361ee;max-width:64rem;margin:0 auto;padding:0 1.25rem;line-height:1.7;word-break:auto-phrase}html.dark .home{--home-heading: rgb(229 231 235);--home-border: rgb(35 42 69);--home-muted: rgb(175 182 197);--home-faint: rgb(148 156 174);--home-surface: var(--admina-dark-surface);--home-primary: #8fa2f7}html[data-current-path=\"/\"] #search-bar-entry,html[data-current-path=\"/en\"] #search-bar-entry{display:none}.home-hero{display:flex;flex-direction:column;align-items:center;gap:0.875rem;padding:4rem 0 3rem;text-align:center}.home-hero h1{margin:0;color:var(--home-heading);font-size:2.25rem;font-weight:700;line-height:1.3;letter-spacing:-0.02em;text-wrap:balance}.home-hero p{max-width:36rem;margin:0;font-size:1rem;color:var(--home-muted)}.home-search{display:flex;align-items:center;gap:0.7rem;width:min(100%, 34rem);height:3.5rem;margin-top:0.75rem;padding:0 1.15rem;border:1.5px solid var(--home-border);border-radius:999px;background:var(--home-surface);box-shadow:0 1px 2px rgb(0 0 0 / 5%), 0 8px 24px rgb(0 0 0 / 4%);font:inherit;color:var(--home-faint);text-align:left;cursor:pointer;transition:border-color 0.15s, box-shadow 0.15s}.home-search:hover{border-color:var(--home-primary)}.home-search:focus-visible{outline:2px solid var(--home-primary);outline-offset:2px}html.dark .home-search:hover{border-color:rgb(var(--primary-light))}.home-search-label{flex:1;font-size:1rem}.home-search-kbd{flex:none;padding:0.1rem 0.4rem;border:1px solid var(--home-border);border-radius:0.3rem;font-size:0.75rem;font-weight:700}.home-section{padding-bottom:2.75rem}.home-section-head{display:flex;align-items:baseline;gap:0.75rem;margin-bottom:1rem}.home-section-head h2{margin:0;color:var(--home-heading);font-size:1.375rem;font-weight:600;letter-spacing:-0.01em}.home-section-links{display:flex;flex-wrap:wrap;gap:0.35rem 1rem;margin-left:auto}.home-section-links a{font-size:0.875rem;color:var(--home-muted);text-decoration:none;white-space:nowrap}.home-section-links a:hover{color:var(--home-primary);text-decoration:underline}.home-badge{display:inline-block;margin-right:0.5rem;padding:0.05rem 0.5rem;border:1px solid var(--home-border);border-radius:999px;font-size:0.72rem;font-weight:600;color:var(--home-muted);vertical-align:0.05em}.home-updates-date{font-size:0.875rem;font-weight:600;font-variant-numeric:tabular-nums;color:var(--home-heading)}.home-updates-list{display:grid;grid-template-columns:max-content max-content minmax(0, 1fr);column-gap:1rem;margin:1rem 0 0;padding:0;border-top:1px solid var(--home-border);list-style:none}.home-updates-list li{display:grid;grid-column:1 / -1;grid-template-columns:subgrid;margin:0;padding:0;border-bottom:1px solid var(--home-border)}.home-updates-list a{display:grid;grid-column:1 / -1;grid-template-columns:subgrid;align-items:baseline;padding:0.6rem 0.25rem;color:var(--home-heading);text-decoration:none}.home-updates-list .home-badge{justify-self:start;margin-right:0}.home-updates-title{font-size:0.9375rem}.home-updates-list a:hover .home-updates-title{color:var(--home-primary);text-decoration:underline}.home-updates-list a:focus-visible{outline:2px solid var(--home-primary);outline-offset:2px}@media (max-width: 640px){.home-hero{padding:4.5rem 0 2rem}.home-hero h1{font-size:1.75rem}.home-updates-list{grid-template-columns:max-content minmax(0, 1fr);column-gap:0.75rem}.home-updates-title{grid-column:1 / -1}}.integration-catalog-controls{display:flex;flex-wrap:wrap;gap:0.5rem;margin-bottom:0.75rem}.integration-catalog-control{padding:0.4rem 0.6rem;border-radius:0.5rem;border:1px solid rgb(156 163 175 / 0.45);background:transparent;color:inherit;font-size:0.8125rem}.integration-catalog-search{flex:1 1 9rem;min-width:0;max-width:24rem}.integration-catalog-meta{display:flex;flex-wrap:wrap;justify-content:space-between;align-items:center;gap:0.5rem 1rem;margin-bottom:0.5rem;font-size:0.8125rem}.integration-catalog-count{margin:0;opacity:0.7}.integration-catalog-toggle{display:inline-flex;align-items:center;gap:0.35rem;cursor:pointer;opacity:0.85}.integration-catalog-toggle input{margin:0}.integration-catalog-actions{display:flex;flex-wrap:wrap;align-items:center;gap:0.5rem 0.75rem}.integration-catalog-actions button{cursor:pointer}.integration-catalog-actions button:disabled{cursor:not-allowed;opacity:0.5}.integration-catalog-empty{opacity:0.45}.integration-catalog-updated{margin:0.5rem 0 0;font-size:0.75rem;opacity:0.6}.integration-catalog-scroll{max-height:33rem;overflow:auto;border:1px solid rgb(156 163 175 / 0.3);border-radius:0.5rem}.integration-catalog-scroll>div,.integration-catalog-scroll>div>div{display:block!important;overflow:visible!important;contain:none!important;padding:0!important;margin:0!important}.integration-catalog-scroll table{display:table;overflow:visible;border-collapse:separate;border-spacing:0;table-layout:fixed;width:100%;min-width:99rem;margin:0;font-size:0.8125rem}.integration-catalog-scroll th,.integration-catalog-scroll td{padding:0.5rem 0.6rem;border-bottom:1px solid rgb(156 163 175 / 0.25);vertical-align:top;text-align:left;overflow-wrap:anywhere}.integration-catalog-scroll thead th{position:sticky;top:0;z-index:2;font-weight:600;background:rgb(var(--background-light))}.integration-catalog-scroll th:first-child,.integration-catalog-scroll td:first-child{position:sticky;left:0;z-index:1;background:rgb(var(--background-light));border-right:1px solid rgb(156 163 175 / 0.3)}.integration-catalog-scroll thead th:first-child{z-index:3}html.dark .integration-catalog-scroll thead th,html.dark .integration-catalog-scroll th:first-child,html.dark .integration-catalog-scroll td:first-child{background:rgb(var(--background-dark))}.integration-catalog-scroll tbody tr:hover td{background:rgb(156 163 175 / 0.12)}.integration-catalog-scroll tbody tr:hover td:first-child{background:#efefee;background:color-mix(in srgb, rgb(var(--background-light)) 88%, rgb(156 163 175))}html.dark .integration-catalog-scroll tbody tr:hover td:first-child{background:#171b2b;background:color-mix(in srgb, rgb(var(--background-dark)) 88%, rgb(156 163 175))}.integration-catalog-badge{display:inline-block;padding:0.1rem 0.45rem;margin:0 0.25rem 0.25rem 0;border-radius:0.625rem;font-size:0.75rem;line-height:1.45;white-space:nowrap;color:#1d1f25}.integration-catalog-badge--blue{background:#cfdfff}.integration-catalog-badge--cyan{background:#d0f0fd}.integration-catalog-badge--teal{background:#c2f5e9}.integration-catalog-badge--green{background:#d1f7c4}.integration-catalog-badge--yellow{background:#ffeab6}.integration-catalog-badge--orange{background:#fee2d5}.integration-catalog-badge--red{background:#ffdce5}.integration-catalog-badge--pink{background:#ffdaf6}.integration-catalog-badge--purple{background:#ede2fe}.integration-catalog-badge--gray{background:#e5e7eb}html.dark .integration-catalog-badge{color:#e8eaf2}html.dark .integration-catalog-badge--blue{background:#2a3a63}html.dark .integration-catalog-badge--cyan{background:#1f3f52}html.dark .integration-catalog-badge--teal{background:#1c4340}html.dark .integration-catalog-badge--green{background:#26432a}html.dark .integration-catalog-badge--yellow{background:#4a3c1c}html.dark .integration-catalog-badge--orange{background:#4d3126}html.dark .integration-catalog-badge--red{background:#4d2632}html.dark .integration-catalog-badge--pink{background:#472541}html.dark .integration-catalog-badge--purple{background:#372a55}html.dark .integration-catalog-badge--gray{background:#2b3040}.integration-catalog-row--suspended td{color:rgb(156 163 175)}.integration-catalog-row--suspended a{color:inherit}.integration-catalog-row--suspended .integration-catalog-badge{opacity:0.5}.integration-catalog-suspended{display:block;font-size:0.75rem}.integration-catalog-scroll col.integration-catalog-col-name{width:13rem}.integration-catalog-scroll col.integration-catalog-col-mode{width:8rem}.integration-catalog-scroll col.integration-catalog-col-plan{width:10rem}.integration-catalog-scroll col.integration-catalog-col-lifecycle{width:12rem}.integration-catalog-scroll col.integration-catalog-col-automation{width:12rem}.integration-catalog-scroll col.integration-catalog-col-fetch{width:17rem}.integration-catalog-scroll col.integration-catalog-col-capabilities{width:13rem}.integration-catalog-scroll col.integration-catalog-col-memo{width:14rem}.integration-catalog:fullscreen{padding:3.25rem 1.25rem 1rem;overflow:auto;background:rgb(var(--background-light, 250 249 247))}.integration-catalog:fullscreen::backdrop{background:rgb(250 249 247)}html.dark .integration-catalog:fullscreen{background:rgb(var(--background-dark, 5 9 25))}html.dark .integration-catalog:fullscreen::backdrop{background:rgb(5 9 25)}.integration-catalog:fullscreen .integration-catalog-scroll{max-height:calc(100vh - 9.75rem)}.integration-catalog-control[aria-pressed=\"true\"]{border-color:rgb(var(--primary));color:rgb(var(--primary))}.integration-catalog:fullscreen .integration-catalog-scroll>div,.integration-catalog:fullscreen .integration-catalog-scroll>div>div{width:100%;max-width:100%}.integration-catalog:fullscreen .integration-catalog-scroll table{min-width:0;width:100%}.integration-catalog:fullscreen col.integration-catalog-col-name{width:15%}.integration-catalog:fullscreen col.integration-catalog-col-mode{width:8%}.integration-catalog:fullscreen col.integration-catalog-col-plan{width:10%}.integration-catalog:fullscreen col.integration-catalog-col-lifecycle{width:14%}.integration-catalog:fullscreen col.integration-catalog-col-automation{width:13%}.integration-catalog:fullscreen col.integration-catalog-col-fetch{width:15%}.integration-catalog:fullscreen col.integration-catalog-col-capabilities{width:12%}.integration-catalog:fullscreen col.integration-catalog-col-memo{width:13%}.nav-tag-pill-text[data-nav-tag=\"連携停止中\"],.nav-tag-pill-text[data-nav-tag=\"Suspended\"]{color:#854d0e;background:#fef9c3}html.dark .nav-tag-pill-text[data-nav-tag=\"連携停止中\"],html.dark .nav-tag-pill-text[data-nav-tag=\"Suspended\"]{color:#fde047;background:#342913}.integration-capabilities{margin:0 0 1.5rem;border:1px solid rgb(156 163 175 / 0.3);border-radius:0.5rem;overflow:hidden}.integration-capabilities-list{margin:0}.integration-capabilities-row{display:grid;grid-template-columns:12rem 1fr;gap:0 1rem;padding:0.6rem 0.9rem;border-bottom:1px solid rgb(156 163 175 / 0.2)}.integration-capabilities-row:last-child{border-bottom:none}.integration-capabilities-row dt{margin:0;font-size:0.8125rem;font-weight:600;opacity:0.75}.integration-capabilities-row dd{margin:0;font-size:0.8125rem}.integration-capabilities-empty{opacity:0.45}.integration-capabilities-note{display:block;margin-top:0.25rem;font-size:0.8125rem;opacity:0.65}@media (max-width: 40rem){.integration-capabilities-row{grid-template-columns:1fr;gap:0.25rem}}.mdx-content img[src*=\"/images/\"]:not(:is(.card,.blog-author-avatar) *){height:auto;max-height:500px;object-fit:contain;object-position:left top}.mdx-content picture>img[src*=\"/images/\"]:not(:is(.card,.blog-author-avatar,.frame) *){margin-top:2em;margin-bottom:2em}.mdx-content ol{padding-left:1.625em}.mdx-content ol>li{padding-left:0.375em}.a11y-limitations{margin:1.25rem 0;border:1px solid rgb(156 163 175 / 0.3);border-radius:0.5rem;overflow:hidden}.a11y-limitations>div{display:grid;grid-template-columns:minmax(9rem, 30%) 1fr}.a11y-limitations>div+div{border-top:1px solid rgb(156 163 175 / 0.2)}.a11y-limitations>div>p{margin:0;padding:0.75rem 1rem}.a11y-limitations>div>p:first-child{font-weight:600;background:rgb(156 163 175 / 0.12)}@media (max-width: 40rem){.a11y-limitations>div{grid-template-columns:1fr}}"}],"page":{"pagePath":"en/integrations/autosana","slug":"/en/integrations/autosana","pageMetadata":{"title":"Autosana","description":"How to integrate Autosana with Admina using an API key. Admina retrieves data such as user names, email addresses, and roles and supports account creation and deletion.","features":["account-deletion","provisioning"],"href":"/en/integrations/autosana"},"description":{"compiledSource":"\"use strict\";\nconst {jsx: _jsx} = arguments[0];\nconst {useMDXComponents: _provideComponents} = arguments[0];\nfunction _createMdxContent(props) {\n const _components = {\n p: \"p\",\n ..._provideComponents(),\n ...props.components\n };\n return _jsx(_components.p, {\n children: \"How to integrate Autosana with Admina using an API key. Admina retrieves data such as user names, email addresses, and roles and supports account creation and deletion.\"\n });\n}\nfunction MDXContent(props = {}) {\n const {wrapper: MDXLayout} = {\n ..._provideComponents(),\n ...props.components\n };\n return MDXLayout ? _jsx(MDXLayout, {\n ...props,\n children: _jsx(_createMdxContent, {\n ...props\n })\n }) : _createMdxContent(props);\n}\nreturn {\n default: MDXContent\n};\n","frontmatter":{},"scope":{}},"pageType":"default","mdx":{"mdxSource":{"compiledSource":"\"use strict\";const{Fragment:_Fragment,jsx:_jsx,jsxs:_jsxs}=arguments[0];const{useMDXComponents:_provideComponents}=arguments[0];const IntegrationCapabilities=({lang=`ja`,modes=``,plan=``,lifecycle=``,automation=``,fetch=``,capabilities=``,memo=``})=>{const _components={a:`a`,..._provideComponents()};const TEXT={ja:{rows:{mode:`連携モード`,plan:`連携可能プラン`,lifecycle:`アカウントライフサイクル`,automation:`自動化`,fetch:`取得データ`,capabilities:`対応機能`,memo:`備考`},empty:`-`,planNote:`AIによる調査をもとにした内容で、実際と異なる場合があります。最新の情報は、各サービスの公式サイトでご確認ください。`,more:`各項目の意味は[連携可能SaaS・機能対応一覧](/integrations/supported-saas)をご覧ください。`,mode:{\"API Key\":`APIキー`},lifecycle:{provisioning:`アカウント作成`,deactivate:`アカウント無効化`,delete:`アカウント削除`},automation:{provisioning:`アカウント作成`,deactivate:`アカウント無効化`,delete:`アカウント削除`},fetch:{User:`ユーザー名`,Mail:`メールアドレス`,Role:`ロール`,Status:`ステータス`,\"2FA\":`二要素認証`,LastActivity:`最終利用日`,Licenses:`ライセンス`},capabilities:{\"employee-master\":`従業員マスター連携`,\"identity-provider\":`IDプロバイダー連携`,\"cost-aggregation\":`コスト管理`,\"file-aggregation\":`ファイル管理`,\"file-permissions\":`ファイル権限管理`,\"device-aggregation\":`MDM連携`}},en:{rows:{mode:`Integration mode`,plan:`Supported plan`,lifecycle:`Account lifecycle`,automation:`Automation`,fetch:`Fetched data`,capabilities:`Capabilities`,memo:`Notes`},empty:`-`,planNote:`Based on AI research and may differ from the actual plans. For the latest information, check each service's official website.`,more:`See [Supported SaaS and Capabilities](/en/integrations/supported-saas) for what each item means.`,mode:{},lifecycle:{provisioning:`Account creation`,deactivate:`Account deactivation`,delete:`Account deletion`},automation:{provisioning:`Account creation`,deactivate:`Account deactivation`,delete:`Account deletion`},fetch:{LastActivity:`Last Activity`},capabilities:{\"employee-master\":`HR master`,\"identity-provider\":`Identity provider`,\"cost-aggregation\":`Cost management`,\"file-aggregation\":`File management`,\"file-permissions\":`File permissions`,\"device-aggregation\":`MDM integration`}}}[lang===`en`?`en`:`ja`];const BADGE_COLORS={\"ID/Password\":`yellow`,\"API Key\":`cyan`,OAuth:`red`,App:`purple`,User:`blue`,Mail:`cyan`,Role:`orange`,Status:`teal`,\"2FA\":`pink`,LastActivity:`green`,Licenses:`purple`,provisioning:`green`,delete:`red`,deactivate:`yellow`,\"employee-master\":`blue`,\"identity-provider\":`teal`,\"cost-aggregation\":`yellow`,\"file-aggregation\":`cyan`,\"file-permissions\":`orange`,\"device-aggregation\":`purple`};const list=value=>String(value||``).split(`,`).map(item=>item.trim()).filter(Boolean);const badges=(source,labels)=>{const values=list(source);if(values.length===0){return _jsx(`span`,{className:`integration-capabilities-empty`,children:TEXT.empty})}return values.map(value=>_jsx(`span`,{className:`integration-catalog-badge integration-catalog-badge--`+(BADGE_COLORS[value]||`gray`),children:labels?.[value]??value},value))};const text=value=>value||_jsx(`span`,{className:`integration-capabilities-empty`,children:TEXT.empty});const linkify=value=>{if(!value)return null;const parts=[];let rest=String(value);let key=0;for(;;){const mid=rest.indexOf(`](`);if(mid\u003c0)break;const open=rest.lastIndexOf(`[`,mid);const close=rest.indexOf(`)`,mid);if(close\u003c0)break;if(open\u003c0){parts.push(rest.slice(0,mid+2));rest=rest.slice(mid+2);continue}if(open>0)parts.push(rest.slice(0,open));parts.push(_jsx(_components.a,{href:rest.slice(mid+2,close),target:`_blank`,rel:`noopener noreferrer`,children:rest.slice(open+1,mid)},key++));rest=rest.slice(close+1)}if(rest)parts.push(rest);return parts};const ROWS=[[`mode`,badges(modes,TEXT.mode)],[`plan`,plan\u0026\u0026plan!==`-`?_jsxs(`span`,{children:[plan,_jsx(`span`,{className:`integration-capabilities-note`,children:TEXT.planNote})]}):text(plan)],[`lifecycle`,badges(lifecycle,TEXT.lifecycle)],[`automation`,badges(automation,TEXT.automation)],[`fetch`,badges(fetch,TEXT.fetch)],[`capabilities`,badges(capabilities,TEXT.capabilities)],[`memo`,text(linkify(memo))]];return _jsx(`div`,{className:`integration-capabilities`,children:_jsx(`dl`,{className:`integration-capabilities-list`,children:ROWS.map(([key,value])=>_jsxs(`div`,{className:`integration-capabilities-row`,children:[_jsx(`dt`,{children:TEXT.rows[key]}),_jsx(`dd`,{children:value})]},key))})})};function _createMdxContent(props){const _components={a:`a`,li:`li`,ol:`ol`,p:`p`,strong:`strong`,ul:`ul`,..._provideComponents(),...props.components},{Heading,Info,OptimizedImage,_MdxComponentBoundary}=_components;if(!Heading)_missingMdxReference(`Heading`,true);if(!Info)_missingMdxReference(`Info`,true);if(!OptimizedImage)_missingMdxReference(`OptimizedImage`,true);if(!_MdxComponentBoundary)_missingMdxReference(`_MdxComponentBoundary`,true);return _jsxs(_Fragment,{children:[_jsx(Heading,{level:`2`,id:`integration-specifications`,children:`Integration Specifications`}),`\n`,_jsx(_MdxComponentBoundary,{name:`IntegrationCapabilities`,children:_jsx(IntegrationCapabilities,{lang:`en`,modes:`API Key`,lifecycle:`provisioning, delete`,fetch:`User, Mail, Role, Status`})}),`\n`,_jsx(Heading,{level:`2`,id:`prerequisites`,children:`Prerequisites`}),`\n`,_jsx(Heading,{level:`3`,id:`getting-your-api-key`,children:`Getting your API key`}),`\n`,_jsxs(_components.ol,{children:[`\n`,_jsxs(_components.li,{children:[`\n`,_jsxs(_components.p,{children:[`After logging in to Autosana, select `,_jsx(_components.strong,{children:`Settings`}),` under `,_jsx(_components.strong,{children:`ORGANIZATION`}),` in the left-side menu.`]}),`\n`,_jsx(`div`,{children:_jsx(OptimizedImage,{src:`https://mintcdn.com/moneyforwardi/7obkQWFAP4vvAV-3/images/integrations/autosana/settings-menu.png?fit=max\u0026auto=format\u0026n=7obkQWFAP4vvAV-3\u0026q=85\u0026s=78d58a4ef00b0d61e1081b23d1f47697`,alt:`Autosana left-side menu with Settings under ORGANIZATION highlighted`,style:{maxWidth:`min(100%, 320px)`,height:`auto`},\"data-og-width\":`584`,width:`584`,\"data-og-height\":`310`,height:`310`,\"data-path\":`images/integrations/autosana/settings-menu.png`,\"data-optimize\":`true`,\"data-opv\":`3`,srcset:`https://mintcdn.com/moneyforwardi/7obkQWFAP4vvAV-3/images/integrations/autosana/settings-menu.png?w=280\u0026fit=max\u0026auto=format\u0026n=7obkQWFAP4vvAV-3\u0026q=85\u0026s=567f696edbd5eb84932d9b205eed9756 280w, https://mintcdn.com/moneyforwardi/7obkQWFAP4vvAV-3/images/integrations/autosana/settings-menu.png?w=560\u0026fit=max\u0026auto=format\u0026n=7obkQWFAP4vvAV-3\u0026q=85\u0026s=6a74246e71bf4ed0956ef9374331fa01 560w, https://mintcdn.com/moneyforwardi/7obkQWFAP4vvAV-3/images/integrations/autosana/settings-menu.png?w=840\u0026fit=max\u0026auto=format\u0026n=7obkQWFAP4vvAV-3\u0026q=85\u0026s=044f4f22f9feccd3d85c254b668857ab 840w, https://mintcdn.com/moneyforwardi/7obkQWFAP4vvAV-3/images/integrations/autosana/settings-menu.png?w=1100\u0026fit=max\u0026auto=format\u0026n=7obkQWFAP4vvAV-3\u0026q=85\u0026s=cdf25a4ed051f3875775c3639a426aec 1100w, https://mintcdn.com/moneyforwardi/7obkQWFAP4vvAV-3/images/integrations/autosana/settings-menu.png?w=1650\u0026fit=max\u0026auto=format\u0026n=7obkQWFAP4vvAV-3\u0026q=85\u0026s=b955ab81661af3e17d2d61e1a031ed92 1650w, https://mintcdn.com/moneyforwardi/7obkQWFAP4vvAV-3/images/integrations/autosana/settings-menu.png?w=2500\u0026fit=max\u0026auto=format\u0026n=7obkQWFAP4vvAV-3\u0026q=85\u0026s=d0a8aadf387c0eb26a99926d8e1e641d 2500w`})}),`\n`]}),`\n`,_jsxs(_components.li,{children:[`\n`,_jsxs(_components.p,{children:[`In the settings menu, select `,_jsx(_components.strong,{children:`API Keys`}),` under `,_jsx(_components.strong,{children:`WORKSPACE`}),`.`]}),`\n`,_jsx(OptimizedImage,{src:`https://mintcdn.com/moneyforwardi/7obkQWFAP4vvAV-3/images/integrations/autosana/api-keys-menu.png?fit=max\u0026auto=format\u0026n=7obkQWFAP4vvAV-3\u0026q=85\u0026s=cd67af3b69cccc9801782b0fff45b549`,alt:`Autosana settings menu with API Keys under WORKSPACE highlighted`,\"data-og-width\":`594`,width:`594`,\"data-og-height\":`866`,height:`866`,\"data-path\":`images/integrations/autosana/api-keys-menu.png`,\"data-optimize\":`true`,\"data-opv\":`3`,srcset:`https://mintcdn.com/moneyforwardi/7obkQWFAP4vvAV-3/images/integrations/autosana/api-keys-menu.png?w=280\u0026fit=max\u0026auto=format\u0026n=7obkQWFAP4vvAV-3\u0026q=85\u0026s=dd056eb85087209a9e21f5e375bb0269 280w, https://mintcdn.com/moneyforwardi/7obkQWFAP4vvAV-3/images/integrations/autosana/api-keys-menu.png?w=560\u0026fit=max\u0026auto=format\u0026n=7obkQWFAP4vvAV-3\u0026q=85\u0026s=27548b587c85d4133c98f3cfd2493e78 560w, https://mintcdn.com/moneyforwardi/7obkQWFAP4vvAV-3/images/integrations/autosana/api-keys-menu.png?w=840\u0026fit=max\u0026auto=format\u0026n=7obkQWFAP4vvAV-3\u0026q=85\u0026s=9a5bc793fb65596057b7dfdf1f6aaa04 840w, https://mintcdn.com/moneyforwardi/7obkQWFAP4vvAV-3/images/integrations/autosana/api-keys-menu.png?w=1100\u0026fit=max\u0026auto=format\u0026n=7obkQWFAP4vvAV-3\u0026q=85\u0026s=0c48f31868209ad4b49960e97944a355 1100w, https://mintcdn.com/moneyforwardi/7obkQWFAP4vvAV-3/images/integrations/autosana/api-keys-menu.png?w=1650\u0026fit=max\u0026auto=format\u0026n=7obkQWFAP4vvAV-3\u0026q=85\u0026s=e08de19df90e6e1d3e2715b3504f054e 1650w, https://mintcdn.com/moneyforwardi/7obkQWFAP4vvAV-3/images/integrations/autosana/api-keys-menu.png?w=2500\u0026fit=max\u0026auto=format\u0026n=7obkQWFAP4vvAV-3\u0026q=85\u0026s=c599749a7507a1ca81303c5245e7fb8e 2500w`}),`\n`]}),`\n`,_jsxs(_components.li,{children:[`\n`,_jsxs(_components.p,{children:[`Click `,_jsx(_components.strong,{children:`New API key`}),` in the upper-right corner.`]}),`\n`,_jsx(OptimizedImage,{src:`https://mintcdn.com/moneyforwardi/7obkQWFAP4vvAV-3/images/integrations/autosana/new-api-key.png?fit=max\u0026auto=format\u0026n=7obkQWFAP4vvAV-3\u0026q=85\u0026s=0cf9e8a512b0461c3913570d8553d203`,alt:`API Keys screen with the New API key button highlighted`,\"data-og-width\":`1920`,width:`1920`,\"data-og-height\":`443`,height:`443`,\"data-path\":`images/integrations/autosana/new-api-key.png`,\"data-optimize\":`true`,\"data-opv\":`3`,srcset:`https://mintcdn.com/moneyforwardi/7obkQWFAP4vvAV-3/images/integrations/autosana/new-api-key.png?w=280\u0026fit=max\u0026auto=format\u0026n=7obkQWFAP4vvAV-3\u0026q=85\u0026s=5b325d87777a3641fed62705310b397e 280w, https://mintcdn.com/moneyforwardi/7obkQWFAP4vvAV-3/images/integrations/autosana/new-api-key.png?w=560\u0026fit=max\u0026auto=format\u0026n=7obkQWFAP4vvAV-3\u0026q=85\u0026s=76086e9422dffc6dcf65ff3111ec29f8 560w, https://mintcdn.com/moneyforwardi/7obkQWFAP4vvAV-3/images/integrations/autosana/new-api-key.png?w=840\u0026fit=max\u0026auto=format\u0026n=7obkQWFAP4vvAV-3\u0026q=85\u0026s=340c7b99e18d9e32fc4e84e9ccd26582 840w, https://mintcdn.com/moneyforwardi/7obkQWFAP4vvAV-3/images/integrations/autosana/new-api-key.png?w=1100\u0026fit=max\u0026auto=format\u0026n=7obkQWFAP4vvAV-3\u0026q=85\u0026s=e5b7a226478331a95788dce8602f73b5 1100w, https://mintcdn.com/moneyforwardi/7obkQWFAP4vvAV-3/images/integrations/autosana/new-api-key.png?w=1650\u0026fit=max\u0026auto=format\u0026n=7obkQWFAP4vvAV-3\u0026q=85\u0026s=8c1ac0d2dc7ce42618d4017c2dc35d1c 1650w, https://mintcdn.com/moneyforwardi/7obkQWFAP4vvAV-3/images/integrations/autosana/new-api-key.png?w=2500\u0026fit=max\u0026auto=format\u0026n=7obkQWFAP4vvAV-3\u0026q=85\u0026s=2f52fdf41880546df5653abd2b04071e 2500w`}),`\n`]}),`\n`,_jsxs(_components.li,{children:[`\n`,_jsxs(_components.p,{children:[`Enter a name that shows the key is used for Admina in `,_jsx(_components.strong,{children:`Name`}),`, and click `,_jsx(_components.strong,{children:`Create API key`}),`.`]}),`\n`,_jsx(OptimizedImage,{src:`https://mintcdn.com/moneyforwardi/7obkQWFAP4vvAV-3/images/integrations/autosana/create-api-key.png?fit=max\u0026auto=format\u0026n=7obkQWFAP4vvAV-3\u0026q=85\u0026s=cee8fb8bb20d11aa103e6f211de11209`,alt:`Create a new API key dialog with the Create API key button highlighted`,\"data-og-width\":`1006`,width:`1006`,\"data-og-height\":`682`,height:`682`,\"data-path\":`images/integrations/autosana/create-api-key.png`,\"data-optimize\":`true`,\"data-opv\":`3`,srcset:`https://mintcdn.com/moneyforwardi/7obkQWFAP4vvAV-3/images/integrations/autosana/create-api-key.png?w=280\u0026fit=max\u0026auto=format\u0026n=7obkQWFAP4vvAV-3\u0026q=85\u0026s=b931d385d78387228c58a053d7291c3d 280w, https://mintcdn.com/moneyforwardi/7obkQWFAP4vvAV-3/images/integrations/autosana/create-api-key.png?w=560\u0026fit=max\u0026auto=format\u0026n=7obkQWFAP4vvAV-3\u0026q=85\u0026s=60c87f1b4c9e2978dc97a4ee0a90efd1 560w, https://mintcdn.com/moneyforwardi/7obkQWFAP4vvAV-3/images/integrations/autosana/create-api-key.png?w=840\u0026fit=max\u0026auto=format\u0026n=7obkQWFAP4vvAV-3\u0026q=85\u0026s=93ae48d919a5313051b611e4d7d5cb1c 840w, https://mintcdn.com/moneyforwardi/7obkQWFAP4vvAV-3/images/integrations/autosana/create-api-key.png?w=1100\u0026fit=max\u0026auto=format\u0026n=7obkQWFAP4vvAV-3\u0026q=85\u0026s=9127aec1b533691a4ab72a1587f3425c 1100w, https://mintcdn.com/moneyforwardi/7obkQWFAP4vvAV-3/images/integrations/autosana/create-api-key.png?w=1650\u0026fit=max\u0026auto=format\u0026n=7obkQWFAP4vvAV-3\u0026q=85\u0026s=905645fff84a5666103287a0a94f75ac 1650w, https://mintcdn.com/moneyforwardi/7obkQWFAP4vvAV-3/images/integrations/autosana/create-api-key.png?w=2500\u0026fit=max\u0026auto=format\u0026n=7obkQWFAP4vvAV-3\u0026q=85\u0026s=a67963bdeb8988faca9c5e1d34a09680 2500w`}),`\n`]}),`\n`,_jsxs(_components.li,{children:[`\n`,_jsx(_components.p,{children:`Click the copy icon to the right of the issued key to copy it, then save it. The key is shown only on this screen, so make sure to save it now.`}),`\n`,_jsx(OptimizedImage,{src:`https://mintcdn.com/moneyforwardi/7obkQWFAP4vvAV-3/images/integrations/autosana/api-key-issued.png?fit=max\u0026auto=format\u0026n=7obkQWFAP4vvAV-3\u0026q=85\u0026s=08a5094047bb5bc5a479badbea785572`,alt:`Issued API key with the copy icon highlighted (key value masked)`,\"data-og-width\":`1012`,width:`1012`,\"data-og-height\":`700`,height:`700`,\"data-path\":`images/integrations/autosana/api-key-issued.png`,\"data-optimize\":`true`,\"data-opv\":`3`,srcset:`https://mintcdn.com/moneyforwardi/7obkQWFAP4vvAV-3/images/integrations/autosana/api-key-issued.png?w=280\u0026fit=max\u0026auto=format\u0026n=7obkQWFAP4vvAV-3\u0026q=85\u0026s=e1ea15f4b10772d41cca7645f4de3eb7 280w, https://mintcdn.com/moneyforwardi/7obkQWFAP4vvAV-3/images/integrations/autosana/api-key-issued.png?w=560\u0026fit=max\u0026auto=format\u0026n=7obkQWFAP4vvAV-3\u0026q=85\u0026s=9a5d3b579ce671547fc99b9197ae03a6 560w, https://mintcdn.com/moneyforwardi/7obkQWFAP4vvAV-3/images/integrations/autosana/api-key-issued.png?w=840\u0026fit=max\u0026auto=format\u0026n=7obkQWFAP4vvAV-3\u0026q=85\u0026s=87b16f8c949111dc539add3deb5d5ac5 840w, https://mintcdn.com/moneyforwardi/7obkQWFAP4vvAV-3/images/integrations/autosana/api-key-issued.png?w=1100\u0026fit=max\u0026auto=format\u0026n=7obkQWFAP4vvAV-3\u0026q=85\u0026s=8e5b004bd5ef3e2c66f5ef84b43b3131 1100w, https://mintcdn.com/moneyforwardi/7obkQWFAP4vvAV-3/images/integrations/autosana/api-key-issued.png?w=1650\u0026fit=max\u0026auto=format\u0026n=7obkQWFAP4vvAV-3\u0026q=85\u0026s=9c0edfef31c700c6655b92f432175f08 1650w, https://mintcdn.com/moneyforwardi/7obkQWFAP4vvAV-3/images/integrations/autosana/api-key-issued.png?w=2500\u0026fit=max\u0026auto=format\u0026n=7obkQWFAP4vvAV-3\u0026q=85\u0026s=58c13cdb9690d312cb684665046d7c36 2500w`}),`\n`]}),`\n`]}),`\n`,_jsx(Info,{children:_jsxs(_components.ul,{children:[`\n`,_jsxs(_components.li,{children:[`This API key acts as an administrator, so Admina can invite members. Create it as an Autosana `,_jsx(_components.strong,{children:`Owner`}),` or `,_jsx(_components.strong,{children:`Admin`}),` user.`]}),`\n`,_jsxs(_components.li,{children:[`The roles you can select when inviting from Admina are `,_jsx(_components.strong,{children:`Member`}),` and `,_jsx(_components.strong,{children:`Admin`}),`. Admina can remove only members whose role is `,_jsx(_components.strong,{children:`Member`}),`. Remove `,_jsx(_components.strong,{children:`Owner`}),` and `,_jsx(_components.strong,{children:`Admin`}),` members from `,_jsx(_components.strong,{children:`Settings`}),` > `,_jsx(_components.strong,{children:`Team`}),` in Autosana.`]}),`\n`,_jsxs(_components.li,{children:[`Autosana has three roles: `,_jsx(_components.strong,{children:`Owner`}),`, `,_jsx(_components.strong,{children:`Admin`}),`, and `,_jsx(_components.strong,{children:`Member`}),`. For details, see Autosana’s `,_jsx(_components.a,{href:`https://docs.autosana.ai/team`,children:`Team (external site)`}),`.`]}),`\n`]})}),`\n`,_jsx(Heading,{level:`2`,id:`setting-up-the-integration`,children:`Setting up the integration`}),`\n`,_jsxs(_components.ol,{children:[`\n`,_jsxs(_components.li,{children:[`\n`,_jsxs(_components.p,{children:[`On the integration screen, search for `,_jsx(_components.strong,{children:`Autosana`}),`.`]}),`\n`]}),`\n`,_jsxs(_components.li,{children:[`\n`,_jsxs(_components.p,{children:[`Enter any string into `,_jsx(_components.strong,{children:`Workspace key`}),`. Enter the API key you copied in the previous step into `,_jsx(_components.strong,{children:`API key`}),`, and click `,_jsx(_components.strong,{children:`Connect`}),`. `,_jsx(_components.strong,{children:`Workspace name`}),` is optional.`]}),`\n`,_jsx(OptimizedImage,{src:`https://mintcdn.com/moneyforwardi/7obkQWFAP4vvAV-3/images/integrations/autosana/integrate-workspace.png?fit=max\u0026auto=format\u0026n=7obkQWFAP4vvAV-3\u0026q=85\u0026s=411be123fbabc5674bd16e375caeea77`,alt:`Autosana integration setup screen showing the Workspace name, Workspace key, and API key fields`,\"data-og-width\":`662`,width:`662`,\"data-og-height\":`876`,height:`876`,\"data-path\":`images/integrations/autosana/integrate-workspace.png`,\"data-optimize\":`true`,\"data-opv\":`3`,srcset:`https://mintcdn.com/moneyforwardi/7obkQWFAP4vvAV-3/images/integrations/autosana/integrate-workspace.png?w=280\u0026fit=max\u0026auto=format\u0026n=7obkQWFAP4vvAV-3\u0026q=85\u0026s=6773ad14dc59ffe45dbd32fe2a439d65 280w, https://mintcdn.com/moneyforwardi/7obkQWFAP4vvAV-3/images/integrations/autosana/integrate-workspace.png?w=560\u0026fit=max\u0026auto=format\u0026n=7obkQWFAP4vvAV-3\u0026q=85\u0026s=c5384b68a6bdab03ccb4f6b5129ed80d 560w, https://mintcdn.com/moneyforwardi/7obkQWFAP4vvAV-3/images/integrations/autosana/integrate-workspace.png?w=840\u0026fit=max\u0026auto=format\u0026n=7obkQWFAP4vvAV-3\u0026q=85\u0026s=a9e82a76421afa3642618ae26b759154 840w, https://mintcdn.com/moneyforwardi/7obkQWFAP4vvAV-3/images/integrations/autosana/integrate-workspace.png?w=1100\u0026fit=max\u0026auto=format\u0026n=7obkQWFAP4vvAV-3\u0026q=85\u0026s=3fc7784d98dcbeafac2e326ab8e59b3d 1100w, https://mintcdn.com/moneyforwardi/7obkQWFAP4vvAV-3/images/integrations/autosana/integrate-workspace.png?w=1650\u0026fit=max\u0026auto=format\u0026n=7obkQWFAP4vvAV-3\u0026q=85\u0026s=06efbb2a9cea4095fc0ade0b7bb7640a 1650w, https://mintcdn.com/moneyforwardi/7obkQWFAP4vvAV-3/images/integrations/autosana/integrate-workspace.png?w=2500\u0026fit=max\u0026auto=format\u0026n=7obkQWFAP4vvAV-3\u0026q=85\u0026s=0c2dd5e99d70cab5c4f04f0b701f6c70 2500w`}),`\n`]}),`\n`,_jsxs(_components.li,{children:[`\n`,_jsxs(_components.p,{children:[`Once the integration with Autosana succeeds, registered user information appears in the account list. If it doesn’t complete successfully, first try the steps in `,_jsx(_components.a,{href:`/en/it-management/saas-management/93nahw45is-trouble`,children:`Troubleshoot SaaS integration errors`}),`. If that doesn’t resolve it, check `,_jsx(_components.a,{href:`/en/it-management/saas-management/93nahw45is-trouble#info-to-provide`,children:`Information to provide`}),` and contact `,_jsx(_components.a,{href:`/en/contact-support`,children:`support`}),`.`]}),`\n`]}),`\n`]})]})}function MDXContent(props={}){const{wrapper:MDXLayout}={..._provideComponents(),...props.components};return MDXLayout?_jsx(MDXLayout,{...props,children:_jsx(_createMdxContent,{...props})}):_createMdxContent(props)}return{IntegrationCapabilities,default:MDXContent};function _missingMdxReference(id,component){throw new Error(`Expected `+(component?`component`:`object`)+\" `\"+id+\"` to be defined: you likely forgot to import, pass, or provide it.\")}","frontmatter":{},"scope":{"config":{},"pageMetadata":{"title":"Autosana","description":"How to integrate Autosana with Admina using an API key. Admina retrieves data such as user names, email addresses, and roles and supports account creation and deletion.","features":["account-deletion","provisioning"],"href":"/en/integrations/autosana"}}},"mdxSourceWithNoJs":null,"noJsSplices":[[159,4217,")=>null;function _cr"]]},"mdxExtracts":{"tableOfContents":[{"title":"Integration Specifications","slug":"integration-specifications","depth":2,"children":[]},{"title":"Prerequisites","slug":"prerequisites","depth":2,"children":[{"title":"Getting your API key","slug":"getting-your-api-key","depth":3,"children":[]}]},{"title":"Setting up the integration","slug":"setting-up-the-integration","depth":2,"children":[]}],"codeExamples":{}},"jsLinks":["/_mintlify/custom/moneyforwardi/abbf0b4838830c9e/search-trigger.js","/_mintlify/custom/moneyforwardi/5c486283aa17f605/blog-author-jsonld.js"],"subdomain":"moneyforwardi","siteName":"Admina Help Center","title":"Autosana - Admina Help Center","navMaps":{"firstHrefInVersion":{},"firstHrefInLanguage":{"ja":{"href":"/integrations/autosana","matchLevel":1},"en":{"href":"/en/integrations/autosana","matchLevel":0}}},"lastModified":"2026-11-05T06:20:38.834Z","gitLastModified":"2026-11-05T06:17:07.000Z","originalFileLocation":"en/integrations/autosana.mdx","locale":"en"},"headHtml":"\u003cscript data-mint-head>(function(){var d=document.documentElement,p=null;if(!p){try{p=localStorage.getItem(\"isDarkMode\")}catch(e){}if(p==='true')p='dark';else if(p==='false')p='light';if(p!=='light'\u0026\u0026p!=='dark'\u0026\u0026p!=='system')p=\"system\"}var r=p==='system'?(matchMedia(\"(prefers-color-scheme: dark)\").matches?'dark':'light'):p;d.classList.remove(r==='dark'?'light':'dark');d.classList.add(r);d.setAttribute(\"data-theme-preference\",p)})();\u003c/script>\u003cmeta data-mint-head name=\"description\" content=\"How to integrate Autosana with Admina using an API key. Admina retrieves data such as user names, email addresses, and roles and supports account creation and deletion.\">\u003cmeta data-mint-head name=\"application-name\" content=\"Admina Help Center\">\u003cmeta data-mint-head name=\"generator\" content=\"Mintlify\">\u003clink data-mint-head rel=\"icon\" type=\"image/png\" sizes=\"192x192\" href=\"/mintlify-assets/_mintlify/favicons/moneyforwardi/mqyv-j-ER3Q2YTmV/_generated/favicon/android-chrome-192x192.png\" media=\"(prefers-color-scheme: light)\">\u003clink data-mint-head rel=\"apple-touch-icon\" type=\"image/png\" sizes=\"180x180\" href=\"/mintlify-assets/_mintlify/favicons/moneyforwardi/mqyv-j-ER3Q2YTmV/_generated/favicon/apple-touch-icon.png\">\u003clink data-mint-head rel=\"icon\" type=\"image/png\" sizes=\"16x16\" href=\"/mintlify-assets/_mintlify/favicons/moneyforwardi/mqyv-j-ER3Q2YTmV/_generated/favicon/favicon-16x16.png\" media=\"(prefers-color-scheme: light)\">\u003clink data-mint-head rel=\"icon\" type=\"image/png\" sizes=\"32x32\" href=\"/mintlify-assets/_mintlify/favicons/moneyforwardi/mqyv-j-ER3Q2YTmV/_generated/favicon/favicon-32x32.png\" media=\"(prefers-color-scheme: light)\">\u003clink data-mint-head rel=\"shortcut icon\" type=\"image/x-icon\" href=\"/mintlify-assets/_mintlify/favicons/moneyforwardi/mqyv-j-ER3Q2YTmV/_generated/favicon/favicon.ico\" media=\"(prefers-color-scheme: light)\">\u003clink data-mint-head rel=\"icon\" type=\"image/png\" sizes=\"192x192\" href=\"/mintlify-assets/_mintlify/favicons/moneyforwardi/mqyv-j-ER3Q2YTmV/_generated/favicon-dark/android-chrome-192x192.png\" media=\"(prefers-color-scheme: dark)\">\u003clink data-mint-head rel=\"icon\" type=\"image/png\" sizes=\"16x16\" href=\"/mintlify-assets/_mintlify/favicons/moneyforwardi/mqyv-j-ER3Q2YTmV/_generated/favicon-dark/favicon-16x16.png\" media=\"(prefers-color-scheme: dark)\">\u003clink data-mint-head rel=\"icon\" type=\"image/png\" sizes=\"32x32\" href=\"/mintlify-assets/_mintlify/favicons/moneyforwardi/mqyv-j-ER3Q2YTmV/_generated/favicon-dark/favicon-32x32.png\" media=\"(prefers-color-scheme: dark)\">\u003clink data-mint-head rel=\"shortcut icon\" type=\"image/x-icon\" href=\"/mintlify-assets/_mintlify/favicons/moneyforwardi/mqyv-j-ER3Q2YTmV/_generated/favicon-dark/favicon.ico\" media=\"(prefers-color-scheme: dark)\">\u003cmeta data-mint-head property=\"og:title\" content=\"Autosana - Admina Help Center\">\u003cmeta data-mint-head property=\"og:description\" content=\"How to integrate Autosana with Admina using an API key. Admina retrieves data such as user names, email addresses, and roles and supports account creation and deletion.\">\u003cmeta data-mint-head property=\"og:site_name\" content=\"Admina Help Center\">\u003cmeta data-mint-head property=\"og:url\" content=\"https://support.i.moneyforward.com/en/integrations/autosana\">\u003cmeta data-mint-head property=\"og:type\" content=\"website\">\u003cmeta data-mint-head property=\"og:image\" content=\"https://moneyforwardi.mintlify.app/_mintlify/api/og/v2?division=0-9+%2F+A-E\u0026amp;title=Autosana\u0026amp;description=How+to+integrate+Autosana+with+Admina+using+an+API+key.+Admina+retrieves+data+such+as+user+names%2C+email+addresses%2C+and+roles+and+supports+account+creation+and+d\u0026amp;theme=8b5fba73138797ee11e51993\u0026amp;signature=26b7ff7e2dd5c20534cf3f26fff3c432547b97548923511ad47f5d63ff121750\">\u003cmeta data-mint-head property=\"og:image:width\" content=\"1200\">\u003cmeta data-mint-head property=\"og:image:height\" content=\"630\">\u003cmeta data-mint-head name=\"twitter:card\" content=\"summary_large_image\">\u003cmeta data-mint-head name=\"twitter:title\" content=\"Autosana - Admina Help Center\">\u003cmeta data-mint-head name=\"twitter:description\" content=\"How to integrate Autosana with Admina using an API key. Admina retrieves data such as user names, email addresses, and roles and supports account creation and deletion.\">\u003cmeta data-mint-head name=\"twitter:image\" content=\"https://moneyforwardi.mintlify.app/_mintlify/api/og/v2?division=0-9+%2F+A-E\u0026amp;title=Autosana\u0026amp;description=How+to+integrate+Autosana+with+Admina+using+an+API+key.+Admina+retrieves+data+such+as+user+names%2C+email+addresses%2C+and+roles+and+supports+account+creation+and+d\u0026amp;theme=8b5fba73138797ee11e51993\u0026amp;signature=26b7ff7e2dd5c20534cf3f26fff3c432547b97548923511ad47f5d63ff121750\">\u003cmeta data-mint-head name=\"twitter:image:width\" content=\"1200\">\u003cmeta data-mint-head name=\"twitter:image:height\" content=\"630\">\u003cmeta data-mint-head name=\"msapplication-config\" content=\"/mintlify-assets/_mintlify/favicons/moneyforwardi/mqyv-j-ER3Q2YTmV/_generated/favicon/browserconfig.xml\">\u003cmeta data-mint-head name=\"apple-mobile-web-app-title\" content=\"Admina Help Center\">\u003cmeta data-mint-head name=\"msapplication-TileColor\" content=\"#4361ee\">\u003cmeta data-mint-head name=\"og:locale\" content=\"en_US\">\u003cmeta data-mint-head name=\"google-site-verification\" content=\"NQWwJQFaBXylW27NyMRORXsBvXNu-mUz6MDPqC7NzF8\">\u003clink data-mint-head rel=\"canonical\" href=\"https://support.i.moneyforward.com/en/integrations/autosana\">\u003clink data-mint-head rel=\"alternate\" type=\"application/xml\" href=\"/sitemap.xml\">\u003clink data-mint-head rel=\"alternate\" type=\"text/markdown\" href=\"/en/integrations/autosana.md\">\u003clink data-mint-head rel=\"alternate\" hreflang=\"en\" href=\"https://support.i.moneyforward.com/en/integrations/autosana\">\u003clink data-mint-head rel=\"alternate\" hreflang=\"ja\" href=\"https://support.i.moneyforward.com/integrations/autosana\">\u003clink data-mint-head rel=\"alternate\" hreflang=\"x-default\" href=\"https://support.i.moneyforward.com/integrations/autosana\">\u003cscript data-mint-head type=\"application/ld+json\">{\"@context\":\"https://schema.org\",\"@graph\":[{\"@type\":\"Organization\",\"@id\":\"https://support.i.moneyforward.com/#organization\",\"name\":\"Admina Help Center\",\"url\":\"https://support.i.moneyforward.com\",\"logo\":{\"@type\":\"ImageObject\",\"url\":\"https://mintcdn.com/moneyforwardi/r7Kl_XskKl0zZU6O/images/logo-light.png?fit=max\u0026auto=format\u0026n=r7Kl_XskKl0zZU6O\u0026q=85\u0026s=34f61220e23b4287c2562d1517958299\"}},{\"@type\":\"WebSite\",\"@id\":\"https://support.i.moneyforward.com#website\",\"name\":\"Admina Help Center\",\"url\":\"https://support.i.moneyforward.com\",\"publisher\":{\"@id\":\"https://support.i.moneyforward.com/#organization\"}},{\"@type\":\"WebPage\",\"@id\":\"https://support.i.moneyforward.com/en/integrations/autosana#webpage\",\"url\":\"https://support.i.moneyforward.com/en/integrations/autosana\",\"name\":\"Autosana\",\"description\":\"How to integrate Autosana with Admina using an API key. Admina retrieves data such as user names, email addresses, and roles and supports account creation and deletion.\",\"dateModified\":\"2026-11-05T06:17:07.000Z\",\"isPartOf\":{\"@id\":\"https://support.i.moneyforward.com#website\"},\"breadcrumb\":{\"@id\":\"https://support.i.moneyforward.com/en/integrations/autosana#breadcrumb\"}},{\"@type\":\"BreadcrumbList\",\"@id\":\"https://support.i.moneyforward.com/en/integrations/autosana#breadcrumb\",\"itemListElement\":[{\"@type\":\"ListItem\",\"position\":1,\"name\":\"Integration guides\",\"item\":\"https://support.i.moneyforward.com/en/integrations/15five\"},{\"@type\":\"ListItem\",\"position\":2,\"name\":\"0-9 / A-E\",\"item\":\"https://support.i.moneyforward.com/en/integrations/15five\"},{\"@type\":\"ListItem\",\"position\":3,\"name\":\"Autosana\",\"item\":\"https://support.i.moneyforward.com/en/integrations/autosana\"}]},{\"@type\":[\"Article\",\"TechArticle\"],\"@id\":\"https://support.i.moneyforward.com/en/integrations/autosana#article\",\"headline\":\"Autosana\",\"name\":\"Autosana\",\"description\":\"How to integrate Autosana with Admina using an API key. Admina retrieves data such as user names, email addresses, and roles and supports account creation and deletion.\",\"url\":\"https://support.i.moneyforward.com/en/integrations/autosana\",\"mainEntityOfPage\":{\"@id\":\"https://support.i.moneyforward.com/en/integrations/autosana#webpage\"},\"dateModified\":\"2026-11-05T06:17:07.000Z\",\"publisher\":{\"@id\":\"https://support.i.moneyforward.com/#organization\"},\"isPartOf\":{\"@id\":\"https://support.i.moneyforward.com#website\"}}]}\u003c/script>\u003cscript data-mint-head type=\"application/ld+json\">{\"@context\":\"https://schema.org\",\"@type\":\"WebSite\",\"name\":\"Admina Help Center\",\"creator\":{\"@type\":\"Organization\",\"name\":\"Mintlify\",\"url\":\"https://mintlify.com\"}}\u003c/script>","siteName":"Admina Help Center","nav":{"global":null,"languages":[{"language":"ja","pages":[{"title":"ja","href":"/integrations/autosana"}]},{"language":"en","tabs":[{"tab":"Home","pages":[{"title":"Home","href":"/en"}]},{"tab":"IT Management","pages":[{"title":"IT Management","href":"/en/it-management"}]},{"tab":"AI Helpdesk","pages":[{"title":"AI Helpdesk","href":"/en/ai-helpdesk"}]},{"tab":"Integration","groups":[{"group":"Introduction","pages":[{"title":"About Integration","href":"/en/integrations"},{"title":"Integration Release Notes","href":"/en/integrations/changelog"}]},{"group":"Integration","pages":[{"title":"List of supported SaaS","href":"/en/integrations/supported-saas"},{"title":"Stopped Integration Services","href":"/en/integrations/3o136jtgw2-stop-services"},{"title":"Identity Provider Integration (Entra ID)","href":"/en/integrations/4l37o2sowt-idp-entraid"}]},{"group":"Integration guides","pages":[{"group":"0-9 / A-E","expanded":false,"pages":[{"title":"15Five","href":"/en/integrations/15five"},{"title":"1Password","href":"/en/integrations/7es19bafxn-1-password"},{"title":"Acall","href":"/en/integrations/386zoza9k6-workstyle-os-acall"},{"title":"Active! gate SS","href":"/en/integrations/begdlmzoij-active-gate-ss"},{"title":"ActiveCampaign","href":"/en/integrations/p9x940kand-active-campaign"},{"title":"Admina","href":"/en/integrations/r522oisczf-admina"},{"title":"Adobe","href":"/en/integrations/mbxljfy03c-adobe-enterprise-plan"},{"title":"Aha!","href":"/en/integrations/aha"},{"title":"AirCourse","href":"/en/integrations/xvvubzr7eb-air-course"},{"title":"Aircall","href":"/en/integrations/aircall"},{"title":"Airtable","tag":"Suspended","href":"/en/integrations/w9iartebkn-airtable"},{"title":"Akerun","href":"/en/integrations/stnxbz0lwb-akerun"},{"title":"Amazon Business","tag":"Suspended","href":"/en/integrations/o61qwgwd2w-amazon-business"},{"title":"Amazon Web Services (AWS IAM)","href":"/en/integrations/dc2mjsw9oy-aws"},{"title":"Amplitude","href":"/en/integrations/j71tfpqbr5-amplitude"},{"title":"AmpTalk","href":"/en/integrations/v7apjz28xg-amptalk"},{"title":"Apollo","href":"/en/integrations/7qfa2jo3vg-apollo"},{"title":"App Store Connect","href":"/en/integrations/ike1sh7ghl-app-store-connect"},{"title":"AppFigures","href":"/en/integrations/d4crjxmmm7-app-figures"},{"title":"AppFollow","href":"/en/integrations/7cfqtg86oq-appfollow"},{"title":"Apple Developer Enterprise Program","href":"/en/integrations/apple-developer-enterprise"},{"title":"AppsFlyer","href":"/en/integrations/4mjkxvswxb-apps-flyer"},{"title":"Asana","href":"/en/integrations/s01way5qw1-asana"},{"title":"Ashita no Cloud","href":"/en/integrations/sp1qst0jcv-ashitano-cloud"},{"title":"Astronomer","href":"/en/integrations/astronomer"},{"title":"Atlassian","href":"/en/integrations/fvq84nqet2-atlassian"},{"title":"Attio","href":"/en/integrations/attio"},{"title":"Auth0","href":"/en/integrations/auth0"},{"title":"Autify","href":"/en/integrations/t0phdfq3mg-autify"},{"title":"Autodesk","description":"The integration between Autodesk and Admina is currently suspended.","tag":"Suspended","href":"/en/integrations/1zqael7fth-autodesk"},{"title":"Autosana","href":"/en/integrations/autosana"},{"title":"Avoma","description":"How to integrate Avoma with Admina using an API key. Admina retrieves data such as user names, email addresses, and roles.","href":"/en/integrations/avoma"},{"title":"Awesome Screenshot","tag":"Suspended","href":"/en/integrations/n8ubs2tq5z-awesome-screenshot"},{"title":"AWS IAM Identity Center","href":"/en/integrations/eujd10zuc3-aws-sso"},{"title":"Azure DevOps","href":"/en/integrations/azure-devops"},{"title":"Backlog","href":"/en/integrations/hmkrwhoa98-backlog"},{"title":"Bakuraku Series","href":"/en/integrations/r7u4ghb6yi-bakuraku"},{"title":"BambooHR","href":"/en/integrations/cr0rct5aw8-bamboo-hr"},{"title":"Basecamp","href":"/en/integrations/odg5jj1uka-basecamp"},{"title":"Baserow","href":"/en/integrations/baserow"},{"title":"Bigin by Zoho CRM","href":"/en/integrations/0i60v7qc0v-bigin-by-zoho-crm"},{"title":"Bitbucket","href":"/en/integrations/5m2o6g9zy1-bitbucket"},{"title":"Bitdefender","href":"/en/integrations/jx2660280q-bitdefender"},{"title":"Bitrise","href":"/en/integrations/bqc0vlrgo8-bitrise"},{"title":"Bitwarden","href":"/en/integrations/wpq2xr7guh-bitwarden"},{"title":"Biz Storage File Share","href":"/en/integrations/ak9xuan3a5-bizstorage"},{"title":"BlazeMeter","href":"/en/integrations/mo7s1o3qfz-blaze-meter"},{"title":"Board","href":"/en/integrations/kudu9thi1d-board"},{"title":"BoldSign","href":"/en/integrations/boldsign"},{"title":"Bonusly","href":"/en/integrations/bonusly"},{"title":"Box","href":"/en/integrations/w1zy4zi45d-box"},{"title":"Brabio!","href":"/en/integrations/oouseblckw-brabio"},{"title":"Brevo","href":"/en/integrations/brevo"},{"title":"Buddycom","href":"/en/integrations/buddycom"},{"title":"BugSnag","href":"/en/integrations/bugsnag"},{"title":"Businessmap","href":"/en/integrations/t5mbn7892s-businessmap"},{"title":"Cacoo","href":"/en/integrations/m7g7zqo3f1-cacoo"},{"title":"Calendly","href":"/en/integrations/d0sig49i3g-calendly"},{"title":"Call Connect","href":"/en/integrations/ih283rpilu-call-connect"},{"title":"Canny","href":"/en/integrations/wo2qi0fq50-canny"},{"title":"Canva","href":"/en/integrations/ww8qpvqk37-canva"},{"title":"Channel Talk","href":"/en/integrations/p8eshern4d-channel"},{"title":"ChatGPT Business (formerly ChatGPT Team)","tag":"Suspended","href":"/en/integrations/4zim1wpjbp-chatgpt-for-teams"},{"title":"Chatwork","href":"/en/integrations/sp3krhj6sn-chatwork"},{"title":"CircleCI","href":"/en/integrations/yjxebmxbbj-circle-ci"},{"title":"Cisco Duo","href":"/en/integrations/jrq4o9c483-cisco-duo"},{"title":"Cisco Meraki","href":"/en/integrations/x4i9war9h0-cisco-meraki"},{"title":"Cisco Umbrella","href":"/en/integrations/yyed0q40i0-cisco-umbrella"},{"title":"Claude (Anthropic)","href":"/en/integrations/8jvckq1cxk-claudeai"},{"title":"ClickHouse Cloud","href":"/en/integrations/clickhouse-cloud"},{"title":"ClickUp","href":"/en/integrations/xee8353y3o-click-up"},{"title":"Clinked","href":"/en/integrations/clinked"},{"title":"ClipStudio","href":"/en/integrations/a8hz7n2q85-clipstudio"},{"title":"Clockify","href":"/en/integrations/o33kkqzkhh-clockify"},{"title":"CLOMO","href":"/en/integrations/i7du3grltw-clomo"},{"title":"Close","href":"/en/integrations/close"},{"title":"Cloud Campus","href":"/en/integrations/ipkp46khcz-cloud-campus"},{"title":"Cloud CIRCUS","href":"/en/integrations/er2et0h79u-cloud-circus"},{"title":"Cloudflare","href":"/en/integrations/7sn4txfknp-cloudflare"},{"title":"Cloudflare Zero Trust","href":"/en/integrations/byfs337j6o-cloudflare-zero-trust"},{"title":"CloudGate UNO","href":"/en/integrations/pjindyqpsm-cloud-gate-uno"},{"title":"CloudSign","href":"/en/integrations/jq2glspkoa-cloudsign"},{"title":"CloudTalk","href":"/en/integrations/cloudtalk"},{"title":"Codecov","href":"/en/integrations/39wtowrizi-codecov"},{"title":"CoderPad","href":"/en/integrations/ruoq6q0oiu-coder-pad"},{"title":"Collaboflow","href":"/en/integrations/2t1x5w55td-collaboflow"},{"title":"Confluence","href":"/en/integrations/kvnlufkmiz-confluence"},{"title":"Contentful","href":"/en/integrations/k3y5rym2sv-contentful"},{"title":"ContractS CLM","href":"/en/integrations/5v8bkw3jv6-contract-s-clm"},{"title":"Convi.BASE","href":"/en/integrations/pr5zoklj5h-convi-base"},{"title":"Coopel","href":"/en/integrations/tz8qzshvby-coopel"},{"title":"Copper","href":"/en/integrations/copper"},{"title":"Craft","href":"/en/integrations/o46m04ukdc-craft"},{"title":"Create!Webflow","href":"/en/integrations/zvo3ys982y-createwebflow"},{"title":"Crisp","href":"/en/integrations/crisp"},{"title":"CrowdStrike","href":"/en/integrations/t7tx0v4prb-crowdstrike"},{"title":"Cursor","href":"/en/integrations/9c92jh7hl7-cursor"},{"title":"CyberMail","href":"/en/integrations/8ccv144y75-cybermail"},{"title":"Cybozu Office","href":"/en/integrations/79jc5hfcpb-cybozu"},{"title":"cybozu.com 共通管理","href":"/en/integrations/cybozu"},{"title":"Databricks","href":"/en/integrations/databricks"},{"title":"Datadog","href":"/en/integrations/l7k9m32990-datadog"},{"title":"DatoCMS","href":"/en/integrations/uejgsq4ov1-datocms"},{"title":"dbt platform (formerly dbt Cloud)","href":"/en/integrations/mfg6gqsqmd-dbt-cloud"},{"title":"Deel","href":"/en/integrations/deel"},{"title":"DeepL","tag":"Suspended","href":"/en/integrations/86thot789k-deepl"},{"title":"DeployGate","href":"/en/integrations/pjqchvktaa-deploygate"},{"title":"Deputy","href":"/en/integrations/deputy"},{"title":"desknet's NEO","href":"/en/integrations/svfko3w1ij-desknets-neo"},{"title":"Dialpad","href":"/en/integrations/91b27etzkf-dialpad"},{"title":"direct","href":"/en/integrations/ig9m949mfz-direct"},{"title":"DirectCloud","href":"/en/integrations/6yj9az049u-direct-cloud"},{"title":"Discord","href":"/en/integrations/wucg3s1k32-discord"},{"title":"Discourse","href":"/en/integrations/discourse"},{"title":"Docbase","href":"/en/integrations/d43uuq61l1-docbase"},{"title":"Docker","href":"/en/integrations/k4qje3khp7-docker"},{"title":"DocSend","href":"/en/integrations/4vi2ej2l02-doc-send"},{"title":"DocuSign","href":"/en/integrations/843jsa1gaw-docu-sign"},{"title":"Domo","href":"/en/integrations/yzxva08tet-domo"},{"title":"Drata","href":"/en/integrations/u794qk7sof-drata"},{"title":"Dropbox Business","href":"/en/integrations/tfthg9pesh-dropbox-business"},{"title":"Dropbox Sign (formerly Hellosign)","href":"/en/integrations/6q4q25nnf0-dropboxsign"},{"title":"Dynatrace","href":"/en/integrations/9h96eh0joi-dynatrace"},{"title":"eeasy","href":"/en/integrations/o0zsq3hb1u-eeasy"},{"title":"Elastic Cloud","href":"/en/integrations/1uylcojwwh-elastic-cloud"},{"title":"ElevenLabs","href":"/en/integrations/elevenlabs"},{"title":"Emergency Call","href":"/en/integrations/5yj0mbvd69-emergency-call"},{"title":"Envoy","href":"/en/integrations/jhmysqco1n-envoy"},{"title":"esa","href":"/en/integrations/flrr62psg2-esa"},{"title":"Exment","href":"/en/integrations/x20rqqc9e7-exment"},{"title":"Expensify","href":"/en/integrations/6bubkg72jm-expensify"},{"title":"ESET PROTECT Hub","href":"/en/integrations/eset-protect-hub"}]},{"group":"F-J","expanded":false,"pages":[{"title":"FastAnswer2","href":"/en/integrations/aameaokacf-fast-answer-2"},{"title":"Fastly","href":"/en/integrations/fvv8h0s6m2-fastly"},{"title":"Fathom","href":"/en/integrations/fathom"},{"title":"Favro","href":"/en/integrations/b6rfkcj0nd-favro"},{"title":"Fieldwire","href":"/en/integrations/fieldwire"},{"title":"Figma","href":"/en/integrations/p1quea1tdz-figma"},{"title":"FileForce","href":"/en/integrations/uecsus6fcv-file-force"},{"title":"Firebase","href":"/en/integrations/firebase"},{"title":"Fivetran","href":"/en/integrations/wjcar8clsj-fivetran"},{"title":"Float","href":"/en/integrations/d8he3uv173-float"},{"title":"Flyle","href":"/en/integrations/6354pq067b-flyle"},{"title":"fondesk","href":"/en/integrations/exw5885xe5-fondesk"},{"title":"Fontworks","href":"/en/integrations/0ua95y2jkt-fontworks"},{"title":"Formrun","href":"/en/integrations/06dfnkix0p-formrun"},{"title":"Formspree","href":"/en/integrations/mp17obsd0f-formspree"},{"title":"freee Accounting","href":"/en/integrations/t6l0w7sttn-freee"},{"title":"freee HR","href":"/en/integrations/phy5i4jwnu-freeehr"},{"title":"freee Sales","href":"/en/integrations/hd3twu1doi-freee-sales"},{"title":"freee Sign (formerly NINJA SIGN)","href":"/en/integrations/4jqd6w7a1y-ninja-sign"},{"title":"FreshBooks","href":"/en/integrations/mjl2hwh7oe-fresh-books"},{"title":"Freshcaller","href":"/en/integrations/k8fk8cd3h0-freshcaller"},{"title":"Freshchat","href":"/en/integrations/xwvru69a70-freshchat"},{"title":"Freshdesk","href":"/en/integrations/my2fk5ld5m-freshdesk"},{"title":"Freshsales","href":"/en/integrations/freshsales"},{"title":"Freshservice","href":"/en/integrations/o2jkh2dty2-freshservice"},{"title":"Front","href":"/en/integrations/2r1x818kde-front"},{"title":"Gainsight NXT","href":"/en/integrations/gainsight-nxt"},{"title":"Ganttpro","href":"/en/integrations/cxgpi4kxlp-ganttpro"},{"title":"Garoon","href":"/en/integrations/8rfggjnd7f-garoon"},{"title":"Gather","href":"/en/integrations/4x34enkfyg-gather"},{"title":"Genesys Cloud","href":"/en/integrations/c9aoxr2cu7-genesyscloud"},{"title":"Ghost","href":"/en/integrations/6cu87lk07y-ghost"},{"title":"GigaCC","href":"/en/integrations/c2zjuk3ep6-giga-cc"},{"title":"GitHub","href":"/en/integrations/ole2ao8nnb-github"},{"title":"GitKraken","href":"/en/integrations/y8s5gnb3no-git-kraken"},{"title":"GitLab","href":"/en/integrations/kft84lhxzk-git-lab"},{"title":"GMO Sign","href":"/en/integrations/7q14nu2x56-gmosign"},{"title":"GMO Trust Login","href":"/en/integrations/ozjjsa4c6z-trustlogin-by-gmo"},{"title":"Google Ads","href":"/en/integrations/56gwb33hdg-google-ads"},{"title":"Google Analytics","href":"/en/integrations/9ikeuhzgwl-google-analytics"},{"title":"Google Cloud Platform","href":"/en/integrations/n0b51m6id9-google-cloud-platform"},{"title":"Google Drive","href":"/en/integrations/k7vonejs7q-google-drive"},{"title":"Google Play Console","href":"/en/integrations/4rntg52e2j-google-play-console"},{"title":"Google Tag Manager","href":"/en/integrations/8xculxcikw-google-tag-manager"},{"title":"Google Workspace","href":"/en/integrations/n0zl359vup-google-workspace"},{"title":"Gorgias","href":"/en/integrations/gorgias"},{"title":"Grafana Cloud","href":"/en/integrations/fuzyhpx0ba-grafana-cloud"},{"title":"Greenhouse","href":"/en/integrations/greenhouse"},{"title":"GrooveHQ","href":"/en/integrations/7fg2w7lma3-groove-hq"},{"title":"Guru","href":"/en/integrations/guru"},{"title":"HackMD","tag":"Suspended","href":"/en/integrations/bb3lz1zs5k-hack-md"},{"title":"HaloPSA","href":"/en/integrations/4jbf5cz8ap-halopsa"},{"title":"Harvest","href":"/en/integrations/harvest"},{"title":"HCP Terraform (formerly Terraform Cloud)","href":"/en/integrations/yllecvqyz0-terraform-cloud"},{"title":"Heap","href":"/en/integrations/h1ea4u5e54-heap"},{"title":"HENNGE One","href":"/en/integrations/6js8u23p28-hennge-one"},{"title":"Heroku","href":"/en/integrations/1mr1hoo79r-heroku"},{"title":"HERP Hire","href":"/en/integrations/goxtpp2q3u-herp-hire"},{"title":"Hex","href":"/en/integrations/hex"},{"title":"Honeybadger","href":"/en/integrations/3hdm7lo91d-honeybadger"},{"title":"Honeycomb","href":"/en/integrations/bi6t4cprik-honeycomb"},{"title":"Hotjar","href":"/en/integrations/6jxo7aavg3-hotjar"},{"title":"HotProfile","href":"/en/integrations/p7q9k3bmtm-hotprofile"},{"title":"HRBrain Talent Management","href":"/en/integrations/aegf3040lo-hrbrain"},{"title":"HRMOS Attendance","href":"/en/integrations/pyny3jlw0i-hrmos-tr"},{"title":"HRMOS Recruit","href":"/en/integrations/sbcynvwzqt-hrmos-hr"},{"title":"HRMOS Talent Management","href":"/en/integrations/4cn6z4acaw-hrmos"},{"title":"Hubble","href":"/en/integrations/tq8t8msoro-hubble"},{"title":"Hubble (SCIM)","href":"/en/integrations/c9g13s8j2p-hubble-scim"},{"title":"HubSpot","href":"/en/integrations/iq3vf71kj6-hubspot"},{"title":"Hubstaff","href":"/en/integrations/hubstaff"},{"title":"Huntress","href":"/en/integrations/xv1b8gmfg5-huntress"},{"title":"i-Reporter","href":"/en/integrations/lh5771gdau-i-reporter"},{"title":"IBM MaaS360","href":"/en/integrations/ibm-maas360"},{"title":"Insightly","href":"/en/integrations/insightly"},{"title":"Intercom","href":"/en/integrations/y67r323dvk-intercom"},{"title":"InVision","tag":"Suspended","href":"/en/integrations/6lt7e9w2ya-invision"},{"title":"invox","href":"/en/integrations/jf879woj80-invox"},{"title":"Iru (Kandji)","href":"/en/integrations/ga789u4vdw-kandji"},{"title":"ISM CloudOne","href":"/en/integrations/4gd2tfn2j6-ism-cloud-one"},{"title":"Jamf (Pro)","href":"/en/integrations/a9ybjwczho-jamf"},{"title":"JetBrains","href":"/en/integrations/imyg5vsnno-jetbrains"},{"title":"Jibble","href":"/en/integrations/pusda3mgeh-jibble"},{"title":"Jicoo","href":"/en/integrations/8b9isuq5du-jicoo"},{"title":"Jinjer","href":"/en/integrations/zasbaln1b1-jinjer"},{"title":"Jira","href":"/en/integrations/ed18w2d8r3-jira"},{"title":"Jitbit Helpdesk","href":"/en/integrations/jitbit-helpdesk"},{"title":"Jobcan Attendance","href":"/en/integrations/b49ss4908h-kintai"},{"title":"Jobcan Labor HR","href":"/en/integrations/3unbhiz10e-jobcan-hr"},{"title":"Jobcan Payroll","href":"/en/integrations/f68boukfow-jobcan-payment"},{"title":"Jobcan Recruitment Management","href":"/en/integrations/6hfzjga7vw-jobcan-jinji"},{"title":"Jobcan Workflow","href":"/en/integrations/61ttgkropf-jobcan-wf"},{"title":"JumpCloud","href":"/en/integrations/jumpcloud"}]},{"group":"K-O","expanded":false,"pages":[{"title":"Kamon","href":"/en/integrations/vazds4d2hh-kamon"},{"title":"kaonavi","href":"/en/integrations/hsz8p8i38g-kaonavi"},{"title":"KARTE","href":"/en/integrations/8tvx0iz32m-karte"},{"title":"Keeper Enterprise","href":"/en/integrations/0z83xd6yzp-keeper"},{"title":"Kentik","href":"/en/integrations/jwpyovm6n2-kentik"},{"title":"Kibela","href":"/en/integrations/e1e0yva5n7-kibela"},{"title":"kickflow","href":"/en/integrations/vkxjfmf909-kickflow"},{"title":"Kincone","href":"/en/integrations/mw6cwiku3m-kincone"},{"title":"KING OF TIME","href":"/en/integrations/mzbp8uovgy-king-of-time"},{"title":"kintone (global version)","href":"/en/integrations/kwxku0pw8d-kintone-en"},{"title":"Kintone (Japan)","href":"/en/integrations/zdvaxq9b9x-kintone"},{"title":"Klipfolio","href":"/en/integrations/lt7lmpqb0u-klipfolio"},{"title":"KnowledgeOwl","href":"/en/integrations/knowledgeowl"},{"title":"Kommo","href":"/en/integrations/xjlzbaix6p-kommo"},{"title":"LANSCOPE Endpoint Manager","href":"/en/integrations/4qs08a6tkc-lanscope-endpoint-manager"},{"title":"LANSCOPE Endpoint Manager (Device)","href":"/en/integrations/0d8iamh58k-lanscope-endpoint-manager-device"},{"title":"Lark","href":"/en/integrations/xei3b539al-lark"},{"title":"Lastpass","href":"/en/integrations/g5u3ii8uy5-lastpass"},{"title":"LaunchDarkly","href":"/en/integrations/sbtbzgv33g-launch-darkly"},{"title":"learningBOX","href":"/en/integrations/i1bhgwylbl-learning-box"},{"title":"lemlist","href":"/en/integrations/lemlist"},{"title":"LINE WORKS","href":"/en/integrations/vh1g8tdfgn-lineworks"},{"title":"Linear","href":"/en/integrations/qbg5cilw29-linear"},{"title":"Livestorm","href":"/en/integrations/livestorm"},{"title":"LogMeIn","href":"/en/integrations/logmein"},{"title":"Logz.io","href":"/en/integrations/logzio"},{"title":"Lokalise","href":"/en/integrations/lokalise"},{"title":"Looker","href":"/en/integrations/dkuqgcrjon-looker"},{"title":"Loom","href":"/en/integrations/qz3x3v36ng-loom"},{"title":"Lucidchart","href":"/en/integrations/xt7uqh1fq6-lucidchart"},{"title":"Lumin","href":"/en/integrations/cpbznabbyw-lumin"},{"title":"Lychee Redmine","href":"/en/integrations/e2uduntzg0-lychee-redmine"},{"title":"Mackerel","href":"/en/integrations/9nme3w3ep7-mackerel"},{"title":"MagicPod","href":"/en/integrations/ycszcwx8n1-magic-pod"},{"title":"Mailgun","href":"/en/integrations/mailgun"},{"title":"Mailtrap","href":"/en/integrations/ai1fzfo82g-mailtrap"},{"title":"Mailwise","href":"/en/integrations/3r3loavepy-mailwise"},{"title":"MAJOR FLOW Z","href":"/en/integrations/s8e403fwwa-major-flow-z"},{"title":"Make","href":"/en/integrations/mkzuhvnfbq-make"},{"title":"ManageEngine ServiceDesk Plus (Cloud)","href":"/en/integrations/manageengine-servicedesk-plus-cloud"},{"title":"Manatal","href":"/en/integrations/manatal"},{"title":"Manifestly","href":"/en/integrations/manifestly"},{"title":"Marketo Engage","href":"/en/integrations/mic4spn9ww-marketo-engage"},{"title":"Mekari Jurnal","href":"/en/integrations/z4ohqpvb6x-mekari-jurnal"},{"title":"Mekari Talenta","href":"/en/integrations/210z3ljddy-mekari-talenta"},{"title":"Meta Ads Manager","tag":"Suspended","href":"/en/integrations/to54vjs8hb-meta-ad-manager"},{"title":"Meta for Business (Meta Business Suite)","tag":"Suspended","href":"/en/integrations/l2dl9iji0t-meta-for-business"},{"title":"Metabase","href":"/en/integrations/0x4wp1rmiq-metabase"},{"title":"MicroCMS","href":"/en/integrations/j1xa8qisq2-micro-cms"},{"title":"Microsoft 365","href":"/en/integrations/yp7xi6xpuk-microsoft-365"},{"title":"Microsoft Entra ID (Azure AD)","href":"/en/integrations/3fyaqnp8nn-azure-ad"},{"title":"Microsoft Intune","href":"/en/integrations/gih8y5idkp-microsoft-intune"},{"title":"Microsoft Teams","href":"/en/integrations/xn1e96v3j3-microsoft-teams"},{"title":"MiiTel","href":"/en/integrations/lvcdqj7dj5-miitel"},{"title":"Miro","href":"/en/integrations/av6idlf6qh-miro"},{"title":"Missive","href":"/en/integrations/missive"},{"title":"Mixmax","href":"/en/integrations/mixmax"},{"title":"Mixpanel","href":"/en/integrations/mixpanel"},{"title":"Monday.com","href":"/en/integrations/a83y4xdxjm-monday"},{"title":"Money Forward Cloud Attendance","href":"/en/integrations/odv3ujqe27-moneyforward-kintai"},{"title":"Money Forward Cloud Human Resources Management","href":"/en/integrations/boroq0cc60-moneyforward-employee"},{"title":"Money Forward Cloud Invoice","href":"/en/integrations/yzhj8qvhbt-moneyforward-invoice"},{"title":"Money Forward Cloud Kintai Plus (formerly AKASHI)","href":"/en/integrations/kvk5tm5epm-akashi"},{"title":"Money Forward Cloud Year-End Tax Adjustment","href":"/en/integrations/drrczgk9w7-money-forward-cloud-year-end-tax-adjustment"},{"title":"Money Forward Pay for Business","href":"/en/integrations/wrep36x1nd-pay-for-business"},{"title":"MoneyForward Cloud Accounting","href":"/en/integrations/blddlma8cd-moneyforward-ac"},{"title":"MoneyForward Cloud Accounting Plus (Accounts)","href":"/en/integrations/krpnv8pzpj-plus"},{"title":"MoneyForward Cloud Accounting Plus (Cost Data)","href":"/en/integrations/7ls3eohrd6-plus-cost"},{"title":"MoneyForward Cloud Accounts Payable","href":"/en/integrations/ux1mgh0a75-moneyforward-payable"},{"title":"MoneyForward Cloud Consolidated Accounting","href":"/en/integrations/j5jdky0i4n-moneyforward-cloud-consolidated-accounting"},{"title":"MoneyForward Cloud Contract","href":"/en/integrations/yt32iy0k0g-moneyforward-contract"},{"title":"MoneyForward Cloud Expense","href":"/en/integrations/0jcl85rfr5-moneyforward-keihi"},{"title":"MoneyForward Cloud Fixed Assets","href":"/en/integrations/g7dvxugyah-fixed-assets"},{"title":"MoneyForward Cloud MyNumber","href":"/en/integrations/66bof0s4fi-moneyforward-cloud-mynumber"},{"title":"MoneyForward Cloud Payroll","href":"/en/integrations/2paasi484j-moneyforward-payroll"},{"title":"MoneyForward Cloud Social Insurance","href":"/en/integrations/9au17o0j7j-moneyforward-cloud-social-insurance"},{"title":"MongoDB Cloud","href":"/en/integrations/hpxi935tbn-mongo-db-cloud"},{"title":"Morisawa Fonts","href":"/en/integrations/dqe221ozps-morisawa-fonts"},{"title":"Mural","href":"/en/integrations/j71amjxqo0-mural"},{"title":"My Redmine","href":"/en/integrations/yd18gv7emi-my-redmine"},{"title":"n8n","href":"/en/integrations/prv90tk517-n8n"},{"title":"n8n Self-Hosted","href":"/en/integrations/gc8vrmg0n1-n8n-self-hosted"},{"title":"Netlify","href":"/en/integrations/z8odcj5dj3-netlify"},{"title":"Netsuite","href":"/en/integrations/6el5kn3y4k-netsuite"},{"title":"New Relic","href":"/en/integrations/jftcsn62g7-new-relic"},{"title":"NEXT ENGINE","href":"/en/integrations/8n1o8xh2ay-next-engine"},{"title":"Nextcloud","href":"/en/integrations/nextcloud"},{"title":"NI Collabo 360","href":"/en/integrations/82urf16h1l-ni-collabo-360"},{"title":"Nicereply","href":"/en/integrations/nicereply"},{"title":"Nimble","href":"/en/integrations/nimble"},{"title":"NinjaMock","href":"/en/integrations/xy3d883spz-ninja-mock"},{"title":"NinjaOne RMM","href":"/en/integrations/m9d3dzk86e-ninjaone-rmm"},{"title":"noCRM.io","href":"/en/integrations/nocrm-io"},{"title":"NotePM","href":"/en/integrations/cyvbwqtdlg-note-pm"},{"title":"Notion","href":"/en/integrations/w4m649fp11-notion"},{"title":"Okta","href":"/en/integrations/5rad7jk230-okta"},{"title":"OneDrive","href":"/en/integrations/wzq7l0abvj-one-drive"},{"title":"Onelogin","href":"/en/integrations/mfo3ap26rr-onelogin"},{"title":"Onshape","href":"/en/integrations/onshape"},{"title":"OpenAI Platform","href":"/en/integrations/lxp6out516-openai-platform"},{"title":"OpenAI Platform (Project level)","href":"/en/integrations/openai-project"},{"title":"Openlogi","href":"/en/integrations/ki7omtrc91-openlogi"},{"title":"oplus","href":"/en/integrations/4a2e9raf57-oplus"},{"title":"OpsRamp","href":"/en/integrations/31psvj9nuo-opsramp"},{"title":"Outline","href":"/en/integrations/outline"},{"title":"OutSystems","href":"/en/integrations/hgqpj36wdn-out-systems"},{"title":"Overflow","href":"/en/integrations/ghscy521op-overflow"},{"title":"oVice","href":"/en/integrations/rlm7ot05za-o-vice"}]},{"group":"P-T","expanded":false,"pages":[{"title":"PagerDuty","href":"/en/integrations/pqyujwryt9-pager-duty"},{"title":"PandaDoc","href":"/en/integrations/pandadoc"},{"title":"PayPal","href":"/en/integrations/paypal"},{"title":"Percy","tag":"Suspended","href":"/en/integrations/hcl7fidtj8-percy"},{"title":"Perdoo","href":"/en/integrations/dw2bvgp5lb-perdoo"},{"title":"PHONE APPLI PEOPLE","href":"/en/integrations/d32r1ydky8-phone-appli-people"},{"title":"Phrase","href":"/en/integrations/phrase"},{"title":"Pingdom","href":"/en/integrations/pingdom"},{"title":"PingIdentity","href":"/en/integrations/pingidentity"},{"title":"Pipedrive","href":"/en/integrations/rnp41ikh8t-pipedrive"},{"title":"Pipefy","href":"/en/integrations/2b97e8do0a-pipefy"},{"title":"Plain","href":"/en/integrations/plain"},{"title":"PostHog","href":"/en/integrations/posthog"},{"title":"Postman","tag":"Suspended","href":"/en/integrations/y8bt5nirxk-postman"},{"title":"Productboard","href":"/en/integrations/mcpdmcty19-productboard"},{"title":"ProtoPie","href":"/en/integrations/0smkbi2ona-protopie"},{"title":"Qiita Team","href":"/en/integrations/yvtawcrlaz-qiita-team"},{"title":"Quantive","href":"/en/integrations/uzr1mserph-quantive"},{"title":"Quay","href":"/en/integrations/2n20dmct4b-quay"},{"title":"Questetra","href":"/en/integrations/8ok1jsuqnk-questetra"},{"title":"Quickbase","href":"/en/integrations/quickbase"},{"title":"Quickbooks","href":"/en/integrations/tdpi2jqz4u-quickbooks"},{"title":"Raku-ro","href":"/en/integrations/3piwdoe5xu-raku-ro"},{"title":"Rakuraku Hanbai","href":"/en/integrations/3l9o5qfiai-rakurakuhanbai"},{"title":"Rakuraku Jidootai (formerly Mail Dealer)","href":"/en/integrations/p61sp98uvq-mail-dealer"},{"title":"Rakuraku Seisan","href":"/en/integrations/srm4zqh0vc-rakurakuseisan"},{"title":"Re:lation","href":"/en/integrations/ntatw65v1d-relation"},{"title":"Receptionist","href":"/en/integrations/vbmoz788ec-receptionist"},{"title":"Redash","href":"/en/integrations/63zn1dirx1-redash"},{"title":"Redis Cloud","href":"/en/integrations/j3fioa2tia-redis-cloud"},{"title":"Reftab","href":"/en/integrations/vqf2ddr7fj-reftab"},{"title":"Ricoh Drive","href":"/en/integrations/d242rrwacm-ricoh-drive"},{"title":"Rollbar","href":"/en/integrations/4ctlnci1a8-rollbar"},{"title":"Runn","href":"/en/integrations/vv8meaqkau-runn"},{"title":"Sage HR","href":"/en/integrations/sage-hr"},{"title":"Saiyo Ikkatsu Kanri-kun","href":"/en/integrations/s82s890tjf-kanri-kun"},{"title":"SAKURA Cloud","href":"/en/integrations/eyaqadi4g1-sakura-cloud"},{"title":"Salesforce","href":"/en/integrations/4wesje6xey-salesforce"},{"title":"Sanity","href":"/en/integrations/sanity"},{"title":"Sansan","href":"/en/integrations/9egq6u8wqg-sansan"},{"title":"Save Point","href":"/en/integrations/7yqqvf4m1s-save-point"},{"title":"Seculio","href":"/en/integrations/ze1evglfas-seculio"},{"title":"SECURE DELIVER","href":"/en/integrations/2v07y0ogl7-secure-deliver"},{"title":"SecureNavi","href":"/en/integrations/ffugyhks7f-securenavi"},{"title":"SendGrid","href":"/en/integrations/pxzjyglr96-send-grid"},{"title":"Sentry","href":"/en/integrations/jqu7mdxcdu-sentry"},{"title":"ServiceM8","href":"/en/integrations/servicem8"},{"title":"ServiceNow","href":"/en/integrations/9hhkg21v33-service-now"},{"title":"Shopify","href":"/en/integrations/oo5n9wd6bu-shopify"},{"title":"Shortcut","href":"/en/integrations/shortcut"},{"title":"Signavio","href":"/en/integrations/fxqc6qrzdr-signavio"},{"title":"Site24x7","href":"/en/integrations/6ojiaqtske-site24x7"},{"title":"Sketch","href":"/en/integrations/mt307n3d70-sketch"},{"title":"Slack","href":"/en/integrations/ewbrldy8ej-slack"},{"title":"Slack Enterprise","href":"/en/integrations/ivgjrxqafk-slack-enterprise"},{"title":"Slido","href":"/en/integrations/64drbe4bx2-slido"},{"title":"Smaregi","href":"/en/integrations/zi1lggkm5y-smaregi"},{"title":"Smaregi TimeCard","href":"/en/integrations/6eugws8a9z-smaregi-tr"},{"title":"SmartDB","href":"/en/integrations/jloes0st8a-smart-db"},{"title":"SmartHR","href":"/en/integrations/zyl6g8sbgx-smart-hr"},{"title":"smartround","href":"/en/integrations/k7aqd0752r-smartround"},{"title":"Smartsheet","href":"/en/integrations/dkme7pl2we-smartsheet"},{"title":"Snowflake","href":"/en/integrations/isgle90yvb-snowflake"},{"title":"Snyk","href":"/en/integrations/yk5cx4vn9t-snyk"},{"title":"Soliton OneGate","href":"/en/integrations/q84p5ttyjx-soliton-one-gate"},{"title":"SonarQube Cloud (formerly SonarCloud)","href":"/en/integrations/t8fj5lzl1o-sonarcloud"},{"title":"Soracom","href":"/en/integrations/9ba4fffkej-soracom"},{"title":"Spir","href":"/en/integrations/spir"},{"title":"Splashtop Enterprise","href":"/en/integrations/9pveygc75d-splashtop-enterprise"},{"title":"Square","href":"/en/integrations/tlhb836y0m-square"},{"title":"SS1 Cloud","href":"/en/integrations/ss1-cloud"},{"title":"Statsig","href":"/en/integrations/statsig"},{"title":"Studio","href":"/en/integrations/q3xm63dp7u-studio"},{"title":"Sumo Logic","href":"/en/integrations/sumologic"},{"title":"Sunsama","href":"/en/integrations/glc4bot90y-sunsama"},{"title":"Supabase","href":"/en/integrations/supabase"},{"title":"Tableau","href":"/en/integrations/bnm2ez8od8-tableau"},{"title":"Tailscale","href":"/en/integrations/0srjpo76x6-tailscale"},{"title":"TalentLMS","href":"/en/integrations/talentlms"},{"title":"Tally","href":"/en/integrations/vma5tiflxr-tally"},{"title":"Tayoreru Doko Demo Cabinet","href":"/en/integrations/yg2aj7mx93-dococab"},{"title":"Tayori","href":"/en/integrations/atgf2ecxm7-tayori"},{"title":"Teachme Biz","href":"/en/integrations/vu7g4pc2lk-teachmebiz"},{"title":"TeamGantt","href":"/en/integrations/5lurp2njpf-team-gantt"},{"title":"TeamSpirit","href":"/en/integrations/ngqvn9shkt-teamspirit"},{"title":"TeamViewer","href":"/en/integrations/344i5hkcpa-teamviewer"},{"title":"Teamwork","href":"/en/integrations/f0x0a3adib-teamwork"},{"title":"Techtouch","href":"/en/integrations/l0gyhq1v0a-techtouch"},{"title":"TestRail","href":"/en/integrations/xnlxeyb7k3-testrail"},{"title":"TimeCrowd","href":"/en/integrations/0thykp0zzb-timecrowd"},{"title":"Timetastic","href":"/en/integrations/timetastic"},{"title":"Todoist","href":"/en/integrations/gl6vc70z6e-todoist"},{"title":"Toggl Track","href":"/en/integrations/vficid255g-toggl-track"},{"title":"TOKIUM","href":"/en/integrations/7d8sfshc6e-tokium"},{"title":"Toyokumo Safety Confirmation Service 2","href":"/en/integrations/ezjsxqt384-anpikakunin"},{"title":"TrackJS","href":"/en/integrations/qwplueeqjj-track-js"},{"title":"Transifex","href":"/en/integrations/8xlogdyn6i-transifex"},{"title":"Trello","href":"/en/integrations/zx3gwqisxm-trello"},{"title":"Trimble","href":"/en/integrations/uf7xp37zd9-trimble"},{"title":"trocco","href":"/en/integrations/f2v9rv7fzo-trocco"},{"title":"Twilio","href":"/en/integrations/uryg6oec9d-twilio"},{"title":"Typeform","href":"/en/integrations/xcuf7lryr7-typeform"},{"title":"TypeTalk","tag":"Suspended","href":"/en/integrations/4bhw1o5pyo-typetalk"}]},{"group":"U-Z","expanded":false,"pages":[{"title":"Unipos","tag":"Suspended","href":"/en/integrations/0oapm5l164-unipos"},{"title":"Unity","href":"/en/integrations/aqx0cjhbfj-unity"},{"title":"VAddy","href":"/en/integrations/fk5tgj9y6z-vaddy"},{"title":"Valimail","href":"/en/integrations/tzf1rd4ddm-valimail"},{"title":"Vercel","href":"/en/integrations/ba5w9kwaf2-vercel"},{"title":"Vimeo","href":"/en/integrations/kq1h6ed9he-vimeo"},{"title":"WakaTime","href":"/en/integrations/wakatime"},{"title":"Wantedly","href":"/en/integrations/leer2p7etd-wantedly"},{"title":"Webex by CISCO","href":"/en/integrations/c1tardcsas-webex-by-cisco"},{"title":"Webflow","href":"/en/integrations/i0ajmys3t3-webflow"},{"title":"Whimsical","href":"/en/integrations/j3asr9onl0-whimsical"},{"title":"Wistia","href":"/en/integrations/z8bh3lsien-wistia"},{"title":"WithSecure","href":"/en/integrations/evw4sq6odq-withsecure"},{"title":"Wix","href":"/en/integrations/kegw6n811m-wix"},{"title":"Wordpress","href":"/en/integrations/mn16q7cley-word-press-com"},{"title":"Wordpress self-host (API)","href":"/en/integrations/l8rsks1rlt-wordpress-selfhost-api"},{"title":"Workable","href":"/en/integrations/ra7rq3zf6w-workable"},{"title":"Workato","href":"/en/integrations/workato"},{"title":"workhub","href":"/en/integrations/6l0b84rqs1-workhub"},{"title":"Workleap","href":"/en/integrations/workleap"},{"title":"WorkOS","href":"/en/integrations/workos"},{"title":"Workplace from Meta","href":"/en/integrations/z0m3cb4q49-workplace-from-meta"},{"title":"Wrike","href":"/en/integrations/rdnxwdie2f-wrike"},{"title":"X-Point Cloud","href":"/en/integrations/m4sqkj2l08-x-point-cloud"},{"title":"xMatters","href":"/en/integrations/xmatters"},{"title":"Xero","href":"/en/integrations/08o450smuz-xero"},{"title":"YarakuZen","href":"/en/integrations/ixu3smjdt1-yarakuzen"},{"title":"Yayoi My Portal","href":"/en/integrations/d92b750sgi-yayoi-myportal"},{"title":"Yoom","href":"/en/integrations/k6967rbw9w-yoom"},{"title":"YouCanBook.me","href":"/en/integrations/mq1mm1tpoq-you-can-book-me"},{"title":"YouTrack","href":"/en/integrations/j8ux6r9cjs-you-track"},{"title":"YouTrack Self-Hosted","href":"/en/integrations/6gicv4soc5-you-track-self-hosted"},{"title":"ZAC","href":"/en/integrations/ktxs696t87-zac"},{"title":"Zaico","href":"/en/integrations/a7zu6u5ljx-zaico"},{"title":"Zapier","href":"/en/integrations/5qwondg96w-zapier"},{"title":"Zendesk","href":"/en/integrations/c45qdh3j6c-zendesk"},{"title":"Zenhub","href":"/en/integrations/uy44brddn2-zenhub"},{"title":"Zeplin","href":"/en/integrations/64d9vmzsuo-zeplin"},{"title":"Zoho Analytics","href":"/en/integrations/7voeaxzynv-zoho-analytics"},{"title":"Zoho Books","href":"/en/integrations/5jn8ggv1rd-zoho-books"},{"title":"Zoho CRM","href":"/en/integrations/z2wpu2vcgn-zoho-crm"},{"title":"Zoho Desk","href":"/en/integrations/bg6ovvnk3l-zoho-desk"},{"title":"Zoho Expense","href":"/en/integrations/4xwwji7s2x-zoho-expense"},{"title":"Zoho Inventory","href":"/en/integrations/09ac48jv6f-zoho-inventory"},{"title":"Zoho People","href":"/en/integrations/huj9r8wh1w-zoho-people"},{"title":"Zoho Recruit","href":"/en/integrations/uyl0mhaqzl-zoho-recruit"},{"title":"Zoho Shifts","href":"/en/integrations/yy346e4vdb-zoho-shifts"},{"title":"Zoom","href":"/en/integrations/49wg0blffw-zoom"}]}]}]},{"tab":"API \u0026 MCP","menu":[{"item":"IT Management API","icon":"server","pages":[{"title":"IT Management API","href":"/en/api-reference/it-management"}]},{"item":"AI Helpdesk API","icon":"message-bot","pages":[{"title":"AI Helpdesk API","href":"/en/api-reference/ai-helpdesk"}]},{"item":"Remote MCP","icon":"diagram-project","pages":[{"title":"Remote MCP","href":"/en/remote-mcp/it-management"}]}],"pages":[{"title":"API \u0026 MCP","href":"/en/api-reference/it-management"}]},{"tab":"Blog","pages":[{"title":"Blog","href":"/blog"}]}]}]},"basePath":"","title":"Autosana - Admina Help Center","buildId":"dpl_9VVk5y1P8k1ATeJguVngy9Q3cmbD","deploymentId":"dpl_9VVk5y1P8k1ATeJguVngy9Q3cmbD","dynamics":["a74be98ba7"],"chunks":["zoom-image-lightbox-CvtNkYOX.js","lightbox-handle-r17bVUz3.js"]}